Django with React
Overview
Anyone well-versed in programming is familiar with the Django and ReactJS techniques. Despite being different technologies, they can be combined to great effect. There is a never-ending debate as to whether ReactJS is a framework or library many developers hallways. However, one thing about which we are certain is that Django is regarded as a complete framework. Let's examine the advantages of each technology separately as well as the advantages of combining them.
Introduction
Django
A formal Python web framework called Django typically enables programmers to use modules for quicker development. In reality, developers don't have to write every line of code from scratch because Django's modules allow them to build apps and websites from an existing source, greatly accelerating the development process.
The advanced features of Django, which are open-source and free, include file upload support, admin panels, authentication support, contact forms, comment boxes, and more.
Transform Your Career
Choose from our industry-leading programs designed for career success
Modern Software and AI Engineering Program
Master full-stack development with AI integration

Modern Data Science and ML with specialisation in AI
Advanced data science techniques with AI specialization
Advanced AIML with Specialisation in Agentic AI
Deep dive into AIML with focus on Agentic systems
DevOps, Cloud & AI Platform Engineering
Build and manage AI-powered cloud infrastructure
AI Engineering Advanced Certification by IIT-Roorkee
Premier AI engineering certification from IIT-Roorkee
Advantages of Django
- With a tonne of pre-built code, Django offers a variety of special libraries, add-ons, and packages. In essence, Django provides everything needed to construct a web application's backend and skillfully manages the majority of web development tasks, including site maps, RSS feeds, content management, user authentication, etc.
- Additionally, Django supports the majority of large databases and enables the use of a more appropriate database for a given project or even multiple databases concurrently.
- Django is comparatively simple to set up and configure, seems to have a manageable learning curve, and excellent documentation.
- Excellent security features built into Django can help shield your website or application from the majority of threats like SQL Injection, XSS, CSRF, Clickjacking, etc.
- Establishing an API on top of Django is comparatively simple thanks to the Django REST Framework.
- For things that developers might not essentially like to custom build in React, Django admin offers simple off-the-shelf views.
- Additionally, Django has a vibrant community of thousands of tutorials as well as support materials.
- To handle projects of any size and scope, from a straightforward website to a high-load web application, Django is infinitely scalable and battle-tested.
React
ReactJS, also known as React in this context, is a well-known open-source JavaScript library used to quickly and easily create stunning modern web apps. ReactJS is renowned for enabling programmers to develop captivating User Interfaces (UI) that speed up apps.
ReactJS is a social media unicorn created and maintained by Facebook. It uses single components so that a software developer can separate complex UI components into their parts, resulting in excellent modularity and separation of concerns. ReactJS is linked to many industry titans, such as Instagram, PayPal, Netflix, Yahoo, and many others.
Some people refer to React as a framework, while others call it a library because of its capacity to manage views with the input framework.
Advantages of React
- Developers can save a tonne of time by using React's extensive library of component components, add-on packages, as well as full template offerings rather than having to start from scratch.
- Excellent developer tools are still available for React to inspect and debug state.
- Redux, an extension for React, offers simple and secure state management.
- React makes it simple to build dynamic web applications, especially when dealing with awkward HTML strings that frequently call for intricate coding. ReactJS uses JSX, a particular syntax that enables HTML quotes as well as HTML tag syntax applications to render particular subcomponents, to address this problem.
- Developers can reuse components created for other applications that share the same functionality thanks to ReactJS. This results in significant time savings, enabling developers to finish projects much more quickly.
- ReactJS has a more manageable learning curve because developers can design web and mobile apps quickly after becoming familiar with its features.
- Building isomorphic apps with React enables programmers to use the same code for the app's client and server sides.
Why Choose Django with React?
- Django and React are the most widely used libraries and frameworks that excel in their specialized fields.
- Thanks to React's fantastic SPA optimization and Django's robust features, it gets even better. A web application known as a Single-Page-Application (SPA) uses JavaScript to dynamically add content to the pages users access. A SPA generally downloads all of the necessary code for a website during a single page load, improving the user's perception of performance.
- They have widespread user community support and offer quick aid.
Turn Learning into Career Growth
Advantages of Connecting React with Django
- Enables effective code management on both the front and back end.
- As long as you use the STATICFILES configuration, you can integrate Django with React reasonably quickly. Files that remain unchanged while your application runs are known as static files. These files significantly enhance your application, but unlike a typical HTML response, they are not dynamically generated by your Python web server.
- Django already has an admin, and because the frontend and backend are distinct, development takes less time because it's easier to test, find, and fix bugs.
- Code sharing is another crucial reason to choose React Native over all other frameworks. Sharing the developer-created code between the iOS and Android platforms is simple.
- The loading time will be significantly reduced since the front and backend are already divided.
- React, with Django can produce complex UI interactions because its base components are easily customizable right from the start. These components' performance is comparable to a native app.
- Without altering prebuilt architecture, developers can later add VueJS or AngularJS to some blocks.
Building a React.js Application Using Django REST Framework
Prerequisites :
React, and Python (Django) fundamental knowledge is required, but I'll do my best to simplify things as far as possible.
To get initiated with React and Python, check out these articles:
You may need to do the following before starting :
Step - 1 : Backend Using Django
Create the django-react-todolistApp project directory from the terminal.
To install Django, a virtual environment needs to be activated. Let's establish and operate a virtual environment :
Do a project called backend after installing Django.
Following the creation of our project, let's create the todolist application and import the models into the database.
If everything goes according to plan, Django's "Congratulations" page should appear.
Add todolist to the list of INSTALLED_APPS by going to backend/settings.py.
We'll proceed and set up our model for the fields of Todolist items.
Change the following in todolist/models.py :
The model includes the following :
Title : Description of the task
Description : Give more elaboration about a specific task.
Completed : If the task has been completed, the status is True, or else it remains False.
Django uses the _str_() function to exhibit a default attribute; in this case, we return the title to be displayed from our model.
Let's run migrations so the database schema will include our model.
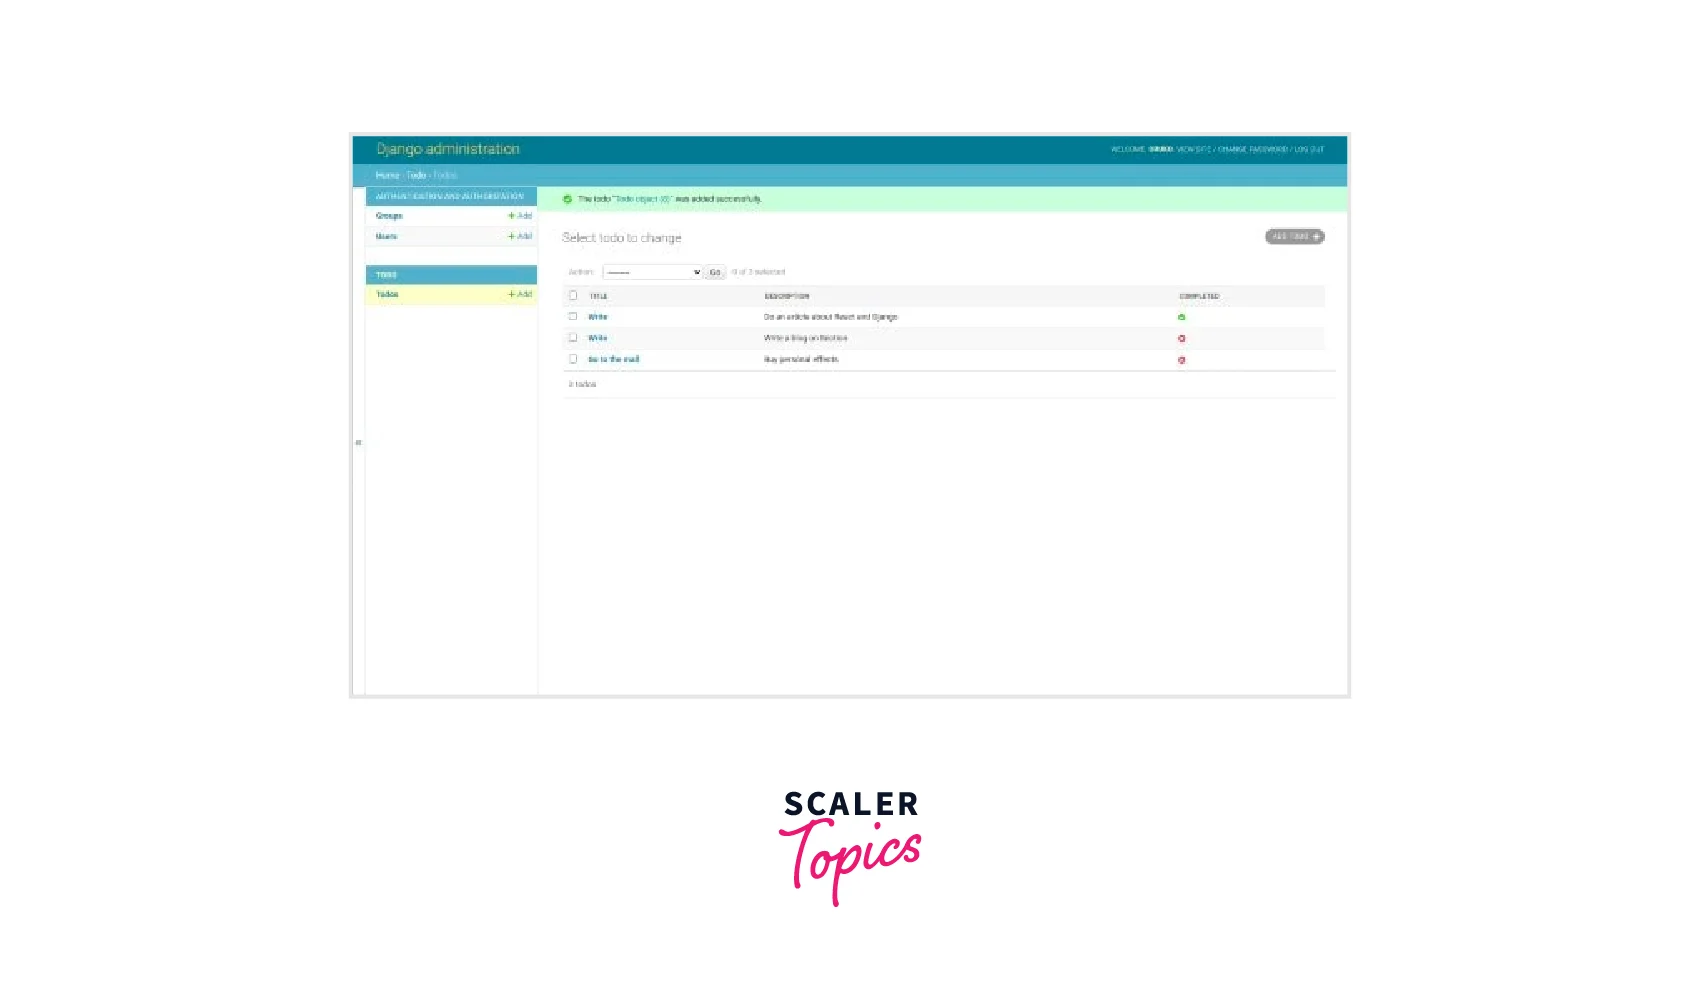
An admin interface is already built into Django. Administrators and authorized users can perform actions on the objects defined in the models directly through the interface.
We can use the admin.site.register() functions to add models to our admin page. Let's update the admin.py file in the todolist app with the model.
Let's make a superuser to log in to the admin page.
Entering your username, email, password, and password (again) will be required. The following URL will take us to the admin pagehttp://localhost:8000/admin.
Now, the admin page allows us to add and remove objects. Great!
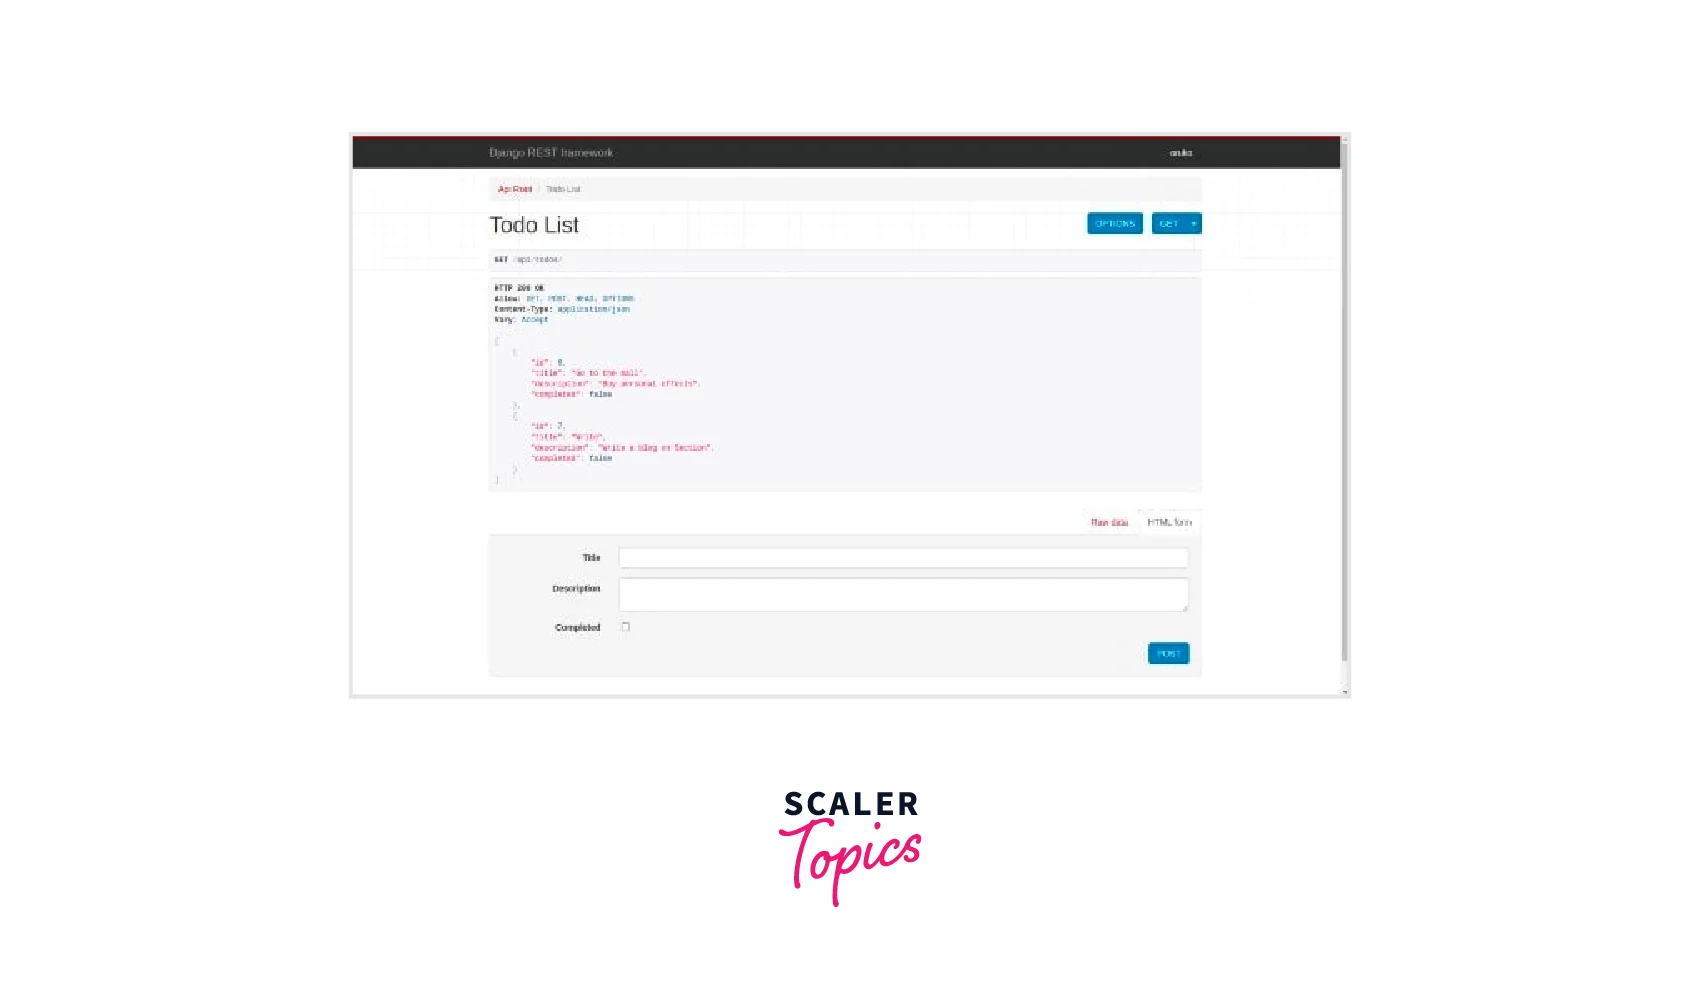
Step - 2 : Putting in the APIs
The API separates your application and external service. You send a specific, straightforward command and receive data in a predetermined format without knowing the service's internal structure or features.
HTTP requests are used by the REST API (Representational state transfer), an API, to communicate with web services. For instance, if a user asks the server for the current temperature in New York City, the server will reply in either XML or JSON, which is a Javascript Object Notation format.
I am installing django-cors-headers and the djangorestframework.
In the file backend/settings.py, alter theMIDDLEWARE and add rest_framework and corsheaders to the list of INSTALLED_APPS.
Include the following code in the file backend/settings.py :
The HTTP-based Django-cors-headers module lets a server specify any different origins to your Django application. We are sharing Resources Across Origins (CORS). Our port will be localhost:3000 within the CORS_ORIGIN_WHITELIST.
CORS, an HTTP-header-based mechanism, enables a server to specify any origins (port or domain) beyond its own from which a browser should be able to load resources. CORS also employs a mechanism through which browsers send a "preflight" request to the server hosting the cross-origin resource to ensure that the server will permit the actual request. The browser transmits headers used in the request and headers indicating the HTTP method during this preflight.
Let's create a serializer file right away.
A serializer component transforms Django models into JSON objects and the other way around.
Adding the following to the serializers.py file :
We import the serializers from the rest_framework package. We make a class called TodolistSerializer that extends ModelSerializer. Next, we specify the model and fields that should be returned.
Additionally, let's update todolist/views.py :
Django requires that we define our URLs before building any web pages. A URL is a location at which a webpage is delivered. When the templates are displayed in the browser, Defining URLs explains which requests are answered by the views.
The URL routes for the API are defined in the backend/urls.py file :
The router.urls module, which provides routing for our API, is the following module.
We can create the subsequent operations thanks to the router :
The router permits were performing CRUD operations on our items.
- /todolists/ : From our API, this route returns every item.
- todolists/id : Reverts a particular item and its ID.
Our backend has been configured to allow us to proceed to the frontend.
Step - 3 : Frontend Using React
The following command is used to install React :
create-react-app is being installed for the first time globally, hence the -g suffix :
Create a React application with a frontend while in the parent directory - django-react-todolistApp- :
For the server to launch :
The default React app ought to be now visible.
Installing bootstrap and reactstrap will style the user interface next. More information on bootstrap and reactstrap is available here.
The code below should appear when we access our index.js file.
A React element is rendered into the DOM in the container element specified by ReactDOM.render(). There must be two arguments. The first shows the JSX being rendered, and the second shows the HTML page's container element.
Replace the following code in src/App.js :
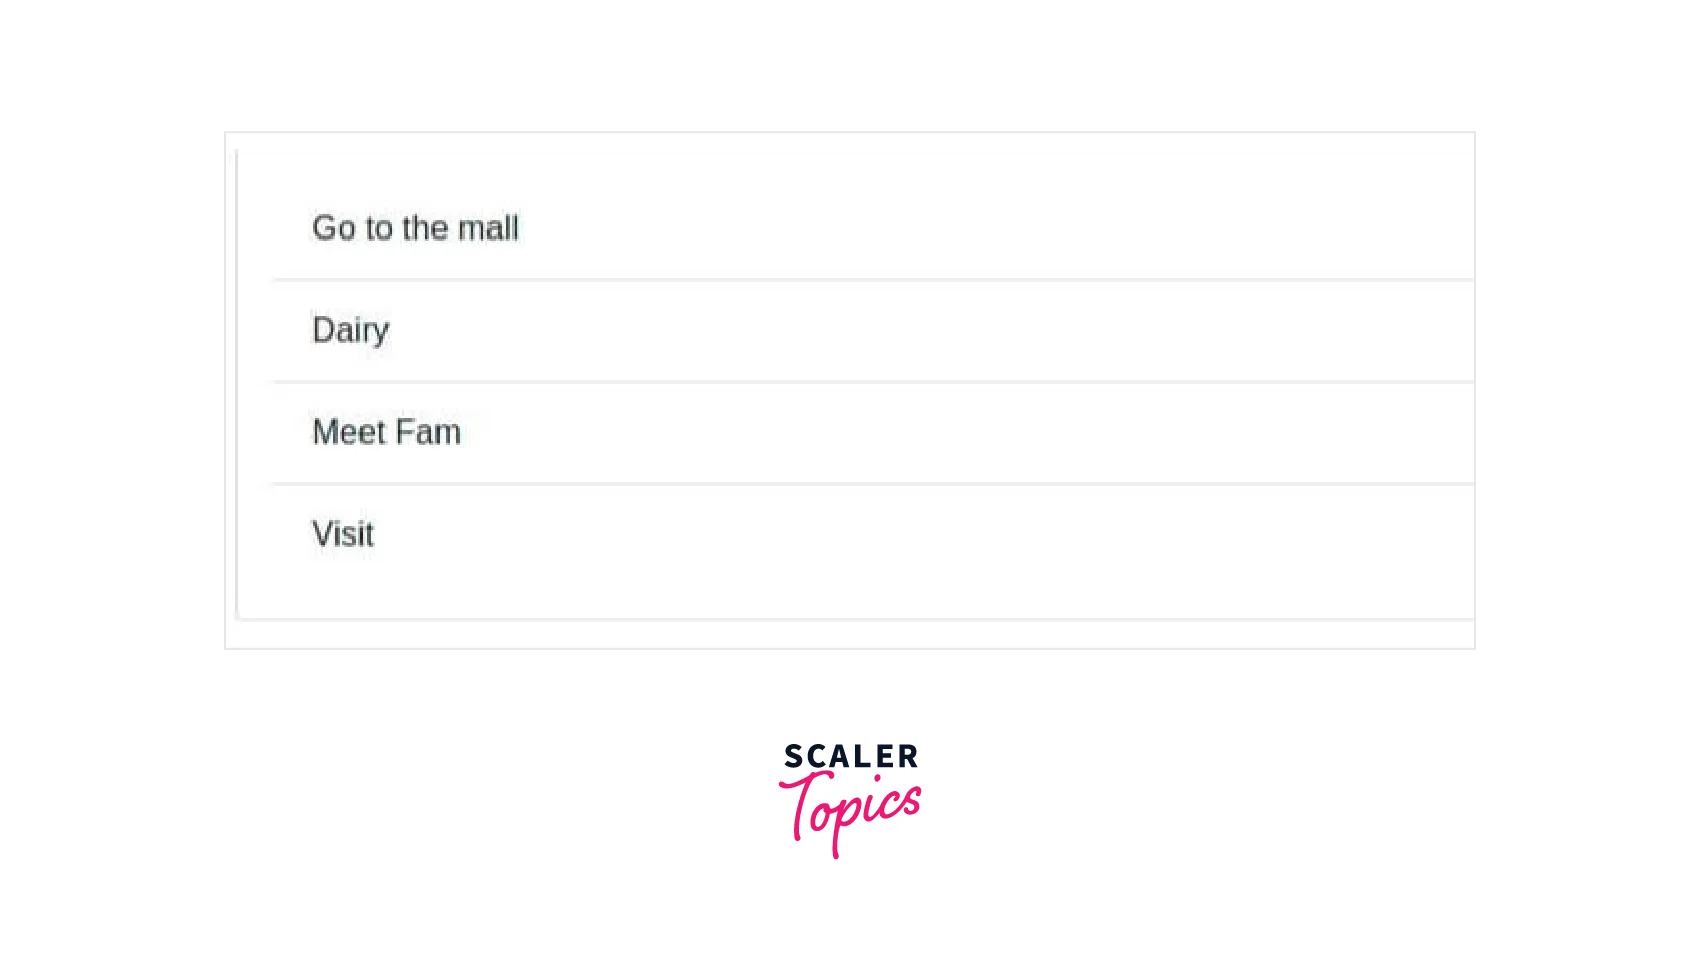
We begin by rendering an item list. The data on the list will be fake, but later we'll retrieve it from the API we built earlier.
A list of items is defined. Each item has a unique id, a title, a description, and a status indicating whether the task has been finished or not, completed.
The class construct is introduced, and the initial state is set there. In this instance, the todolistItems mock list of items serves as the internal state.
Our JavaScript XML utilizes the built-in JavaScript map functionality (JSX).
The map() method builds a new array from the contents of the calling array after calling a given function on each element. Curly braces are used when evaluating JavaScript expressions.
When the render() method is called, the JSX is displayed. We can use the CSS properties by using the render() method's classname attribute.
Because they condense the declaration of our function, we use arrow functions.
The following should be your user interface :

It is now time to use the API that we previously developed.
We must add proxy to the frontend/package.json file. Since the backend and the UI will be running on different ports, communication between the server and the UI must be facilitated using a proxy in the development environment.
Thanks to the proxy, we can use Django's localhost, which manages our API requests.
Let's add it right away.
Replace the artificial data with our API by updating frontend/src/App.js with the following code :
Let's examine each line of code to learn more about what it does :
We added a few properties to our state object in the constructor. Since only items marked as incomplete in our API are currently displayed in our interface, we set the viewCompleted property to false.
The title and description are both contained in the activeItem property, which also defaults to false when completed is selected.
Since we'll be getting our data from an API, we pass our todolist an empty array.
We first enclose fetch() in a try/catch block to handle any network errors. Then, passing our API endpoints, we invoke fetch() using the await keyword.
A resolve value promise is returned from our function by the async command, which enables asynchronous operations.
The componentDidMount() method will be defined as a part of the async function. This makes it possible for us to use the await keyword to execute each fetch.
React calls the componentDidMount() function when a client-side component is rendered. Check out other articles for more information on life cycle functions.
When updating a change to our prior state in the application, we call the setState() method in the componentDidMount() function.
To display the completed items from our todolist, we create the renderItems() function, which makes use of the array functionality built into the filter. Each item in the list is evaluated by a function that is passed to the filter function.
We create a variable called newItems to hold the items that we use the map functionality to display. To demonstrate whether an item description is considered complete or not, we use a ternary conditional operator.
The JavaScript operator ternary returns true when the first condition is met and false when the second condition is met.
We display the items using the renderItems() function in our render() method.
The following should be displayed for the API data that was consumed :
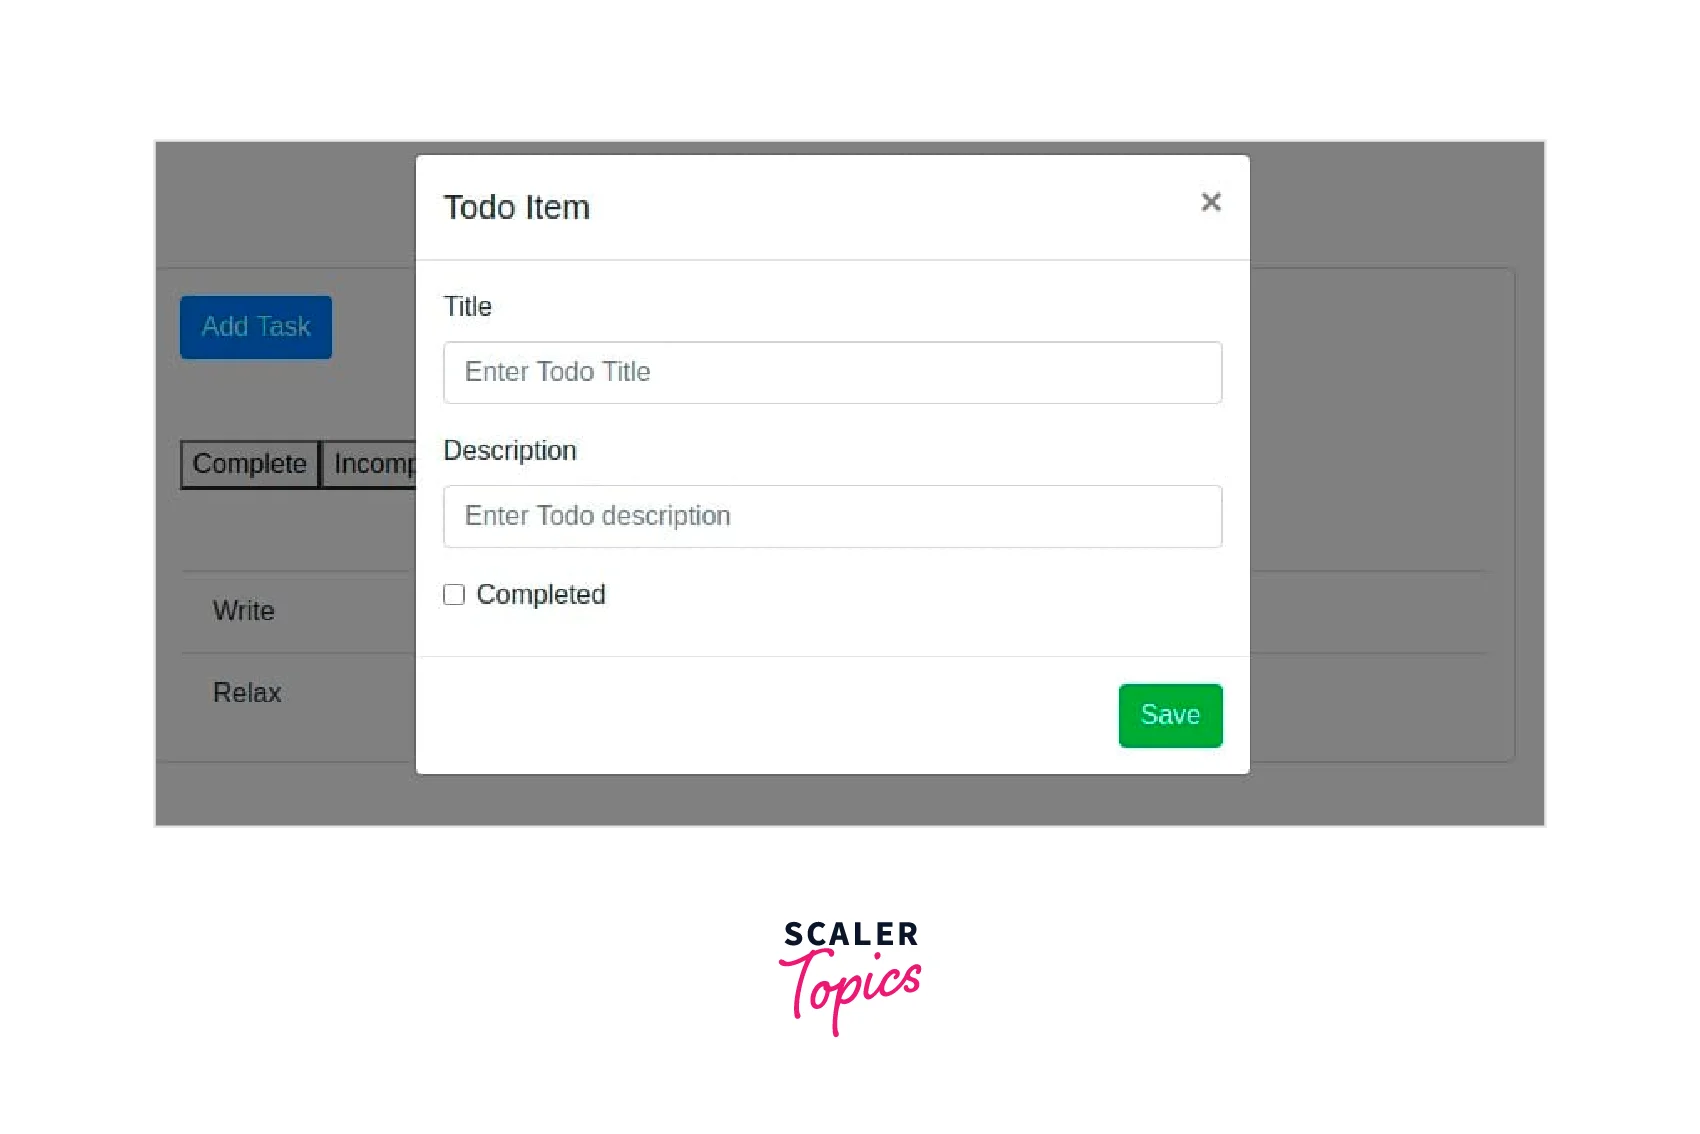
We can create a modal component to handle actions like adding tasks and marking them complete.
For building dialogues, lightboxes, popovers, etc., the modal component offers a strong foundation. This component is offered to us by Material UI for React and is very simple to integrate.
Let's create a Modal.js file in the components folder we just made in the src directory.
To the file, let's add this :
The code mentioned above first imports Reacts and thereactstrap components we previously installed. We use the property we created in the App.js file in the construct. The activeItem component receives the argument as an object when the props keyword is used.
The handleChange method acts to alter the state of a React component after noting a change in its state and receiving an event as a parameter.
Users can check a box to designate a task as finished by clicking on it using the destructuring assignment checkbox. Then, using the setState() method, we modify the activeItem in our state object.
We pass the toggle and the onSave() method to props in our render() method. When toggled, we returned the Modal component.
To enable dropping the modal, the toggle component is added to the ModalHeader. The forms for adding the item description and title are added to the ModalBody.
We define the value of the activeItem in each FormGroup. The name and value of the target input are returned using the onChange event, which is used to determine when the input value changes.
The target value will be examined as we specified in our handlechange() method because the final FormGroup's input type is a checkbox.
We'll create a button to save our items in the ModalFooter using the onSave() method.
Following that, we can add task and mark App.js functionalities as finished.
Let's install axios first, then move on. It enables requests to be sent from our applications to external endpoints. It helps us carry out CRUD operations on our API.
Add the following code to App.js :
Import axios and the Modal we first created earlier. If the expression is true, the toggle() method returns the properties defined in the Modal in Modal.js, otherwise, nothing happens. The toggle() method modifies the state of the Modal when toggled. This is included in the render() method.
We use axios to send requests to the API after handleSubmit() has saved our items there. According to the item id, we use PUT to add the item to the list of items that is already there.
The task is defined in the render() method, so we create a createItem() method to add it.
The viewCompleted we earlier created in our state is checked by the displayCompleted() method, which returns true or false depending on its result.
The viewCompleted() method returns true if the item is Complete. The renderTabList() method defines two buttons, Complete and Incomplete. If false is returned, the item is incomplete. The renderItems() method's operation was described earlier.
Our render() method returns the renderTabList(), renderItems(), and Add Task functionality, which makes use of the createItem() method to let users add tasks.
Now, your application ought to resemble the one below :
Step - 4 : Testing
Let's launch our Django-based backend server by issuing the following commands :
Run the following commands to launch our React application :
Scaler Placement Report and Statistics
Scaler learners achieved 2.5x salary growth with average post-Scaler CTC reaching ₹23L.
Conclusion
- We have mastered the integration of a Django application with the React frontend.
- Building web software is primarily a canonical merge of Django and React technologies. Django will therefore serve as the backend as well as ReactJS as the frontend of the web apps.
- Our application requires an API, or application programming interface, to link the frontend and the backend. Its duty is to make the two environments talk to one another.
- The frontend would be capable of asking us anything as long as we have such an API set up on the backend.
- It gives you the freedom to alter your API's entire architecture without affecting your React apps (for example, switching from Django to Flask).