Introduction to NLP with Keras
Overview
Natural Language Processing(NLP) is rapidly increasing its footing in ML projects. We can intuitively analyze data in texts, speech, and voice using NLP to derive meaningful results. We can build a powerful NLP model within the Keras ecosystem by manoeuvering NLP with Keras.
If one is familiar with Keras, one can easily comprehend most of KerasNLP, a library that is an extension of the core Keras API in which all high-level modules are Layers or Models.
Let's build some deep-learning models for text!
What is Keras?
Keras is a deep learning framework that uses other deep learning frameworks behind the scenes to reveal a simply amazing, easy-to-use, and exciting to work with high-level API. Keras uses deep learning libraries to manifest powerful yet intuitive API that looks like scikit-learn.
Keras can use either of these backend frameworks:
- Google's Tensorflow.
- Theano.
- Microsoft's CNTK.
- Apache.org's MXNet.
Installation:
To install the latest official release:
Keras Advantages:
- Seamless integration with the various backends
- Run training on either CPU/GPU
- Build models in two flavors: sequential or functional.
- Good abstractions via Fast prototyping
With these upper hands, you can focus more on the problem and hyperparameter tuning.
Transform Your Career
Choose from our industry-leading programs designed for career success
Modern Software and AI Engineering Program
Master full-stack development with AI integration

Modern Data Science and ML with specialisation in AI
Advanced data science techniques with AI specialization
Advanced AIML with Specialisation in Agentic AI
Deep dive into AIML with focus on Agentic systems
DevOps, Cloud & AI Platform Engineering
Build and manage AI-powered cloud infrastructure
AI Engineering Advanced Certification by IIT-Roorkee
Premier AI engineering certification from IIT-Roorkee
Types of Natural Language Processing Models Using Keras
- Deep Neural Network:
With the help of the BOW model, build the classic NN model - Convolutional Network:
With the help of word vectors, build a network using 1D Conv Layers. - Recurrent Neural Networks:
With the help of word vectors, build a Long Short-Term Memory (LSTM) Network. - Transfer Learning for NLP:
With the help of word vectors, learn how to load spaCy's vectors or GloVe vectors.
Deep Neural Network
Let's start with cleaning the data:
Let's now build a CountVectorizer:
To create a simple 2-layer network in which the first layer after an input layer is called the hidden layer, and the second one is called the output layer, we need to specify the input dimension (input_dim).
We only have a 1 unit in the output layer because we're dealing with a binary classification problem. Since we're dealing with a binary classification problem, we chose the output layer's activation function to be the sigmoid. For the same reason, we chose the binary_crossentropy as the loss function:
Output:
Let us now train the model:
We also need to set aside some samples for validation.
Output:
We got an amazing 87.5% accuracy.
Convolutional Network
We need to transform the texts into sequences of word ids to work with convolutional nets and recurrent nets. We will then train an embedding layer, and using the word ids, we can fetch the corresponding word vector.
To solve the problem of sequences with different lengths, we will pad the sequence to the left with 5000.
Compute the max length of a text.
Let's now define a simple CNN for text classification:
Let us now train the model:
Let's now transform the test data into sequences and pad them:
Let us now do the model evaluation:
Output:
We again got a pretty good 87.6% accuracy.
LSTM Network
Let's build what's the most popular type of model in NLP with keras: Long-Short-Term Memory network. This architecture is specially designed to work on sequence data which fits perfectly for many NLP tasks like tagging and text classification. Its specialty is treating the text as a sequence rather than a bag of words or ngrams.
Let's now define a possible model:
Let us now train the model:
Results of the evaluation phase:
We again got a similar 87.5% accuracy.
Turn Learning into Career Growth
Transfer Learning
Transfer learning is a method for reducing the number of parameters we need to train for a network.
NLP with Keras using Transfer Learning is primarily of two types:
- Transfer Learning with spaCy embeddings
- Transfer learning with GloVe embeddings
- Transfer Learning with spaCy embeddings
Observe that in the previous two examples, we used an Embedding layer. Wherein that layer had to be trained, adding to the number of parameters that needed to be trained. What if we used some precomputed embeddings to reduce the number of parameters? Say we trained a Word2Vec model on our corpus, and then use those embeddings for the other models we need to train. To do so, we will use the spaCy embeddings.
Now, we'll define the same network, using a pretrained Embedding layer:
Let us now train the model and evaluate it:
We got a slightly reduced accuracy of 85%.
Transfer Learning with GloVe Embeddings
We will build a similar NLP with the Keras model using transfer learning but with smaller, GloVe embeddings.
Let's try this model out:
We got an even more reduced accuracy of 82.9%.
Emotion Detection Problem Using NLP with Keras and Tensorflow
About Dataset:
The dataset uses a set of English Twitter messages classified into six basic emotions: anger, fear, joy, love, sadness, and surprise. You can view the dataset here.
Though we don't have to download the dataset, we will be importing it using the NLP module.
Step 1: Imports
Step 2: Preparing Data
Loading the dataset and separating it into the training, validation, and testing sets.
We are separating our training data into 2 arrays: "tweets" and "labels".
Output:
Step 3 - Tokenization
We will initialize a tokenizer and calibrate it to our training data. It will assign each word a number by how commonly they appear in the dataset. Notice below when we run "texts_to_sequences" on the first tweet in our dataset, we will get an array of four numbers. Each number corresponds to one of the words in the tweet and is determined by how common the word is. So, for example, we can see that the word "i" corresponds with the number "2", as it is a very common word.
Output:
Output:
Step 4 - Making all Sequences the Same Shape
Now we will convert all tweets in the dataset into the same length and set their lengths to 50 words each (this number might change based on the length of text in various datasets). This step is important as the ML model expects the input to be a fixed shape and length. For this to happen, empty spaces will be added, and extra words will be removed.
Output:
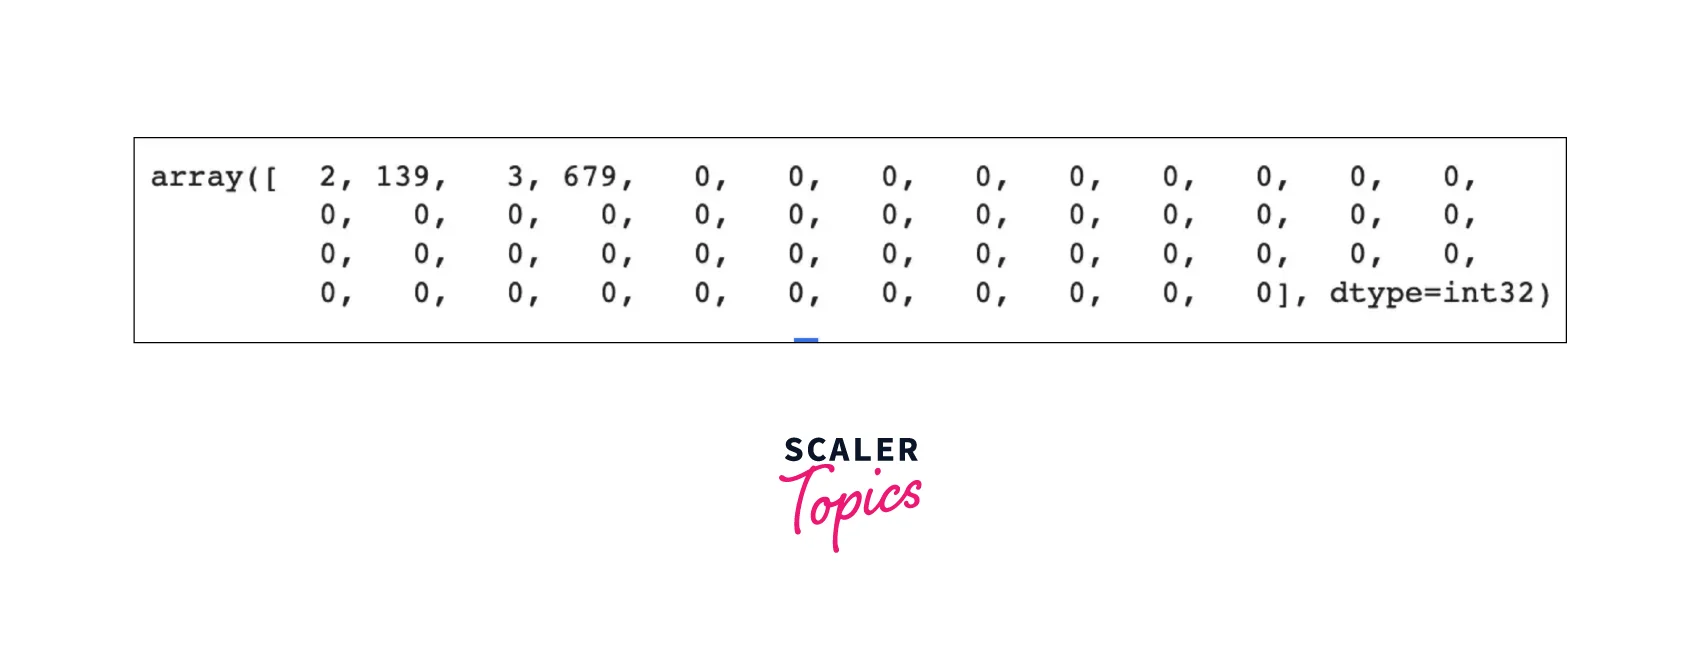
When running "get_sequences()" on our tweets and taking the first tweet from that set, we can see that we have the same four sequences as above, except that its length has been extended to 50.
Step 5 - Preparing Data for Model
Next, we will create a set of all of our labels and a dictionary to convert our classes to their indexes and the indexes to classes. This is especially useful when converting the values the model returns into something we can understand easily. Additionally, we create a lambda function named "names_to_ids" and use it to convert all labels in our training data into their respective indexes.
Notice below we can view what each of the variables looks like to gain a better sense of their purposes. Note that your variables differ slightly in their indexes, which is normal.
Output:
It shows that the first tweet has a class of index "1", which corresponds to "sadness".
Step 6 - Creating Model
We now create a simple model that includes an embedding layer, two bidirectional LSTM layers, and a dense layer for the Output. The bidirectional layers allow for two-way communication and use long short-term memory layers, a type of RNN architecture capable of learning long-term dependencies.
We also compile the model and its loss function, and optimizer and measure it by accuracy.
Step 7 - Training Model
Let us start training the model. Note that we use callbacks to halt the training when our accuracy on the validation set doesn't go up for more than 2 epochs.
Output:
Step 8 - Evaluating and Testing Model
Now, let's separate our test data and get their sequences. We then evaluate the model to find its accuracy against the test data.
Output:
We got an amazing accuracy of 88.65%.
We then write the code to generate a random tweet and let the model predict what class it belongs to. It also predicts the tweet and its label, so we can easily compare the prediction and the correct answer.
Next, we can enter our sentence and let the model predict its emotion.
Output:
Step 9 - Saving Model
We now save our model to our Google Drive in a .h5 filetype. I am using Google Collab, so the path will change if you run your code locally.
Step 10 - Loading Model
If you want to load your model from a specific filepath, you can use the code below. From then, you can run all the functions you wish to with your model, except replacing the word "model".
Conclusion
If one wants to build fascinating projects in NLP, then KerasNLP with Keras can be handy. The key takeaways from this article are:-
- KerasNLP is a simple and powerful API for building Natural Language Processing (NLP) models within the Keras ecosystem.
- KerasNLP is a natural language processing library that supports users throughout their development cycle.
- KerasNLP provides modular building blocks following standard Keras interfaces (layers, metrics) that allow us to quickly and flexibly iterate on our task.
- Using NLP with Keras, we can build different network models like Convolutional, LSTM & Deep Neural Networks.
- We also learned about Transfer Learning using Spacy and GloVe embeddings.
- Finally, we implemented the Emotion detection KerasNLP model via implementing steps like data preprocessing, Tokenization, training, and evaluating the model.