Defect/Bug Life Cycle in Software Testing
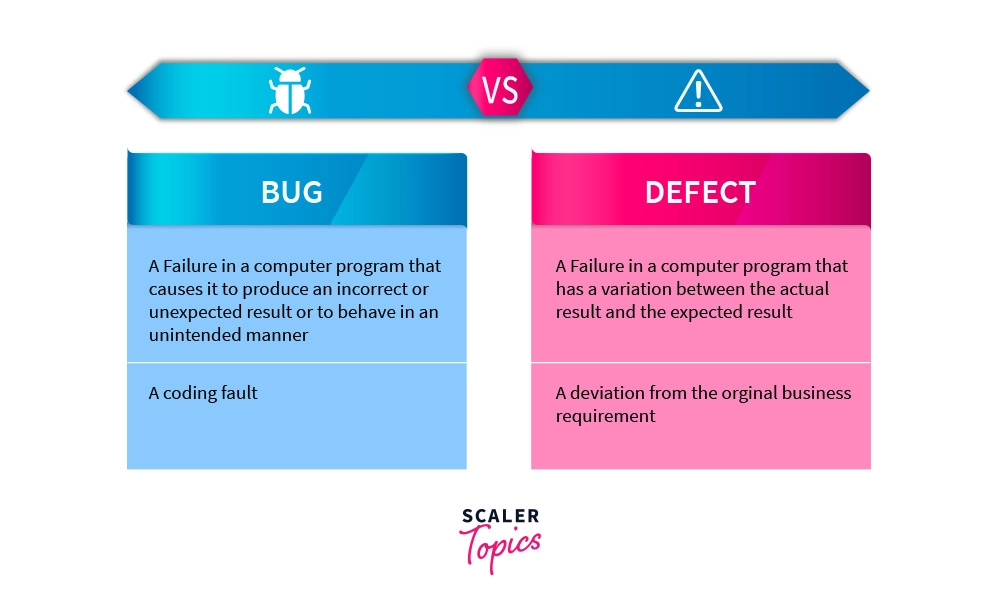
A defect is an error in the application that causes it to work in a way that is unintended by the programmer. It occurs when the programmer makes a mistake during the designing or building phase of the application.
The error is officially termed as ‘defect’ when a developer or a tester discovers it while testing a part of or the whole application during the testing phase. Once a defect is found, the developer/tester makes a note of it in the logs and notifies to the developer’s group.
The term ‘bug’ is used to define defects found in the application that cause it to produce unintended outputs.
Bugs can result in errors that compromise the functionality of other components of the application, resulting in a ripple effect that can bring the whole system down.
The process of removing or rectifying the bugs is called ‘debugging’.
What is Defect/Bug Life Cycle?
The Defect Life Cycle, also known as the Bug Life Cycle in software testing, is a well-defined sequence of states that a defect or bug undergoes throughout its existence. The primary objective of the Defect Life Cycle is to facilitate seamless coordination and communication regarding the current status of a defect among various assignees. This structured process ensures that the defect fixing process is systematic and efficient, enabling effective collaboration among team members and stakeholders.
Defect Status
Defect status, also known as bug status, is a crucial aspect of software development that plays a pivotal role in managing and resolving defects throughout the defect life cycle. It serves as a communication tool that keeps stakeholders informed about the current state of each defect, enabling them to track progress, identify potential issues, and make informed decisions. By effectively utilizing defect status, teams can streamline the defect resolution process, enhance software quality, and deliver exceptional products
Scaler Placement Report and Statistics
Scaler learners achieved 2.5x salary growth with average post-Scaler CTC reaching ₹23L.
Defect States Workflow
The bug life cycle, also called the defect life cycle, goes through various stages throughout its life. This entire life cycle is called its ‘workflow’.
The diagram below shows the workflow of the defect life cycle:

The meaning of each of these steps is as follows:
1) New
When a new defect has been discovered by a ‘quality assurance engineer’, or a QA Engineer, it is automatically placed into the ‘New’ category. The QA engineer is part of the testing team and is responsible for preventing defects during production. This is the first state of the bug life cycle. The QA Engineer writes detailed documentation of the bug and passes it on to the developer teams. In terms of this particular bug, the job of the QA Engineer is done.
2) Assigned
Once the bug in the ‘New’ state is approved, it is assigned to a development team, who will do the necessary changes to rectify it. Once this development team is assigned to rectify the bug, it is moved to the ‘Assigned’ state.
Transform Your Career
Choose from our industry-leading programs designed for career success
Modern Software and AI Engineering Program
Master full-stack development with AI integration

Modern Data Science and ML with specialisation in AI
Advanced data science techniques with AI specialization
Advanced AIML with Specialisation in Agentic AI
Deep dive into AIML with focus on Agentic systems
DevOps, Cloud & AI Platform Engineering
Build and manage AI-powered cloud infrastructure
AI Engineering Advanced Certification by IIT-Roorkee
Premier AI engineering certification from IIT-Roorkee
3) Open
In this state, the bug is being worked upon by the members of the development team the bug was assigned to.
4) Fixed
After the members of the development team rectify the bug by making the necessary changes, the team marks the bug as ‘Fixed’, and moves it to the ‘Fixed’ state.
5) Pending Retest
After the development team fixes the bug, it is once again sent to the testing team for retesting to make sure the bug is indeed fixed. Till the testing team does the necessary retests, the bug is kept in the ‘Pending Retest’ state.
Scaler Placement Report and Statistics
Scaler learners achieved 2.5x salary growth with average post-Scaler CTC reaching ₹23L.
6) Retest
In this state, the testing team does the necessary retests to check if the bus is fixed. A crucial decision is made by the testing team here, on whether to mark the bug as fixed or not.
7) Reopen
If the testing team finds the development team’s attempt to fix the bug as unsatisfactory, they ‘Reopen’ the issue and send it back to the development team for refixing. The bug is once again put in the ‘Open’ state and all the successive steps are repeated.
8) Verified
If the testing team finds the development team’s attempt to fix the bug in the retest as satisfactory and does not find any additional issues caused by the fixing of the bug, then the bug is marked as ‘Verified’.
Turn Learning into Career Growth
9) Closed
Once the bug is verified as resolved, and the bug is not found to continue under any condition, then the bug is marked as ‘Closed’. This is the end of the life cycle of the bug.
A few additional states also come under the Bug Life Cycle:
10) Rejected
After the tester finds a defect and pushes the bug into the open state. The development teams may feel that the defect is not genuine. In this case, the development team may simply ‘Reject’ the bug. The cause of the rejection may be:
- A duplicate defect
- It is NOT a defect, but a feature 😛.
- Or simply non-reproducible i.e. It is not easy to trace or recreate the bug.
11) Deferred
If the members of the development team feel that the bug may cause problems with the existing state of the software, or that the bug can be fixed in upcoming patches or updates, they can simply ‘Defer’ the bug. i.e. choose to postpone the bug rectification to a later time.
Defect/Bug Life Cycle Explained
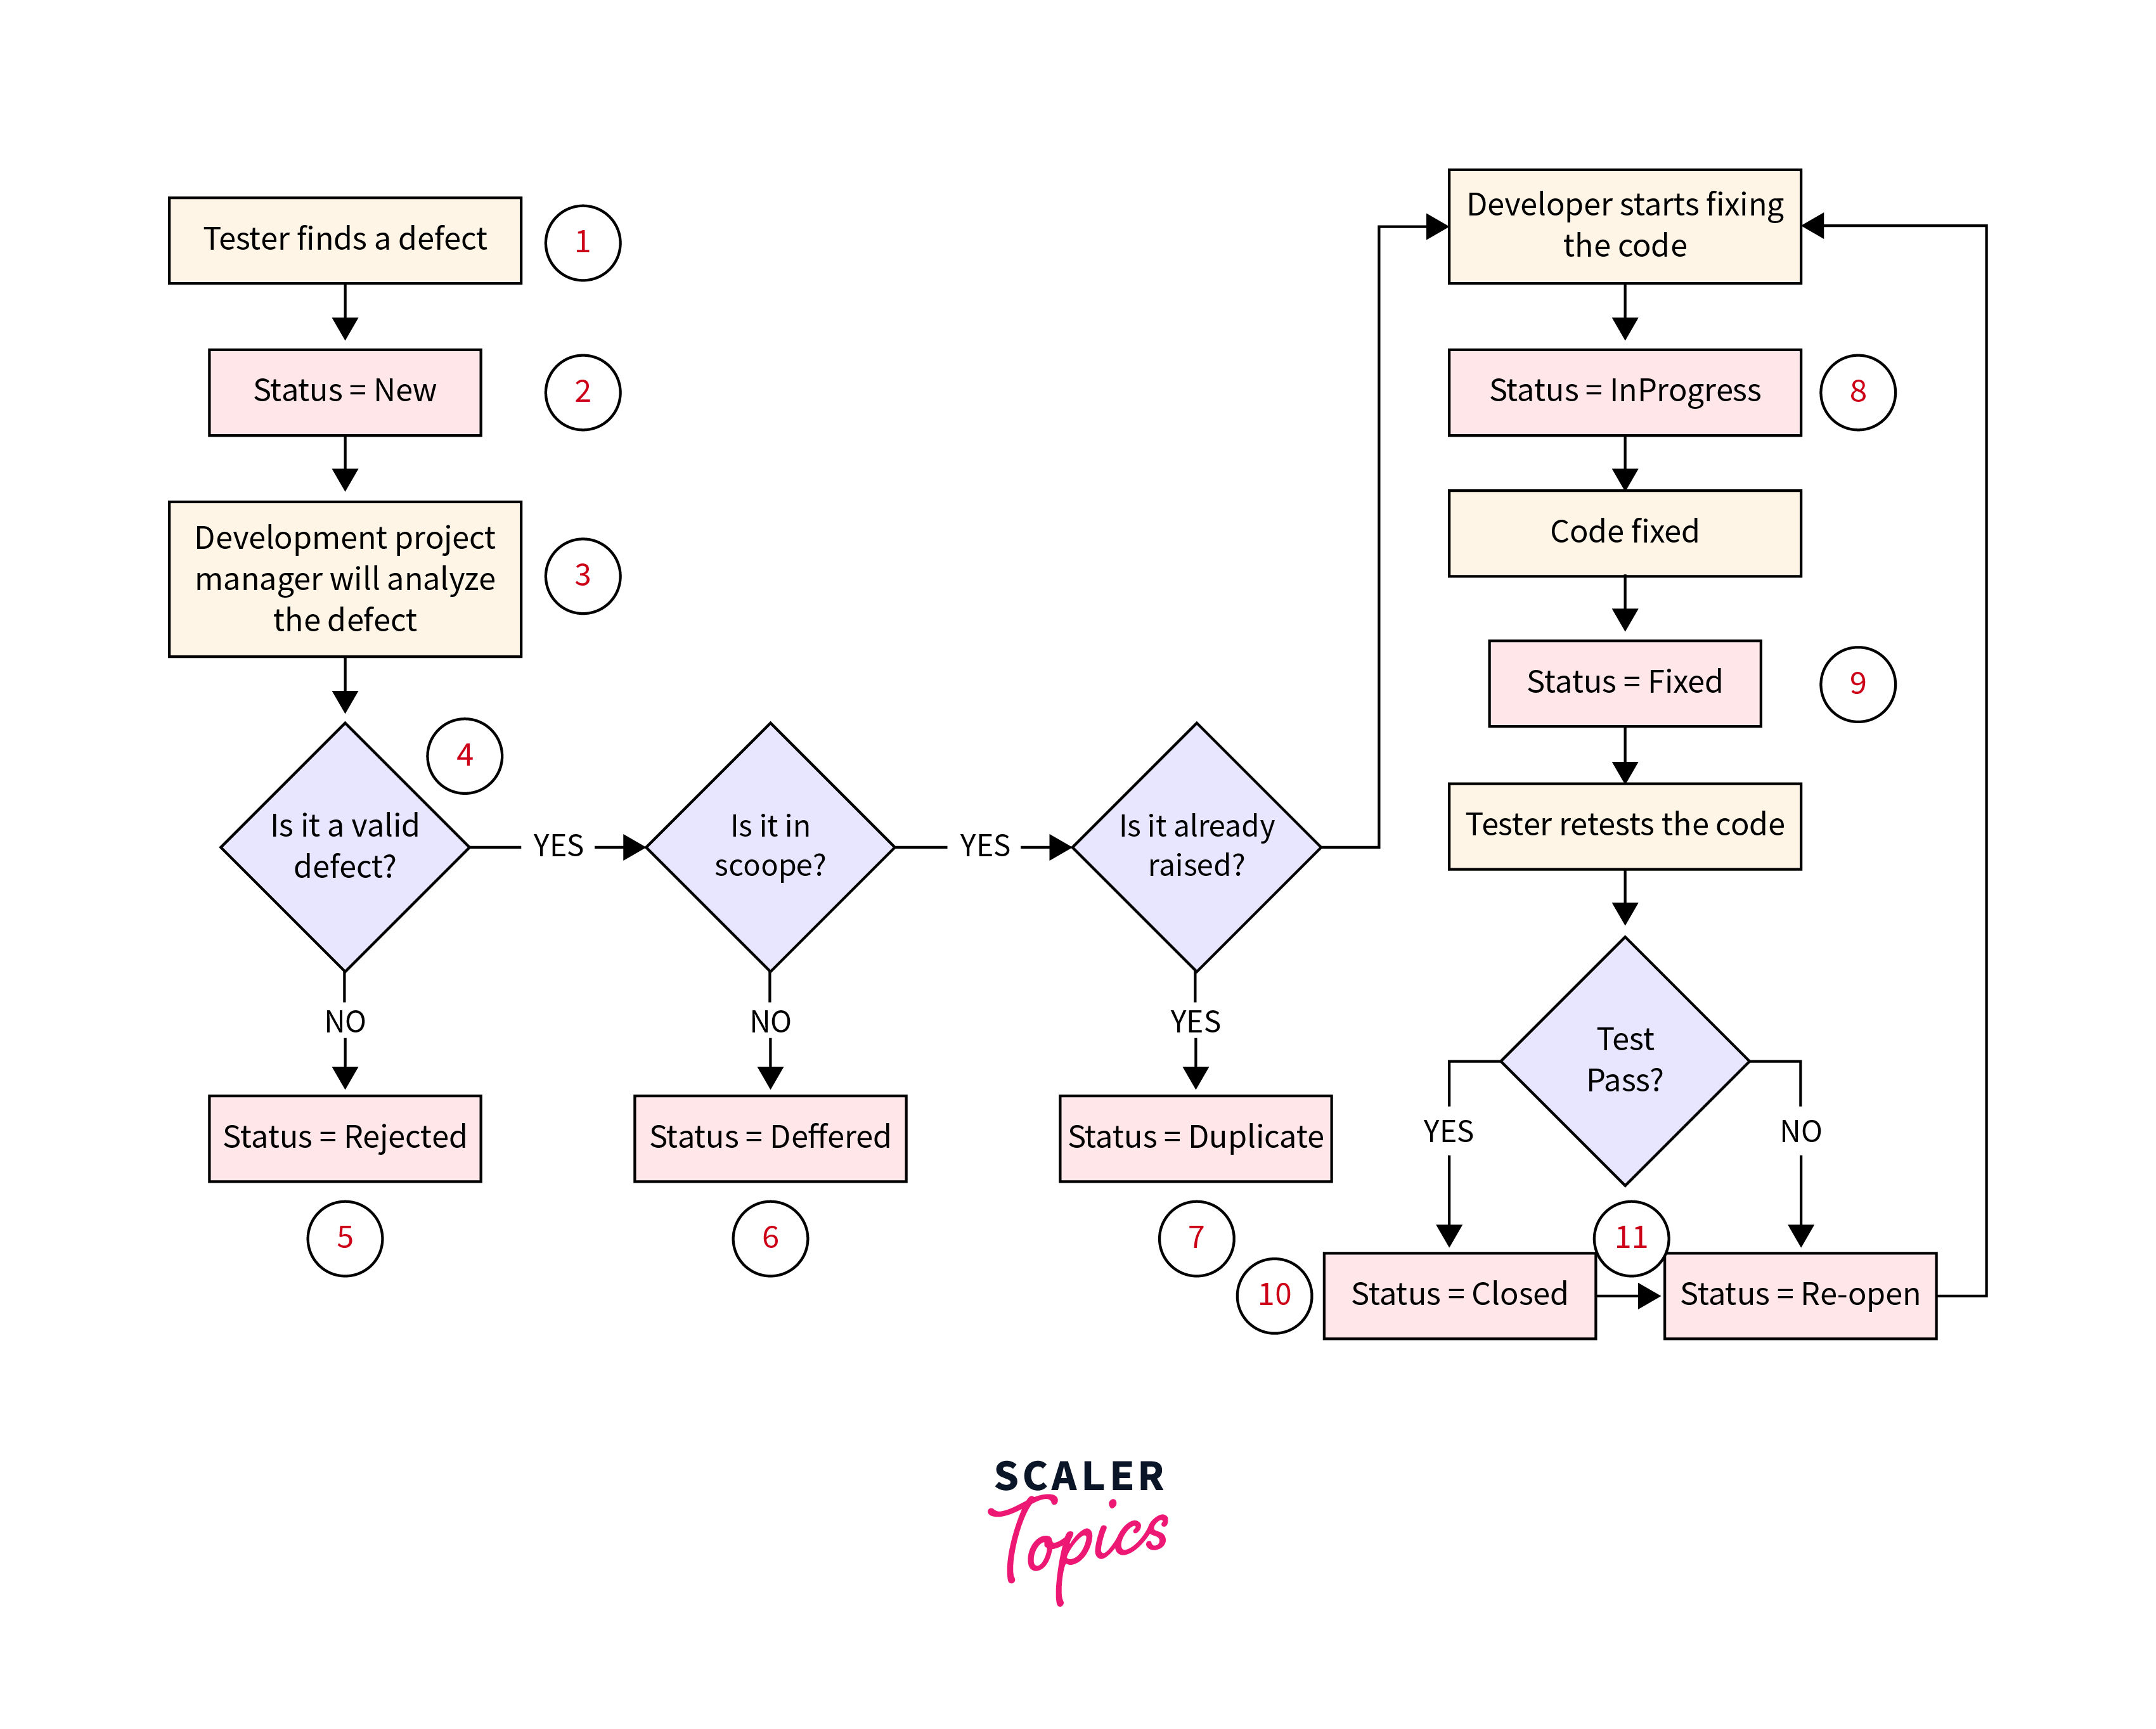
The Defect/Bug Life Cycle unfolds as follows:
-
Tester Identifies Defect:
- The testing phase begins, and a tester discovers a defect in the application.
-
Defect Status: New:
- The defect is reported and assigned the status "New."
-
Defect Sent to Project Manager:
- The defect is forwarded to the Project Manager for analysis.
-
Project Manager Validation:
-
The Project Manager assesses the defect's validity.
-
If the defect is not valid, it is marked with a status of "Rejected."
-
-
Scope Check:
-
If the defect is considered valid, the Project Manager checks if it is within the current release scope.
-
If it's out of scope, it is assigned a status of "Postponed" or "Deferred."
-
-
Check for Duplicate:
-
The manager checks if a similar defect was raised earlier.
-
If yes, the defect is marked with a status of "Duplicate."
-
If no, the defect proceeds to the next step.
-
-
Assigned to Developer:
-
The defect is assigned to the developer for code fixing.
-
At this stage, the status is set to "In-Progress."
-
-
Defect Fixed:
- Once the developer fixes the code, the defect is assigned a status of "Fixed."
-
Tester Re-Tests:
-
The tester re-tests the fixed code.
-
If the test case passes, the defect is marked with a status of "Closed."
-
If the test case fails, the defect is re-opened and sent back to the developer.
-
-
Scenario of Reopened Closed Defect:
-
In certain situations, a closed defect may re-surface in subsequent releases.
-
For example, a defect fixed and closed during the 1st release may reappear in a later upgrade.
-
In such cases, the previously closed defect is re-opened for further resolution.
This Defect/Bug Life Cycle ensures a systematic and thorough process for defect identification, analysis, fixing, and validation through various stages, contributing to the overall quality of the software.
Benefits of Defect Life Cycle
Some of the benefits of the bug life cycle include:
- It enables us to create a high quality product that works reliably.
- It reduces the cost of development as each step of the process is marked and well-documented, enabling us to use fewer resources to find the problem.
- It enables a better environment of communication between the members of the development and testing teams, thus increasing understanding and empathy.
- It allows us to detect issues earlier, thus significantly reducing the cost of finding a bug.
- It allows for better services and increases customer satisfaction.
Limitations of Defect Life Cycle
Some of the limitations of the life cycle include:
-
The dynamic nature of software development and real-time issue tracking make it difficult to maintain centralized control in the Defect Life Cycle.
-
Alternative life cycles offer enhanced issue tracking and increased work throughput, suggesting the traditional Defect Life Cycle may be outdated.
-
Clear understanding of bug states, roles, and responsibilities among team members is crucial for effective Bug Life Cycle implementation.
-
Detailed defect documentation facilitates understanding of thought processes and conclusions, promoting efficient collaboration.
-
Regular updates to the defect tracking tool are essential for synchronized communication and collaboration in the Bug Life Cycle.
Conclusion
The defect life cycle helps us to detect and rectify bugs faster, and keep the members of the development and testing teams in the loop on the status of the bug.
It enables quick tracking, rectification, teamwork, and quicker development time of the application.
Following these life cycle steps, we can always ensure the defects found are tracked and documented, to ensure a reliable and bug free end product!
See More
FAQs
Q. What is the difference between a defect, error, and failure?
Q. What is a ‘producible’ defect?
A: A defect that can be clearly identified, documented, and reproduced repeatedly after every execution is a producible defect. This means that when the QA engineer comes across the defect, he properly documents it in his notes on how he approached it and discovered it. The developer team that reads his notes can now read his notes retrace his steps and discover the same bug at the same place.
Q. What is a defect report?
A: A defect report is a document that details the way the defect was found, and how it affected the execution of the application.