How to Install Angular?
The rising demand for web applications underscores the importance of proficient developers adept in front-end, back-end, and full-stack development. To meet this demand, developers require efficient tools like Angular and Node.js. This article guides Windows users on installing Angular CLI to craft robust Single Page Applications (SPAs). Developed by Google, Angular stands out among frameworks like ReactJs and VueJs due to its comprehensive features. It offers integrated sub-packages for routing, asynchronous calls, security, and more, enhancing development versatility. By integrating Angular and Node.js into your system, you not only amplify your development capabilities but also harness the power of cutting-edge technologies, ensuring you stay ahead in the dynamic world of web development.
Prerequisites
You must have a basic understanding of HTML, CSS, and Javascript. That's enough to get started with Angular. Let's see these prerequisites in Layman Terms and what exactly these languages are.
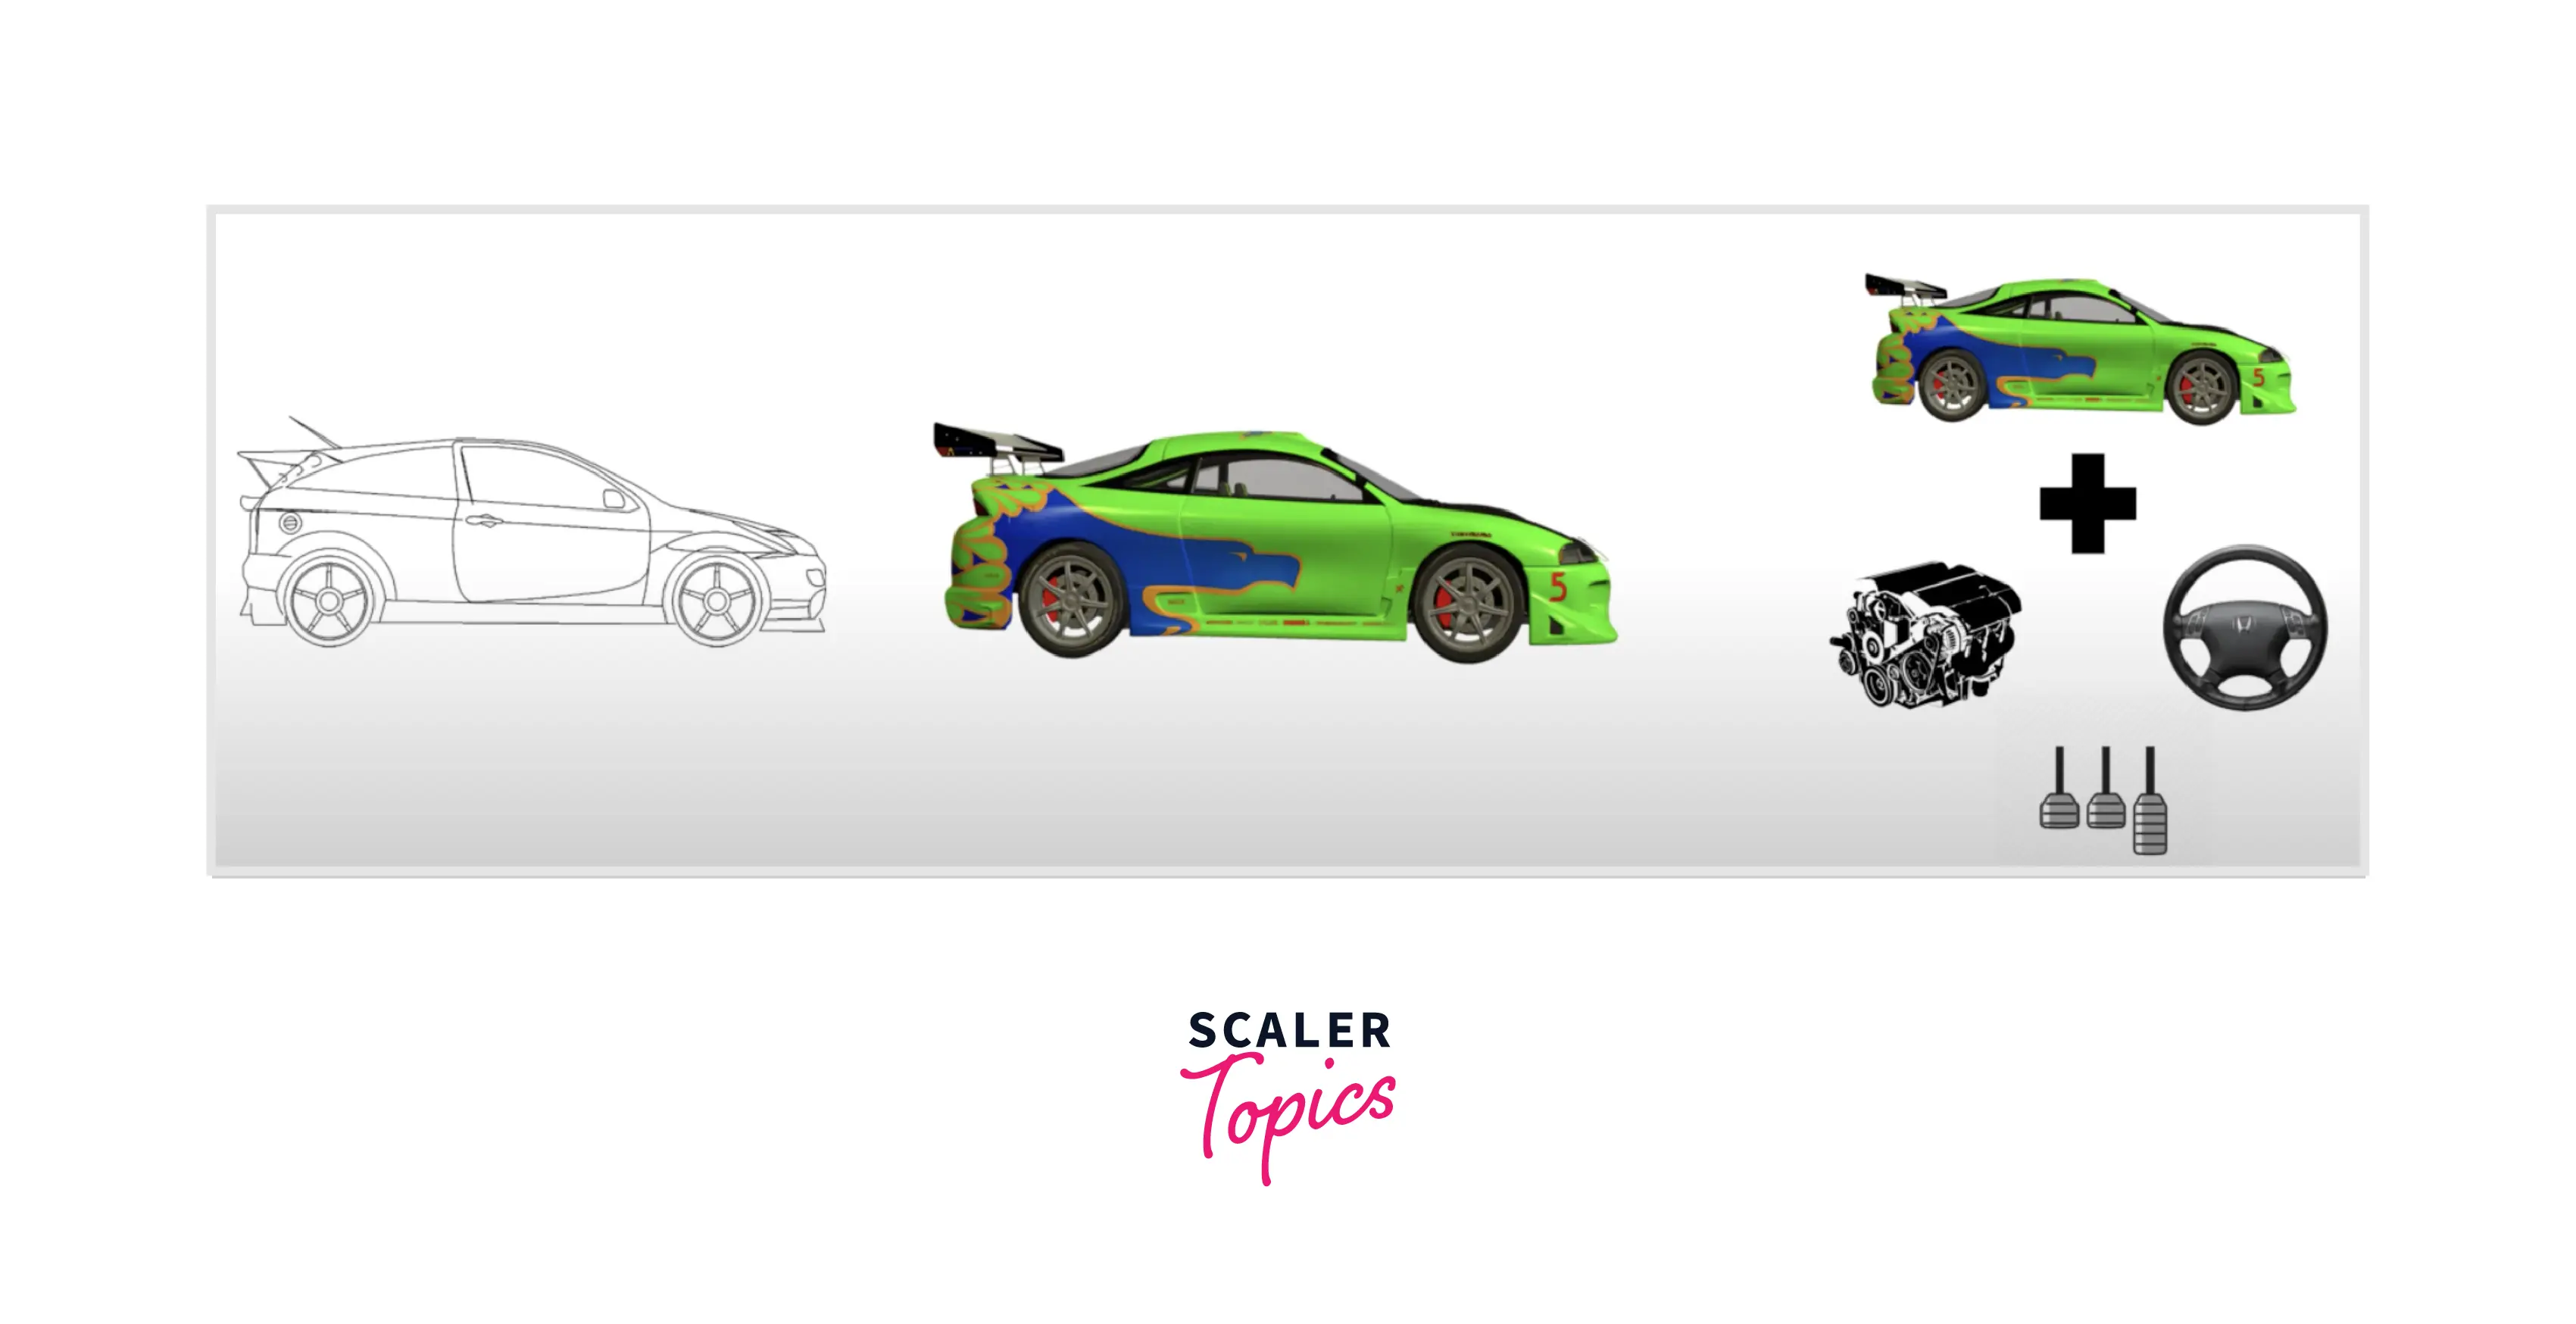
To understand HTML, CSS, and JavaScript in layman's terms, we will take an example of the car manufacturing process. Look at the first diagram of the car sketch, what can you think of? Basically, it is a skeleton of a car, with no colors only a baseline. Hence we can consider relating this part of the process as an HTML.
Now look at the 2nd image, it is the same sketch but with attractive colors and cosmetic updates. Don't you think? the second image looks far better and more intuitive than the first image. Yes! Of course, the car designer has to do that, otherwise, their car won't make a good sale. We can relate this process with applying CSS to HTML. So far whatever we have seen was static, in nature. Both images were representing a car model. It does not contain the internal parts yet.
The third image is pretty interesting, You can see we're adding the internals of the car model, like engine, clutch, staring, etc. These parts are the most important pieces which help a car move. Rather we can say, without these features, there is no use for a car that can't move at all. Great! We can easily relate this with Javascript. That means we can say that JavaScript helps to make things dynamic. In another word, we can call JavaScript the brain of the webpage.
Now, let's move ahead and learn the theoretical part about prerequisites.
HTML
HTML stands for HyperText Markup Language. It is used to structurize the page.
Above is an example of HTML. At a quick glance, it looks similar to XML (Extended Markup Language), but it is not. HTML consists of HTML elements HTML has a specific terminology, we can have a quick look at it
- tag/element - The start of the node like html,head, meta, title, etc. are examples of tag/element.
- attribute - Apart from the element anything that exists on the element is called an attribute, for eg. lang and charset.
- Attribute value - attribute contains a value after = symbol, it is called as attribute value.
- Element text - Text present inside element is called as element text. For eg. In <h1>This is test page</h1> element, the element text is This is text page.
You can learn more about HTML from Scaler topic HTML
Scaler Placement Report and Statistics
Scaler learners achieved 2.5x salary growth with average post-Scaler CTC reaching ₹23L.
CSS
CSS Stands for Cascading Style Sheets. HTML is used for setting a skeleton, and on top of that CSS is applied to make things attractive and beautiful.
Output:
Find more about CSS in Scaler topics
JavaScript
JavaScript is one of the most popular languages, it is an interpreted, just-in-time compiled scripting language. It can be used for web, mobile, and desktop applications. On the HTML page, JavaScript helps to interact with the page by adding events, manipulation, navigations, animations, etc.
Let's try to write some javascript code. The problem statement is, that when you click on a div element, the color should be changed from blue to red.
There is a simple JS code written on the 1st line, we get a hold of the HTML element querying by its id and on the very next line attaching click event listener with a parameter of event handler arrow function. The event handler calls container. style.background = 'red' to change its color.

Fantastic! wasn't that super easy? Anyways there is a lot to learn about JavaScript, you find more about JS in Scaler topics
Transform Your Career
Choose from our industry-leading programs designed for career success
Modern Software and AI Engineering Program
Master full-stack development with AI integration

Modern Data Science and ML with specialisation in AI
Advanced data science techniques with AI specialization
Advanced AIML with Specialisation in Agentic AI
Deep dive into AIML with focus on Agentic systems
DevOps, Cloud & AI Platform Engineering
Build and manage AI-powered cloud infrastructure
AI Engineering Advanced Certification by IIT-Roorkee
Premier AI engineering certification from IIT-Roorkee
Typescript
Typescript is a superset of Javascript. It's a syntactical sugar on Javascript to introduce types. Any valid javascript code is a valid typescript code. In JavaScript, not only variables but also objects can hold any data type value.
The above behavior is okay, but in few situations, we can't be certain about accessing the fullName variable. We have to add different kinds of checks to extract specific values.For accessing the value of object properties we shall write property names appropriately. Do you see any problem with the above code? Yes, there are a couple of potential issues that can happen.
- In general, keeping two types of (here string / object) information inside a single variable wouldn't be a good idea in a code. It can lead to error-prone situations.
- We can easily make a mistake while accessing object properties, on line:18, we had a typo ${fullName.FirstName} ${fullName.lastname} should have been ${fullName.firstName} ${fullName.lastName}.
One way to solve this issue could be using JSDoc or a similar library, which helps to add extra information about variables/functions/classes etc. But it comes with the cost of maintenance.
This is one of the scenarios, where Typescript shines. It can help you to define a type while defining variable/classes/objects/function and whatnot.
The potential error that we spoke about, Typescript had diligently handled. Typos can be caught at compile time, isn't that an interesting fact? We would save an enormous amount of time, like debugging applications for such a small thing. There are so many more features that exist in typescript
- Enum
- Typed classes/interfaces
- Generics
- Object-oriented
- Static typing
- Modules
We're not going to learn about all of these in this chapter, I would highly recommend you to look at official Typescript Handbook
System Requirements
- Windows / Mac Machine
- Good Internet Connectivity
- System user account with all/admin installation privileges.
- Your favorite IDE (VSCode, WebStrom, Atom, etc.)
What is Angular CLI?
Angular CLI is a Command Line Interface tool.
- Enforce best practices in web project setup from the beginning
- Initial project setup
- webpack configuration that you don’t have to maintain and upgrade yourself.
- Generation of scaffold files for generating templates (schematics).
- Generate optimized production ready deployable bundles.
- Super easy to use any pre-processor tool like scss, sass, less, tailwind, etc. ng build
- Serve application locally ng serve
- Deployment is simplified ng deploy
- First-class support for Test tools like Cypress, Nightwatch, WebdriverIO, Jasmine, etc.
- Ease of providing environment-specific configurations.
Install Angular on Windows
Step 1: Install Node.js
Install the latest LTS version from nodejs.com
Otherwise, you can install the specific version from the downloads section
Set-ExecutionPolicy -Scope CurrentUser -ExecutionPolicy RemoteSigned https://angular.io/guide/setup-local
Install setup.exe file
Follow setup instruction screenshot
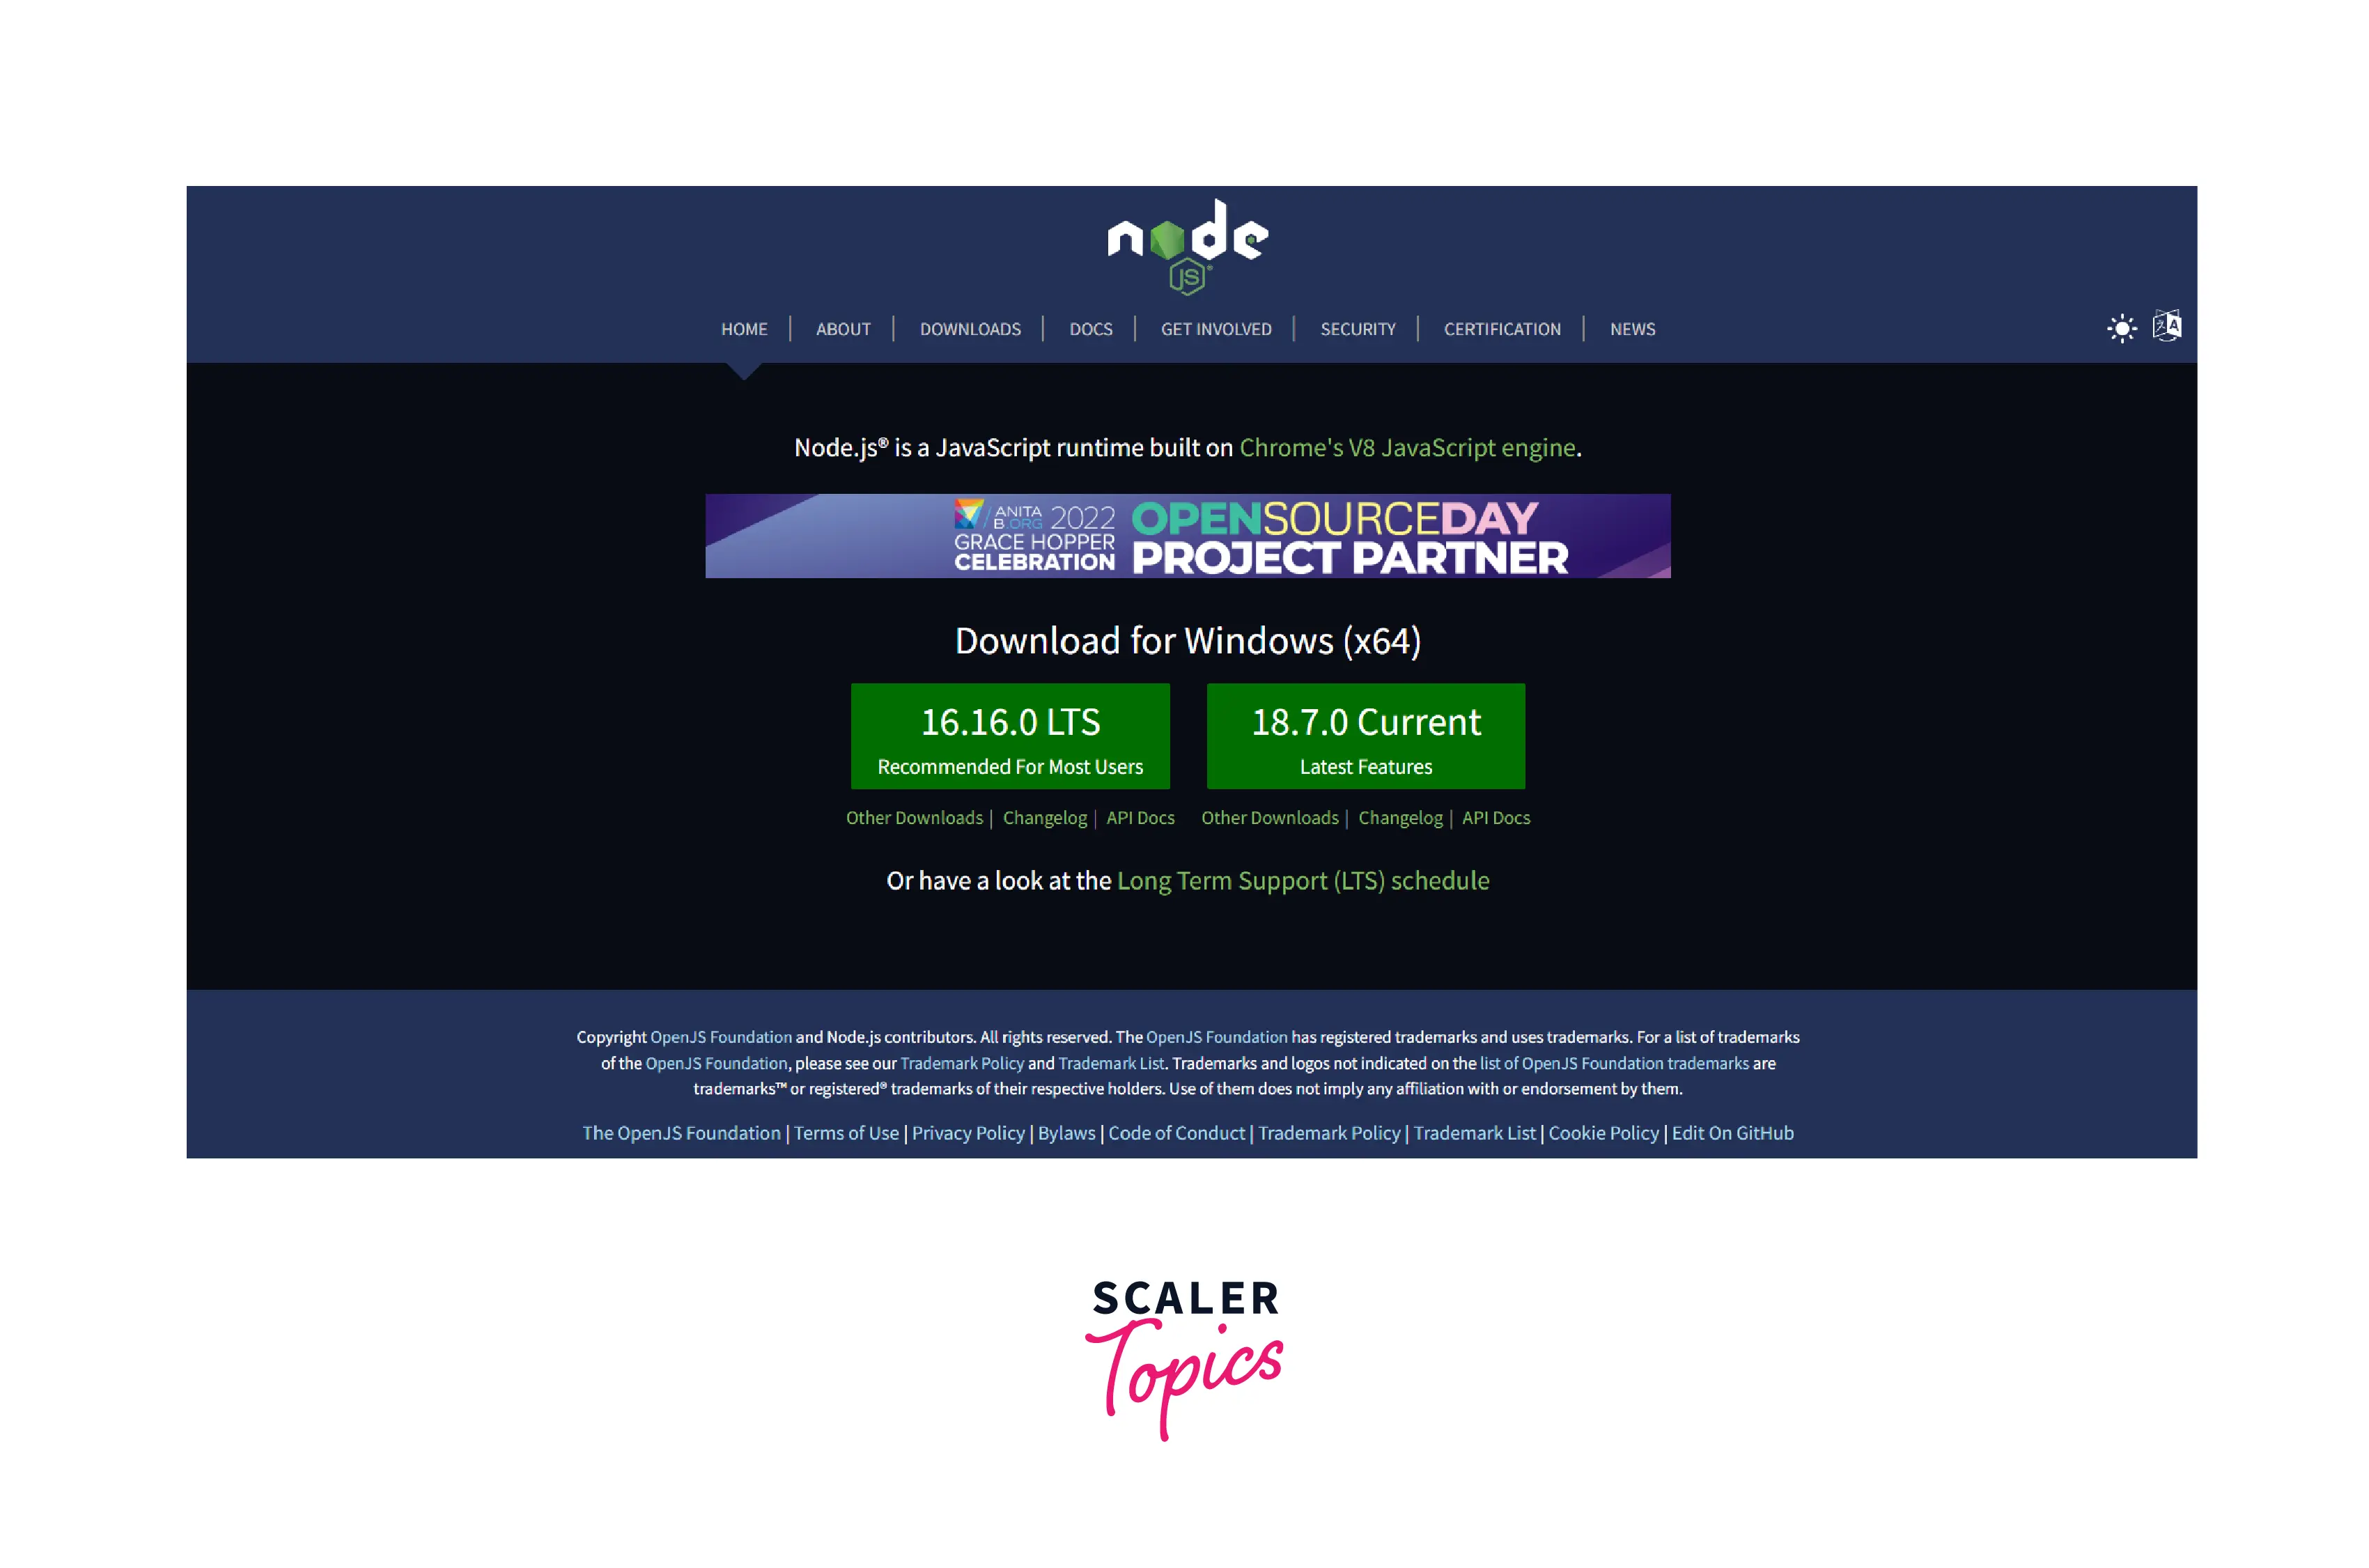
- Visit nodejs.org - Now select LTS version (16.16.0) to download
- Click on the downloaded file, and you will see a popup to install a Node.js Setup Wizard. Now click next to proceed.

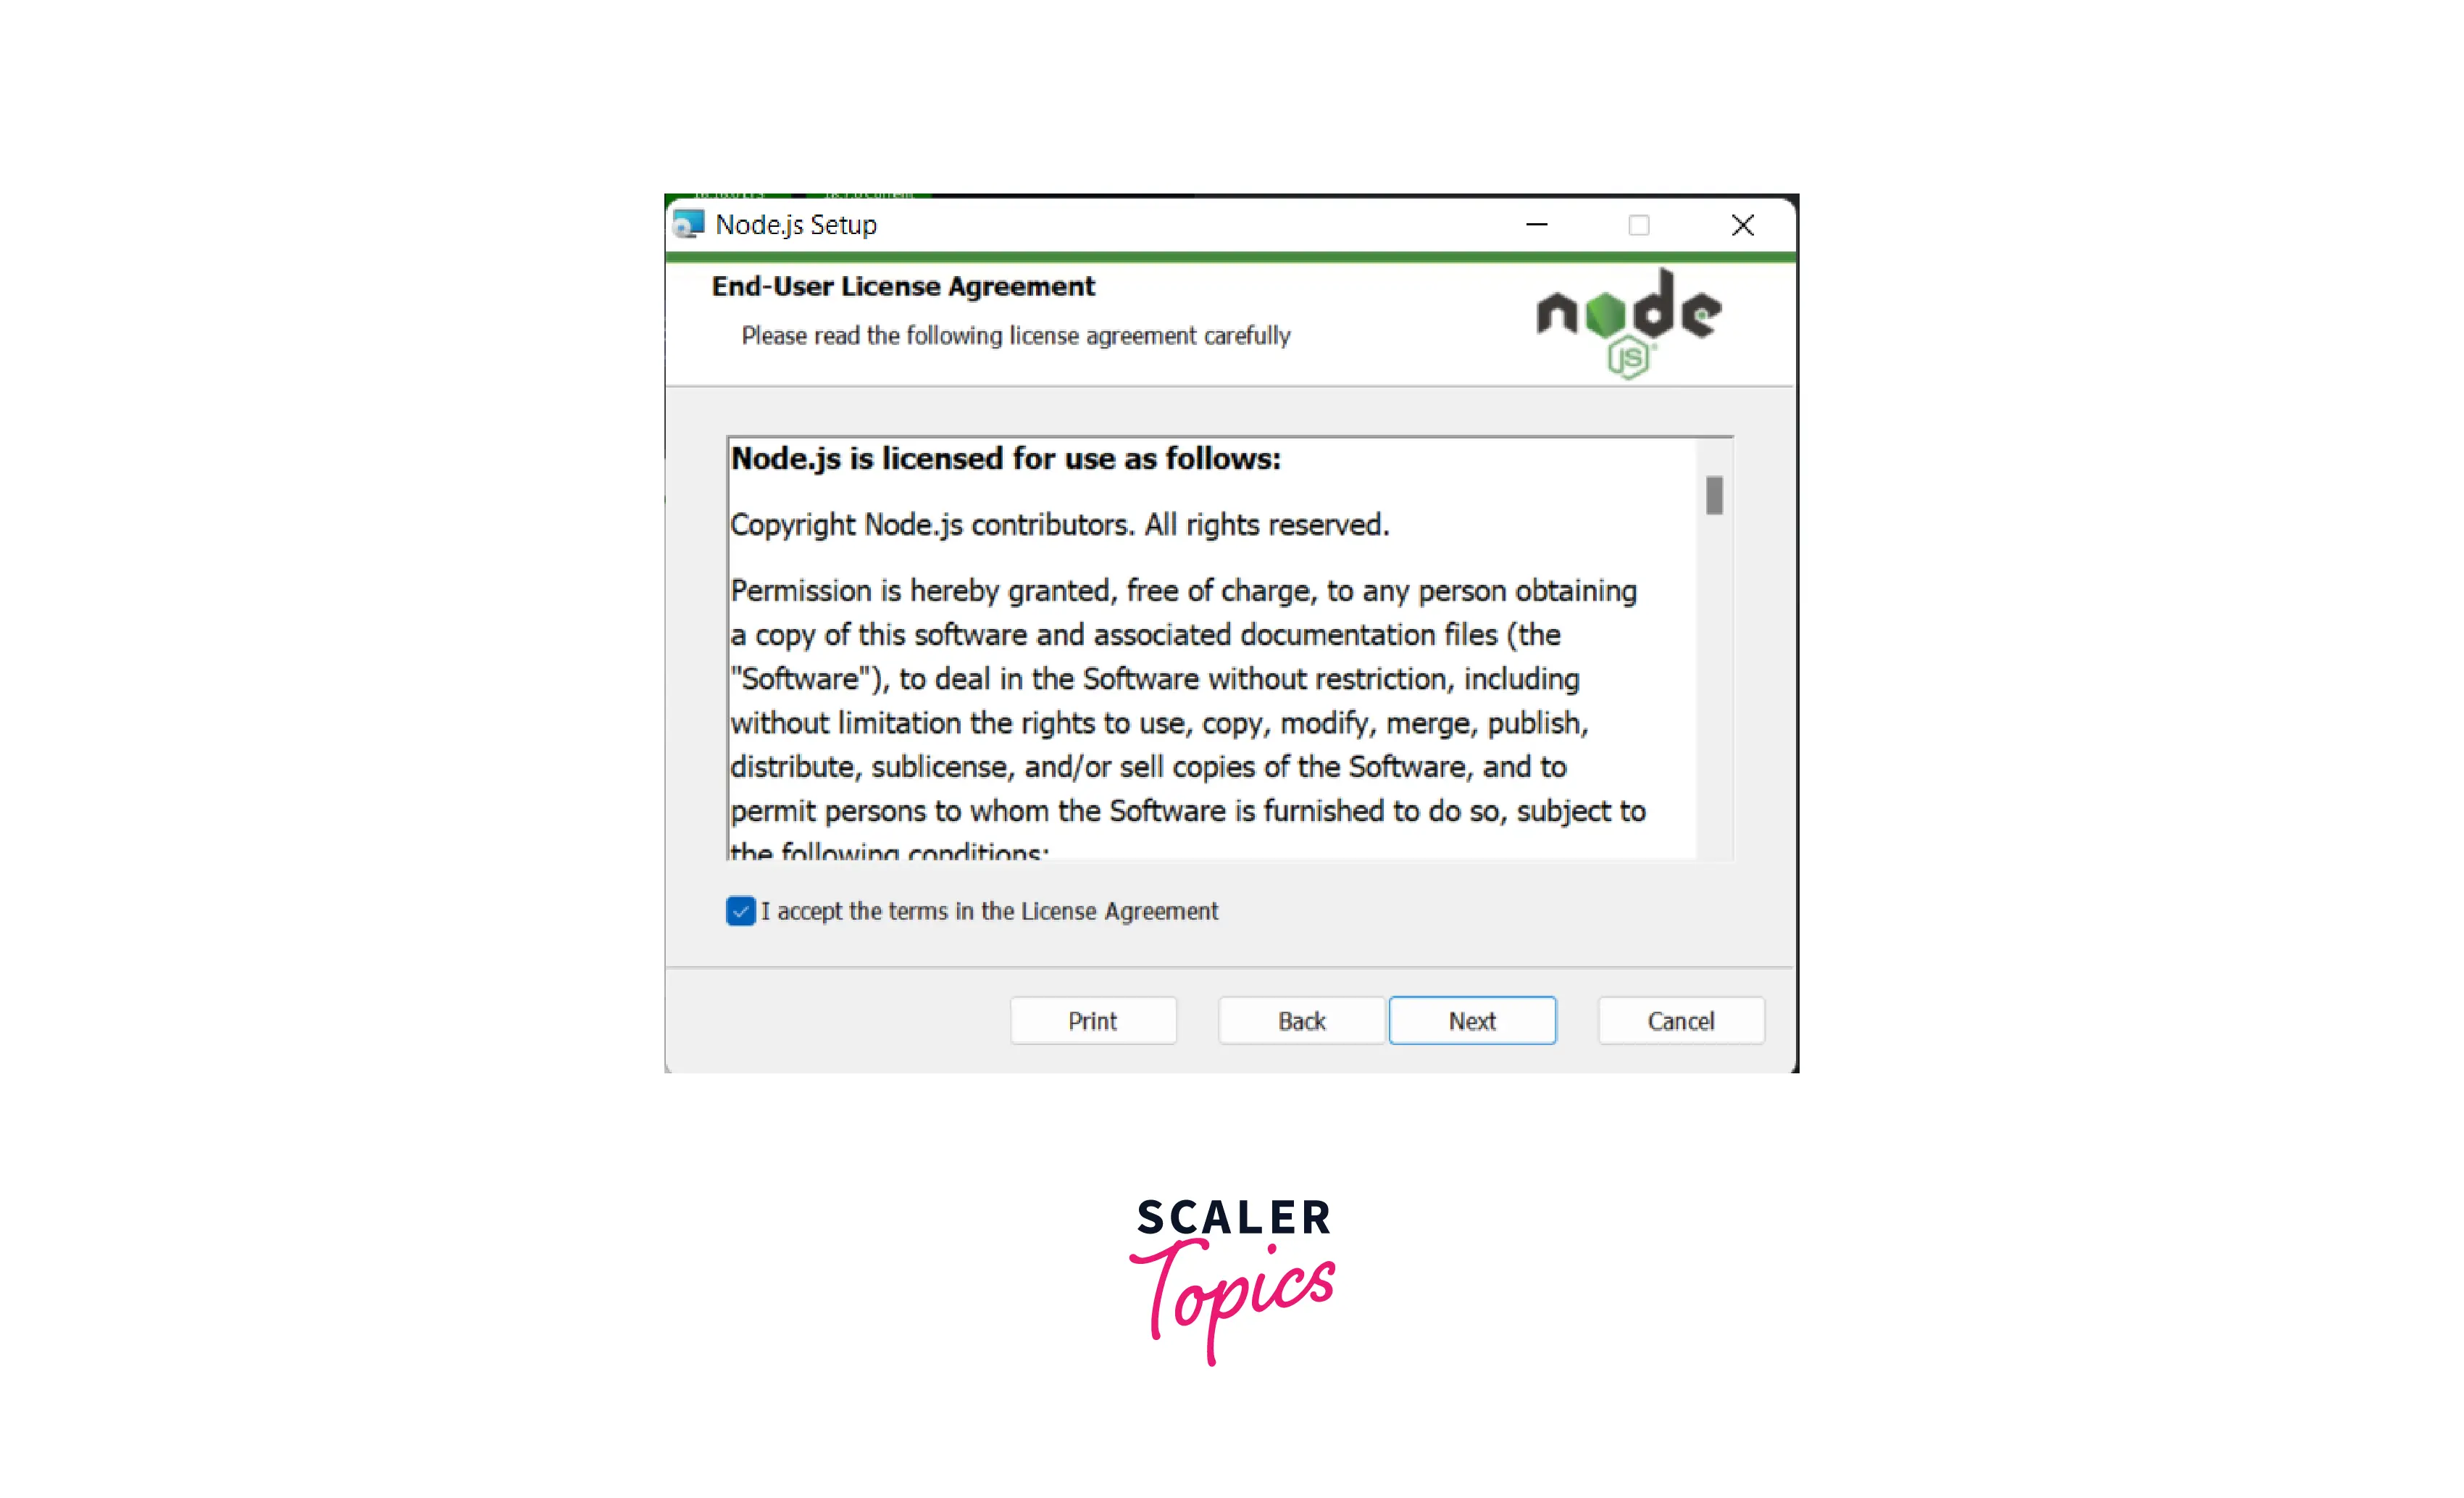
- You would see the End-User License Agreement screen. Check ✅ "I accept the terms in the License Agreement" checkbox. Then click the Next button.
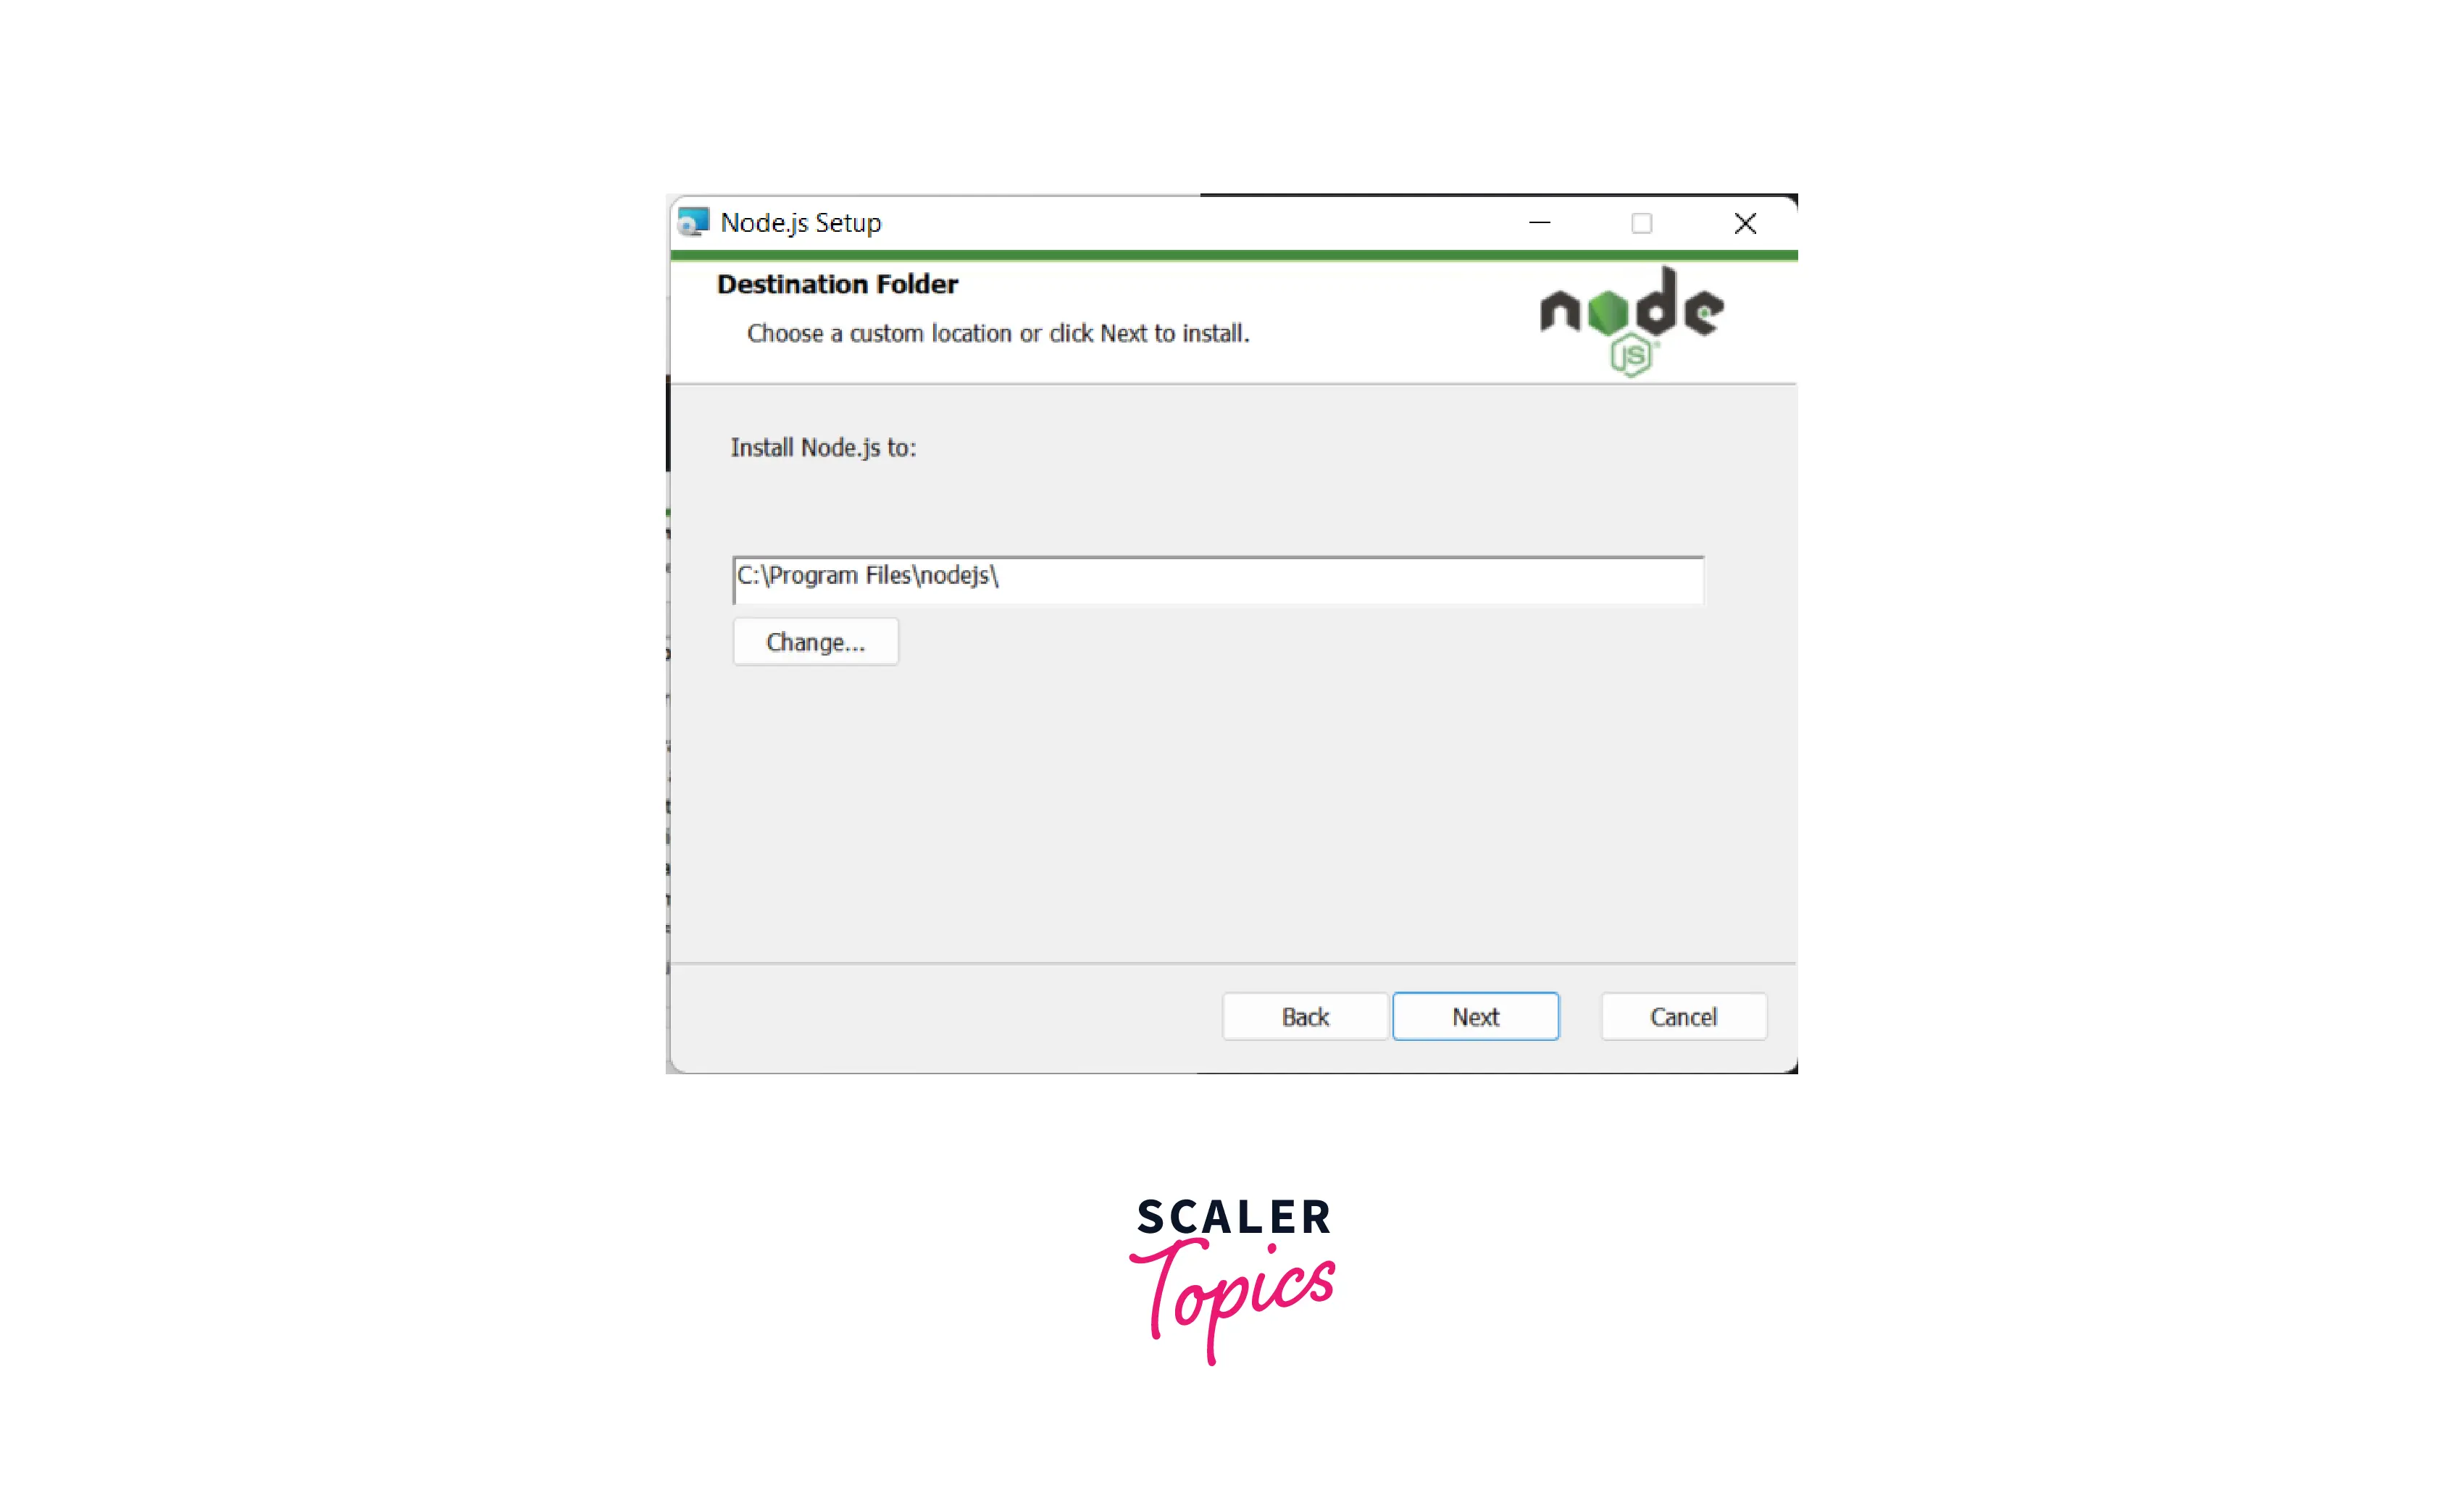
- Select the destination folder, where you want to install Node.js application. By default it will keep C:\Program Files\nodejs\ folder.
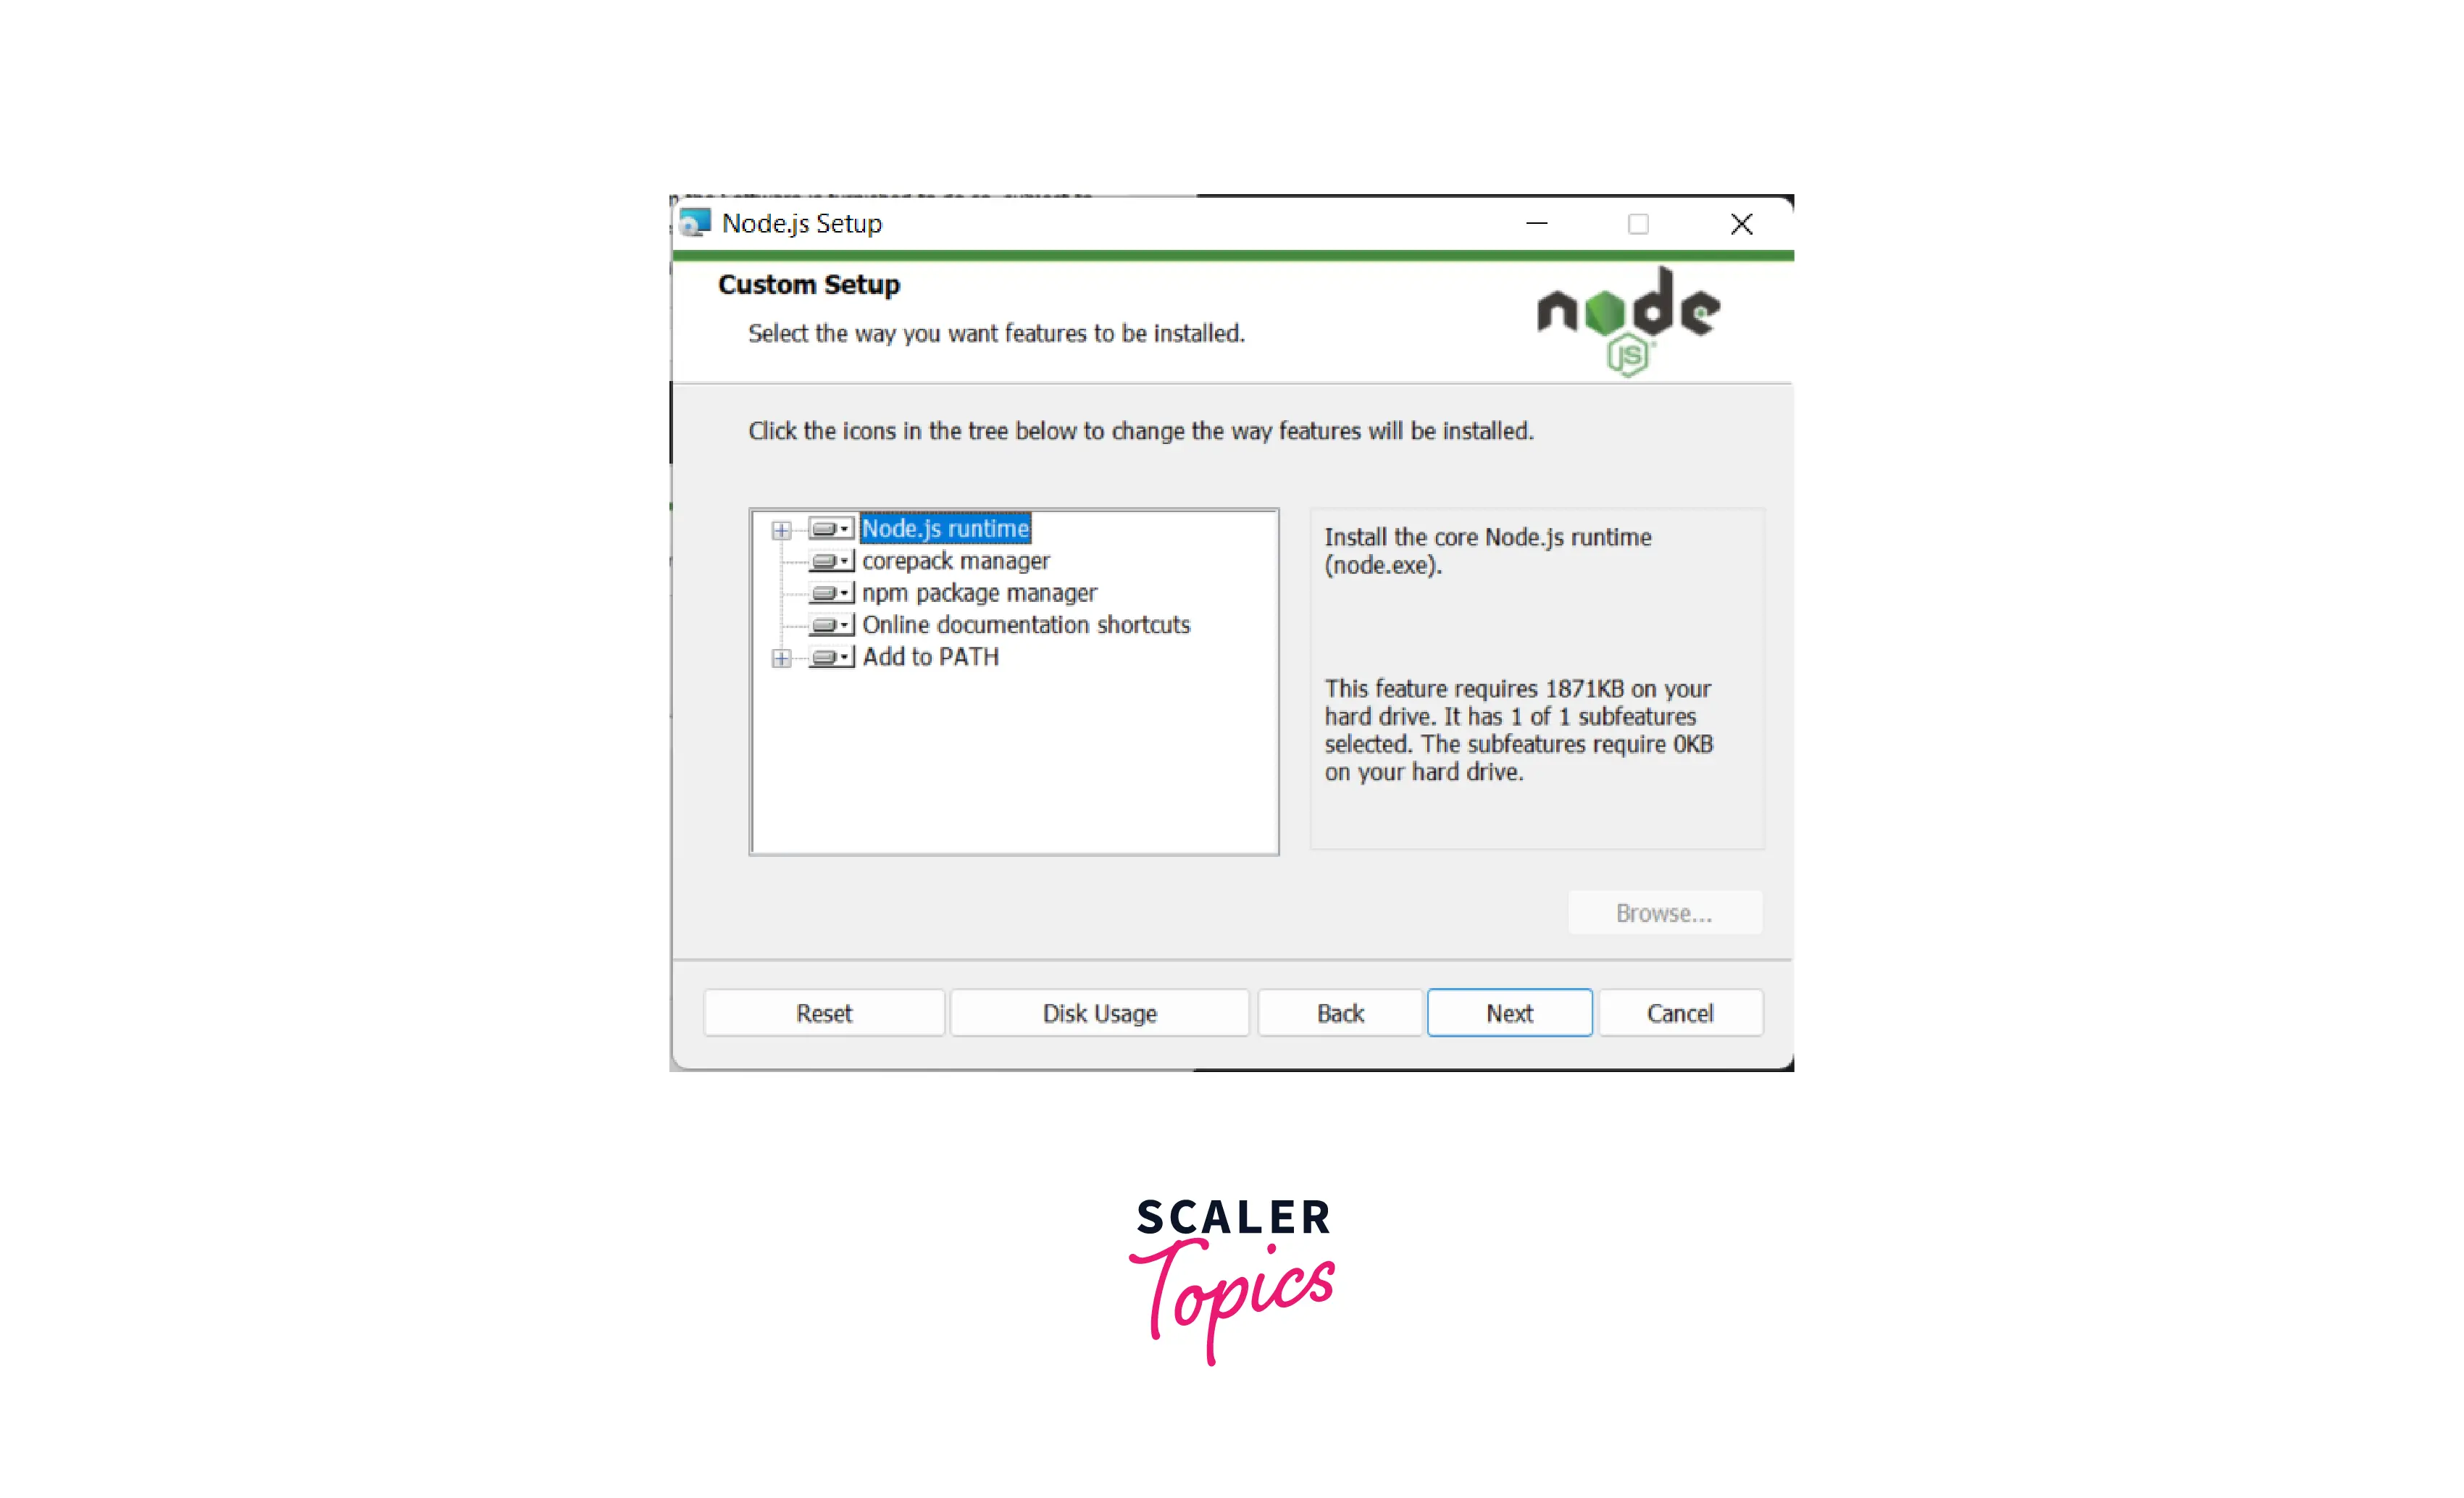
- Customize your setup by selecting the relevant packages that you wanted to install. By default, all packages are included. You can customize or directly proceed by pressing the Next button
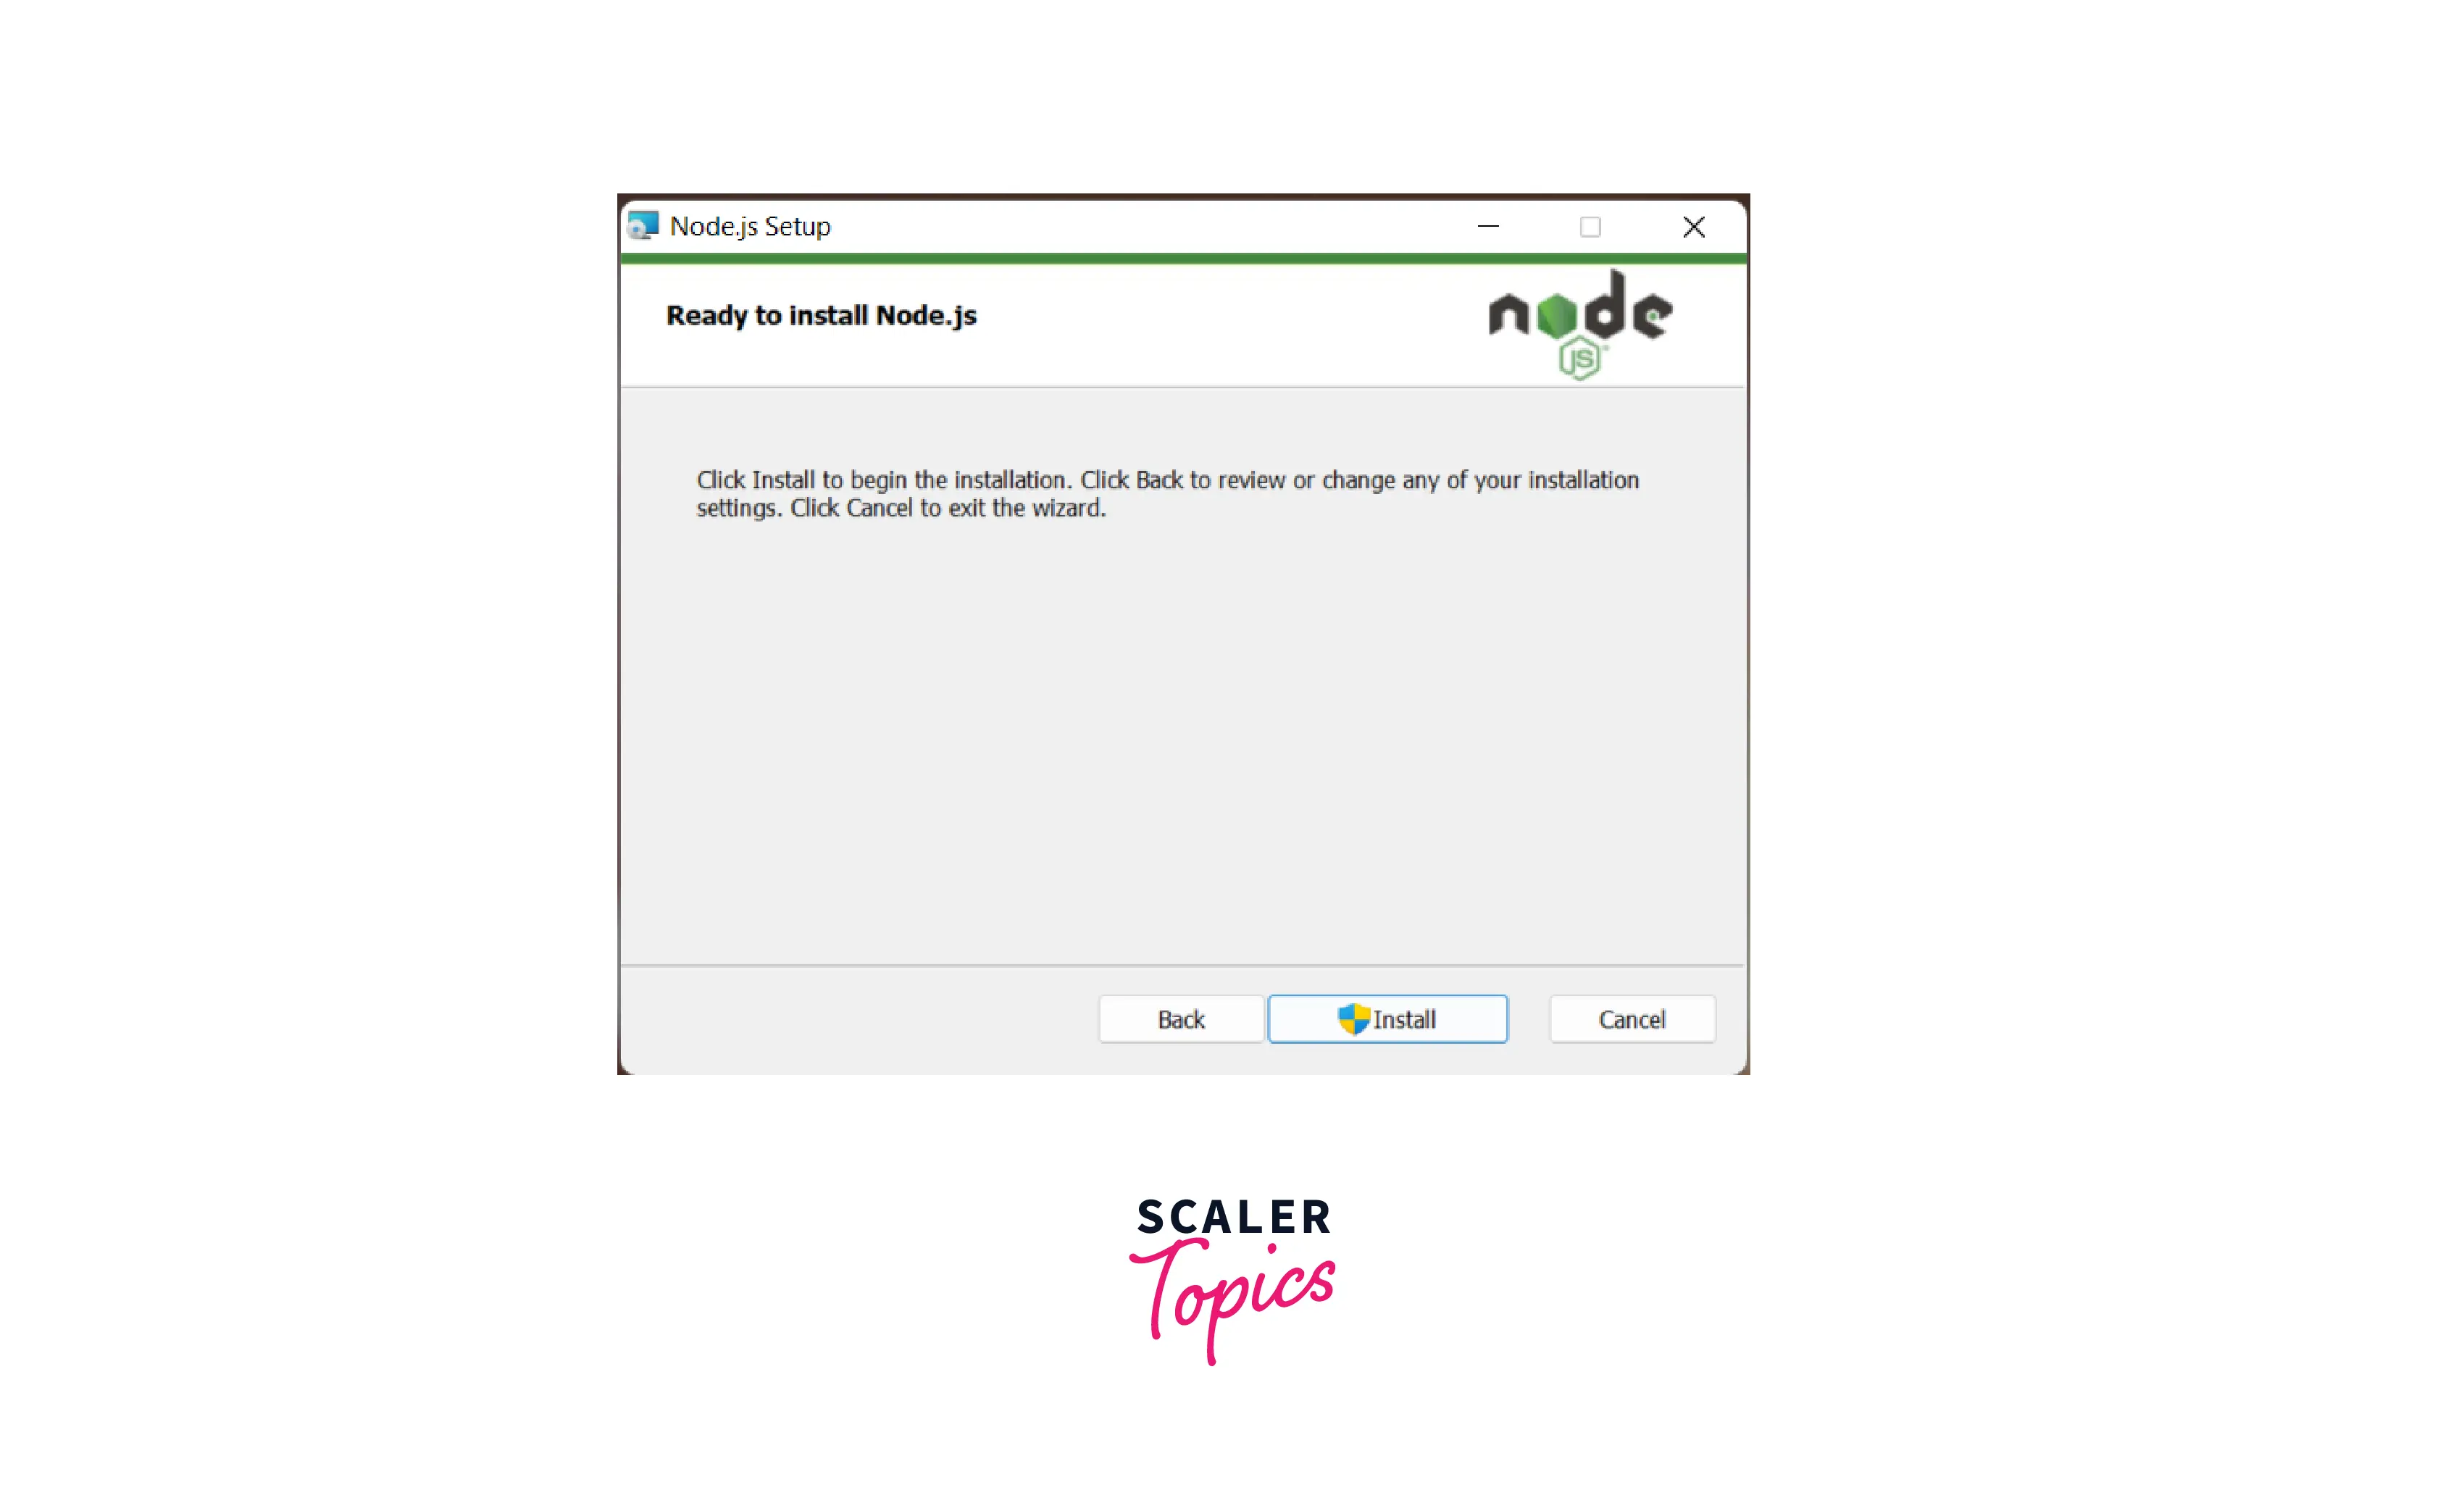
- You can click Install button to proceed on Ready to Install Node.js step.
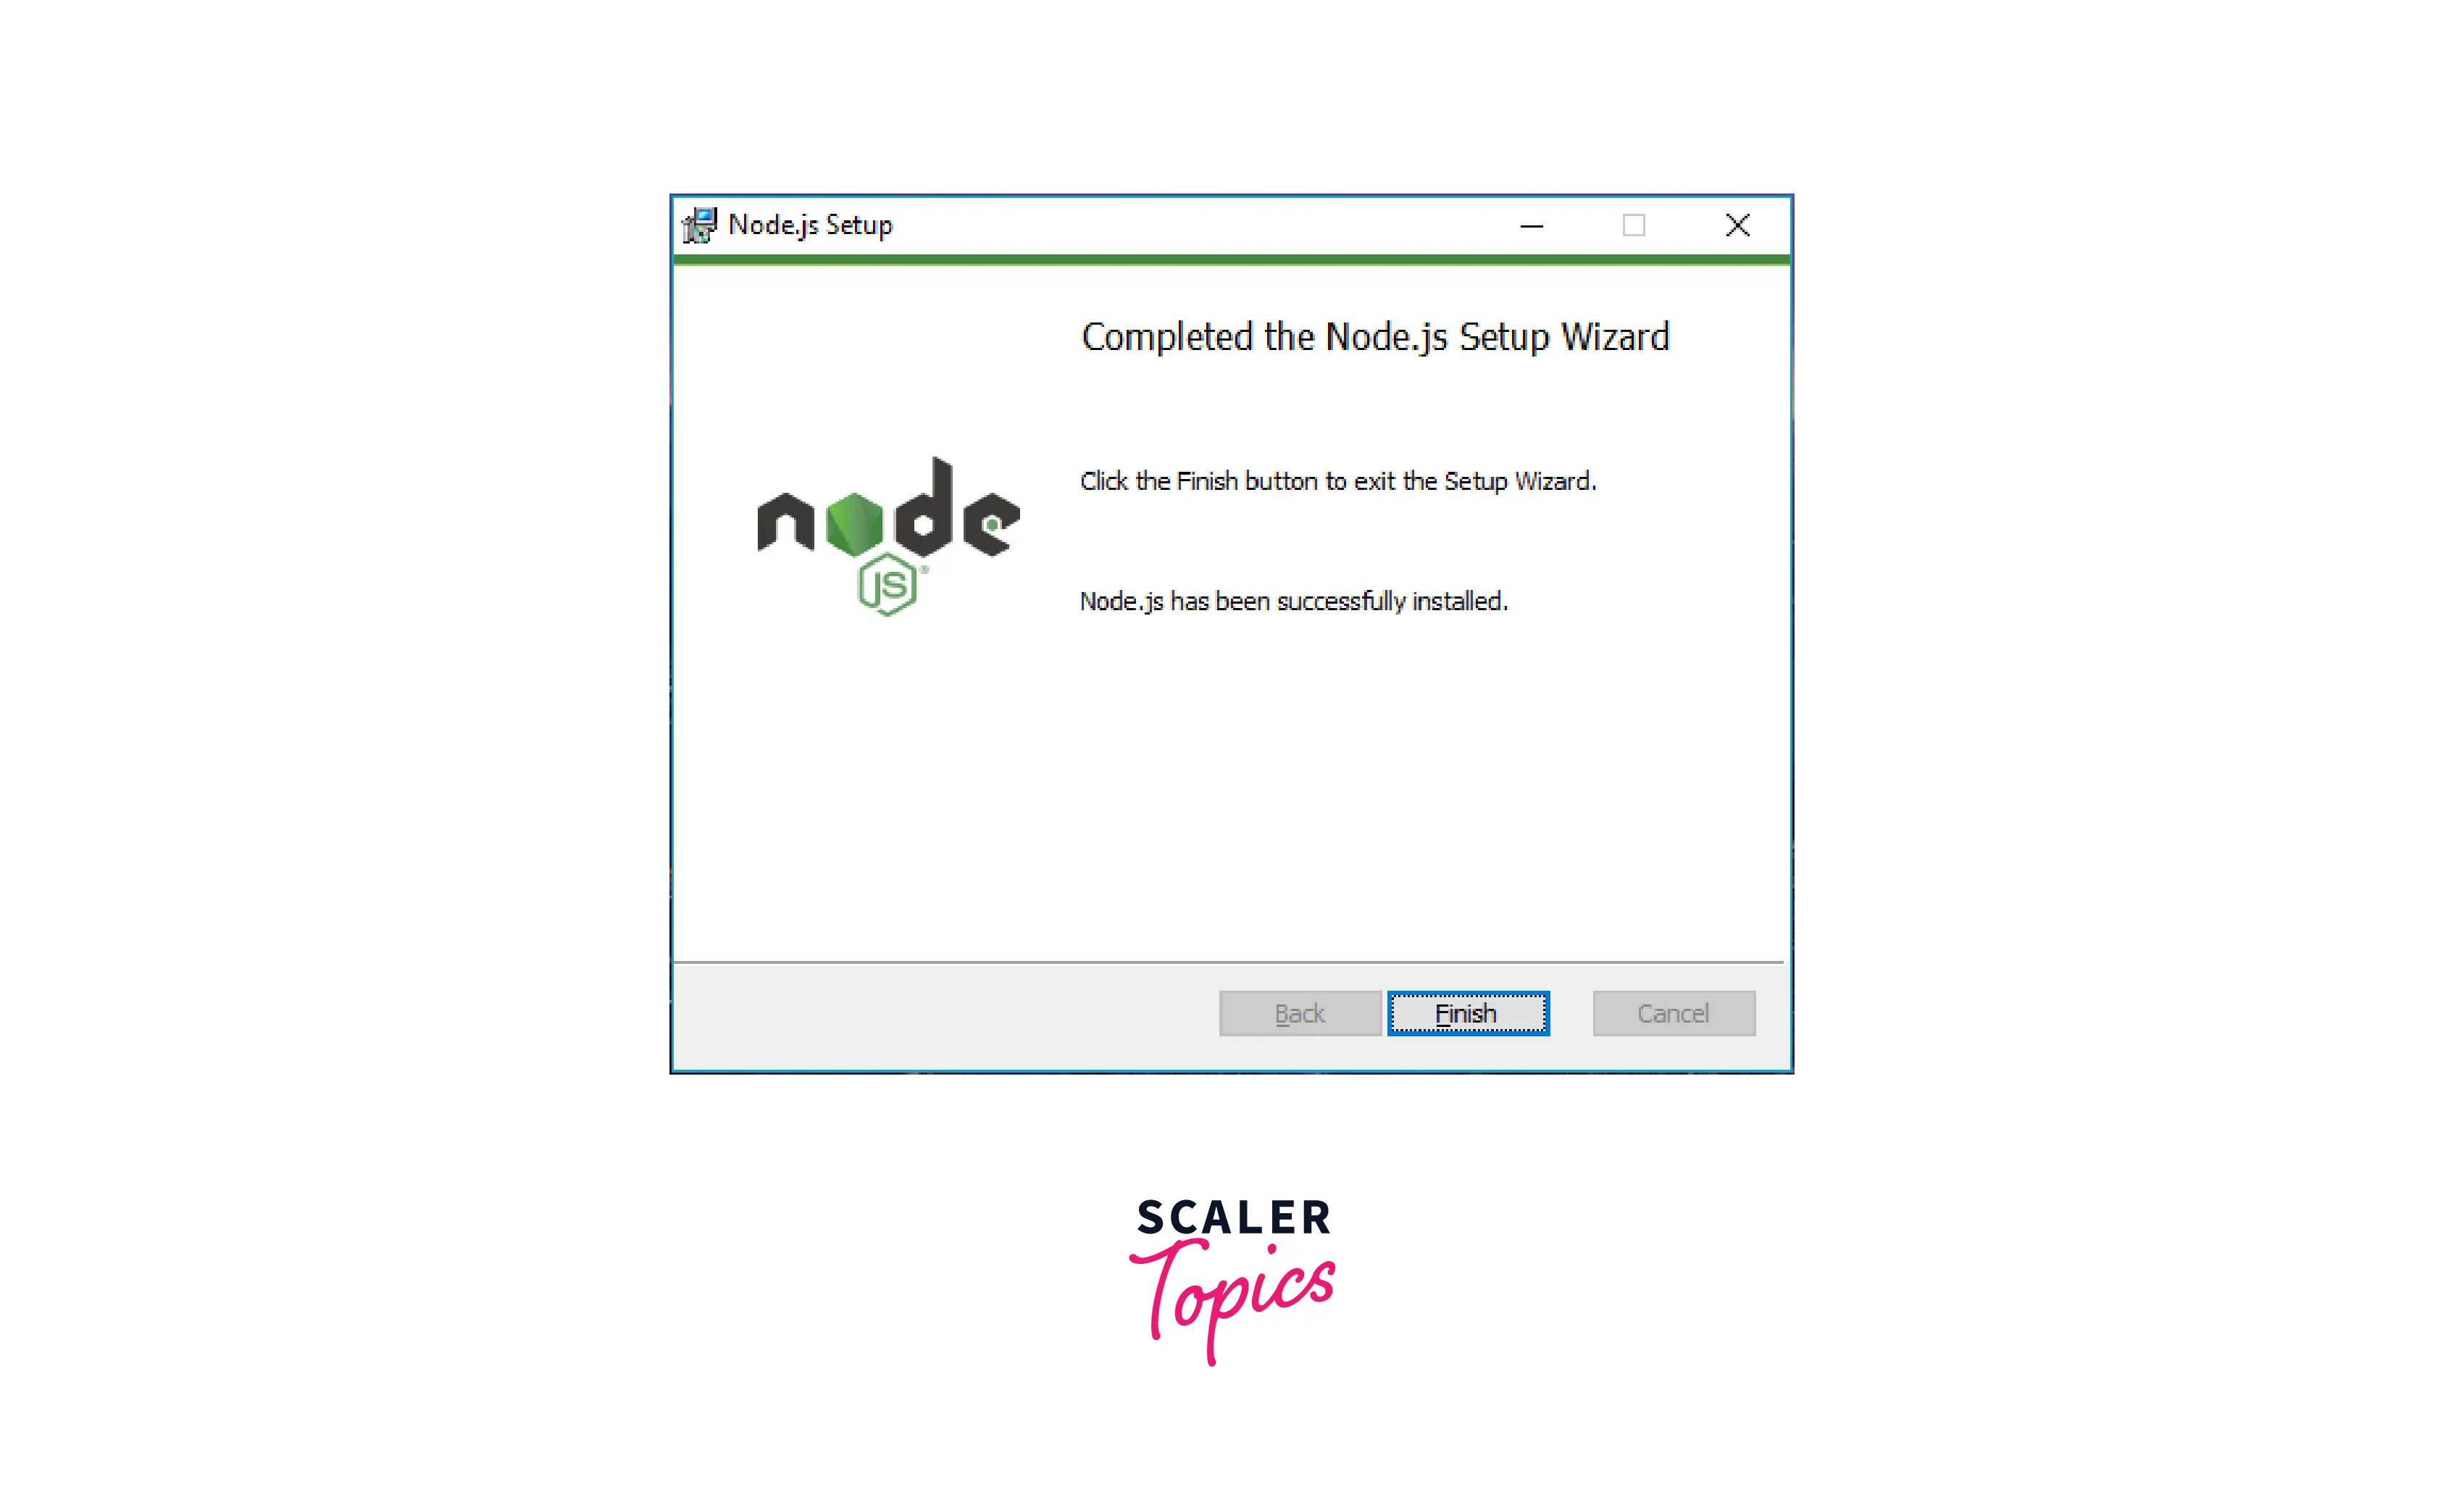
- Finally! Node.js is installed on your machine. Now you can use it.
You can verify whether node and npm is installed.
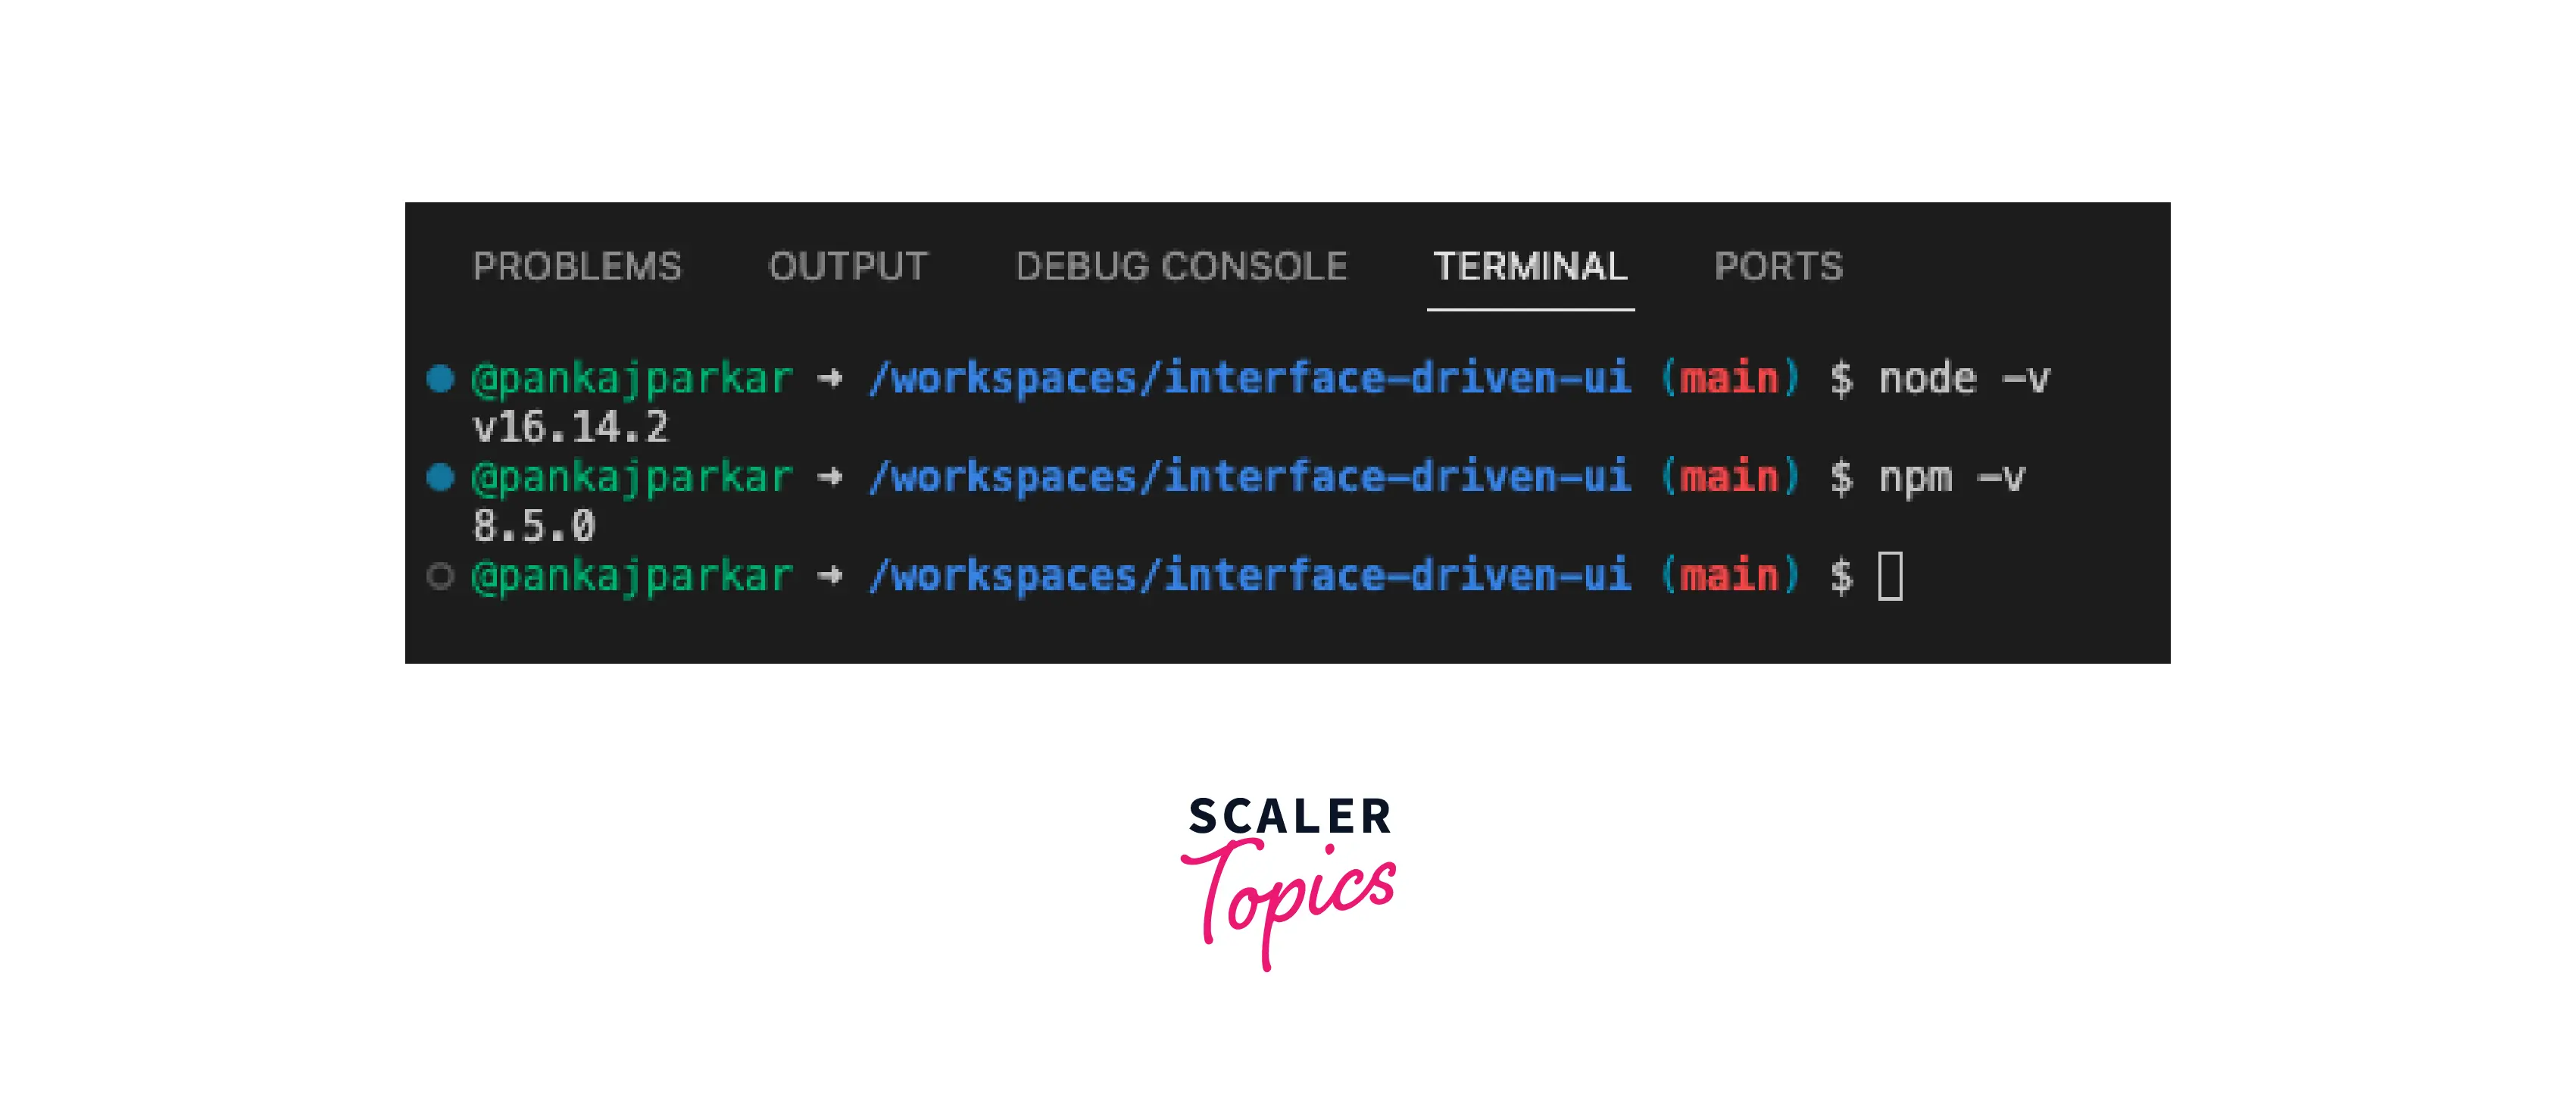
It should print the latest installed version of node (16.14.2) and (8.5.0).
:bulb: You can apply the same steps to install Nodejs on a Mac machine
Turn Learning into Career Growth
Step 2: Install TypeScript (Optional)
The next step is to install Typescript on your local machine. It's a completely optional step. The reason is, along with the Angular project typescript is installed as a part of devDependencies.
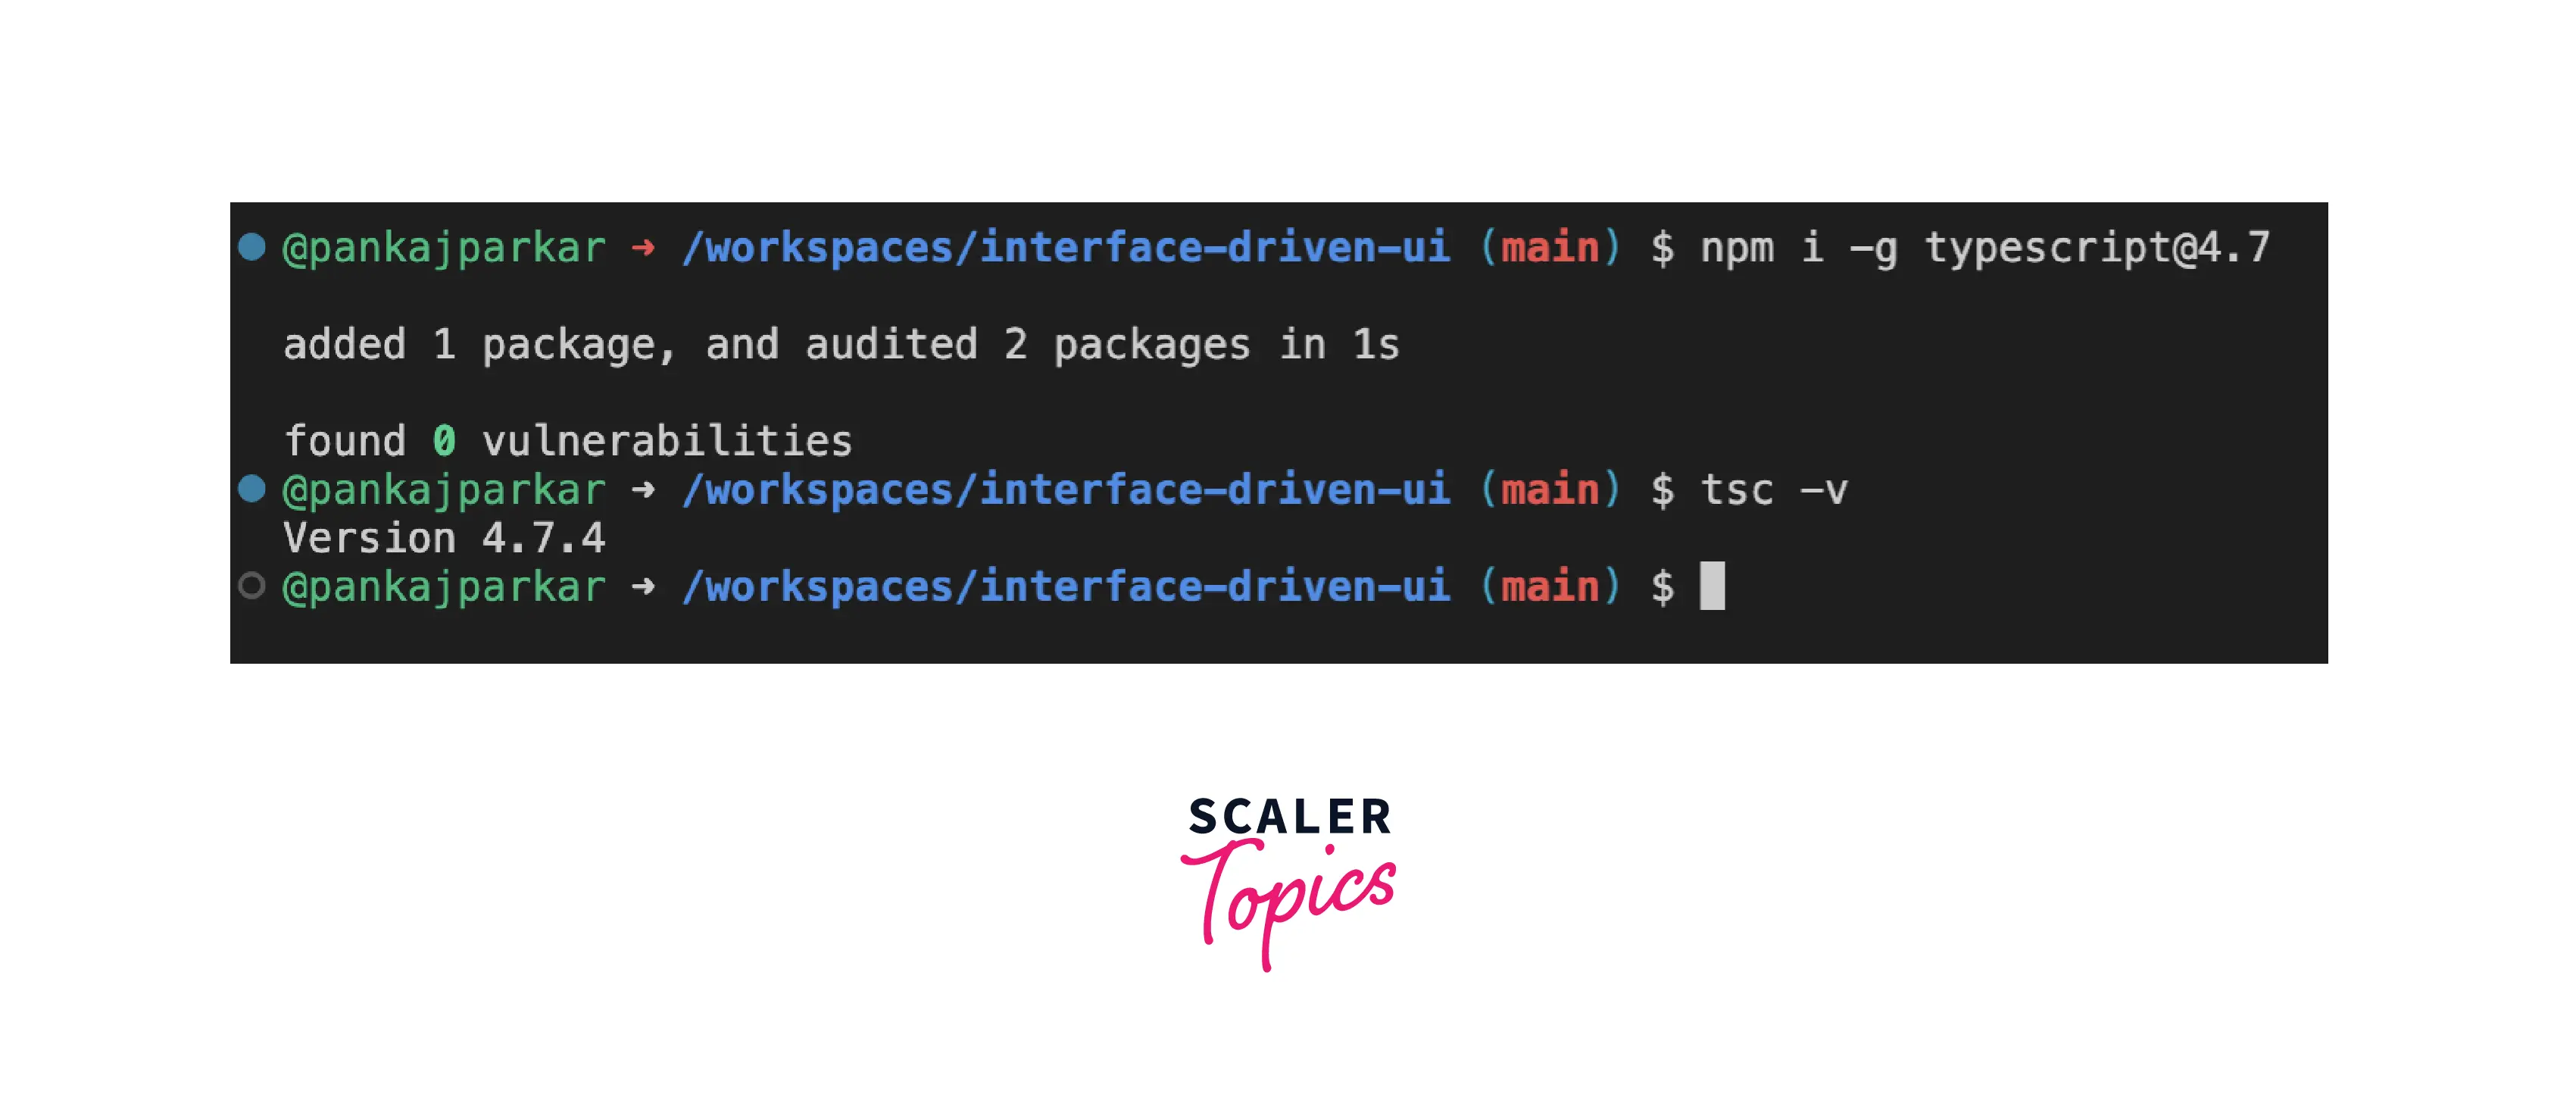
Although, to install a typescript version globally. You can run the below command.
After installation, you can verify whether Typescript is installed.
Output :
Step 3: Install Angular CLI (Angular command line interface)
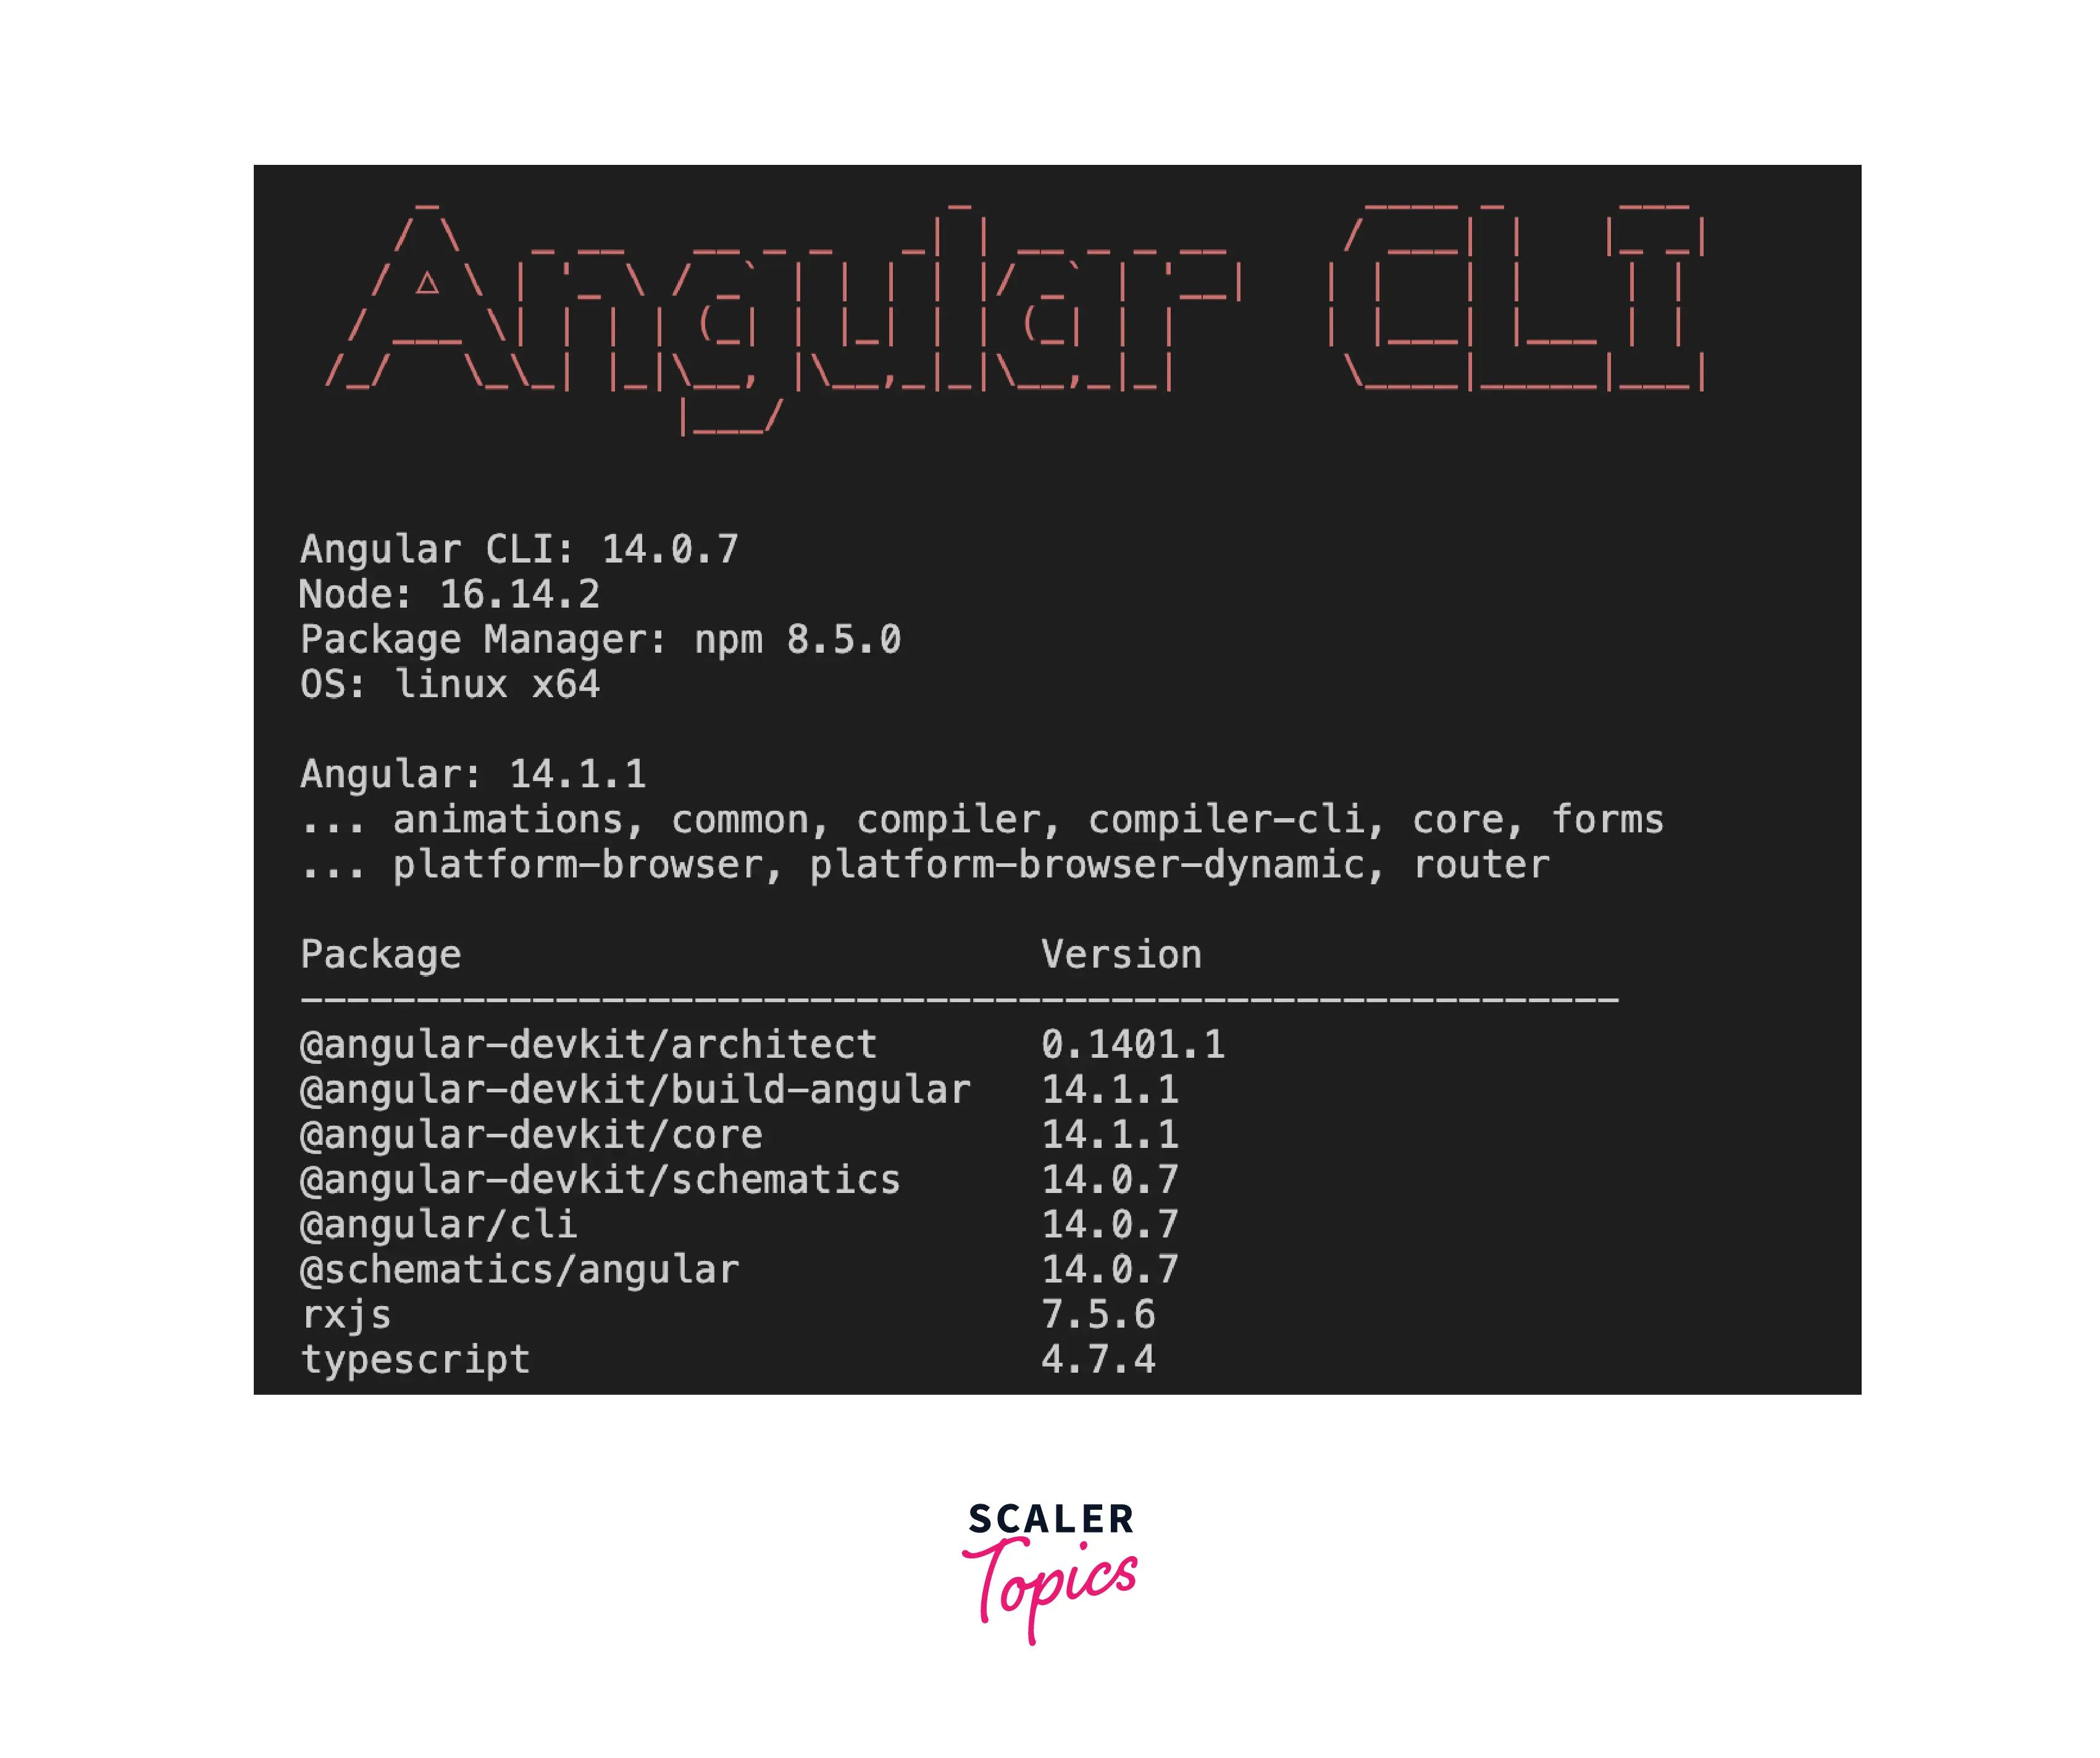
After installing the typescript, let's install @angular/cli. To install @angular/cli version globally. You can run the below command.
After installation, you can verify whether Angular CLI is installed.
Output :
Scaler Placement Report and Statistics
Scaler learners achieved 2.5x salary growth with average post-Scaler CTC reaching ₹23L.
Step 4: Create Angular Project
Next, we will create an Angular Project. For the same purpose, we are going to use Angular CLI that we installed in the last step. We would run the below command to create an Angular App.
After you run the command, it will prompt you for a few questions
- Want to enable Analytics?
- Do you like to add Angular routing?
- Which styling format do you like? CSS, SCSS, SASS, LESS.
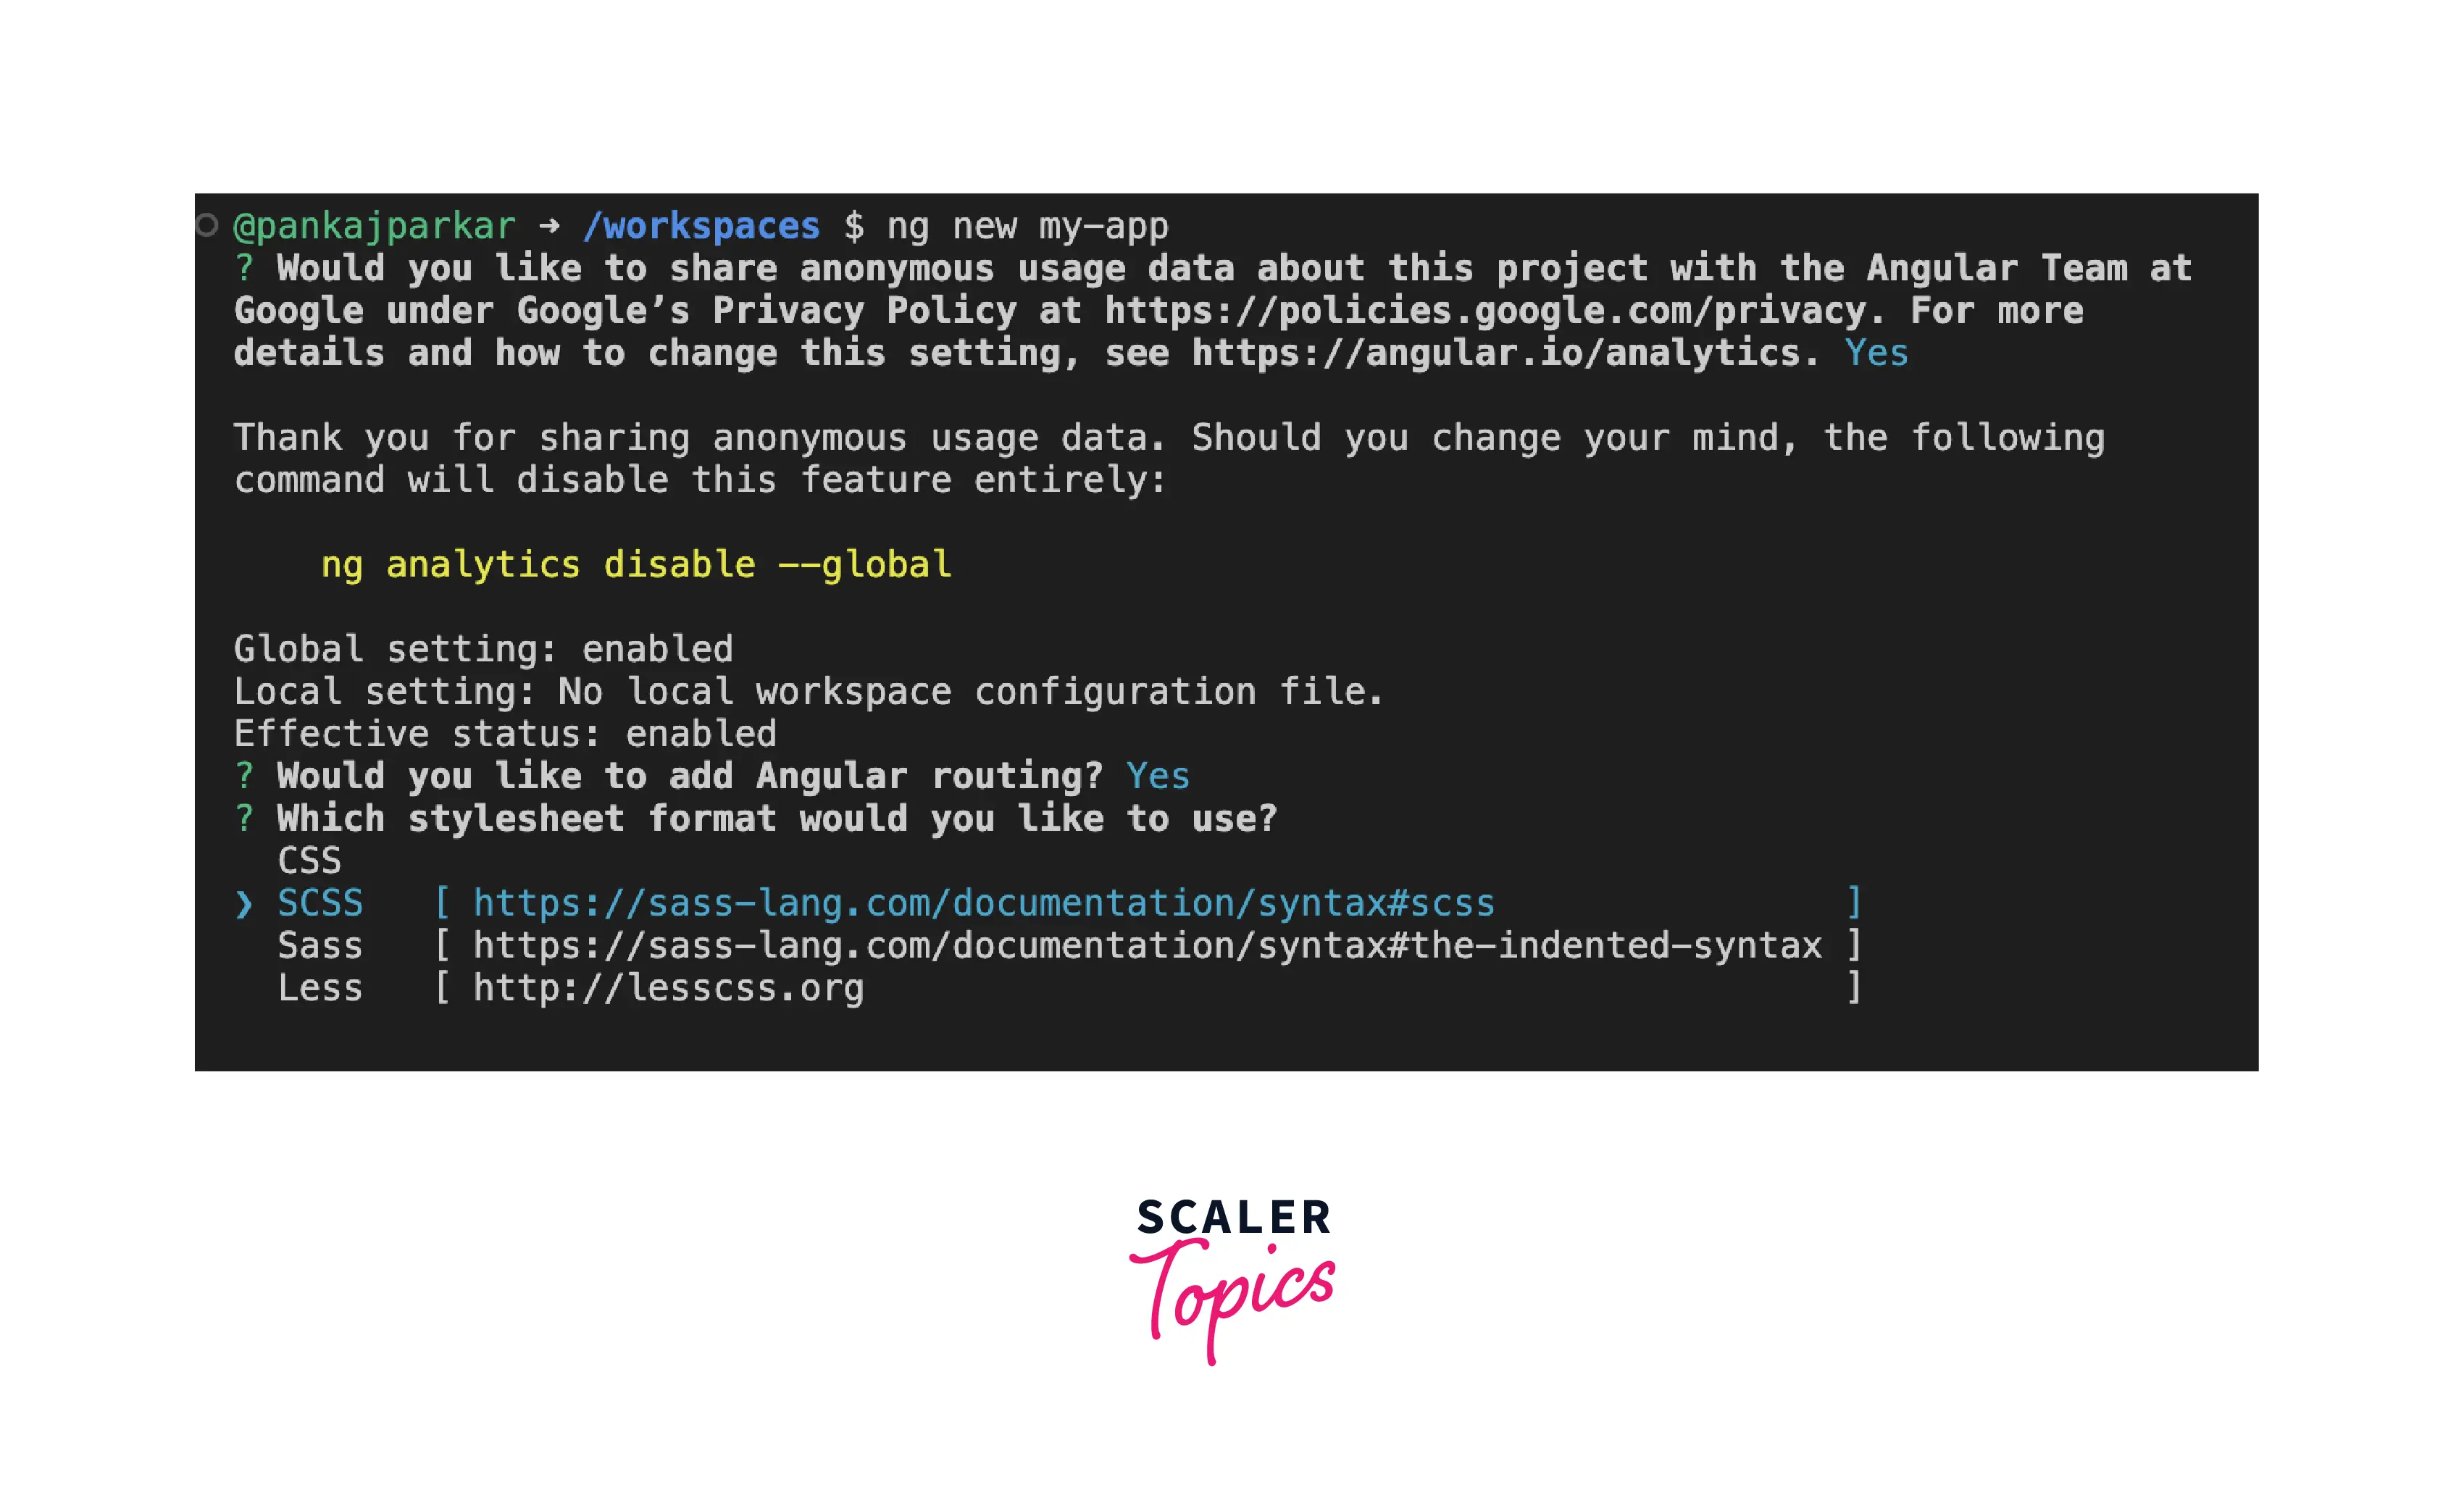
After running this command, you will see a folder my-app populated with a set of files including package.json, angular.json, tsconfig.json, src, etc. Once you fill in all the details, it creates a folder with the name my-app then it starts installing npm packages.
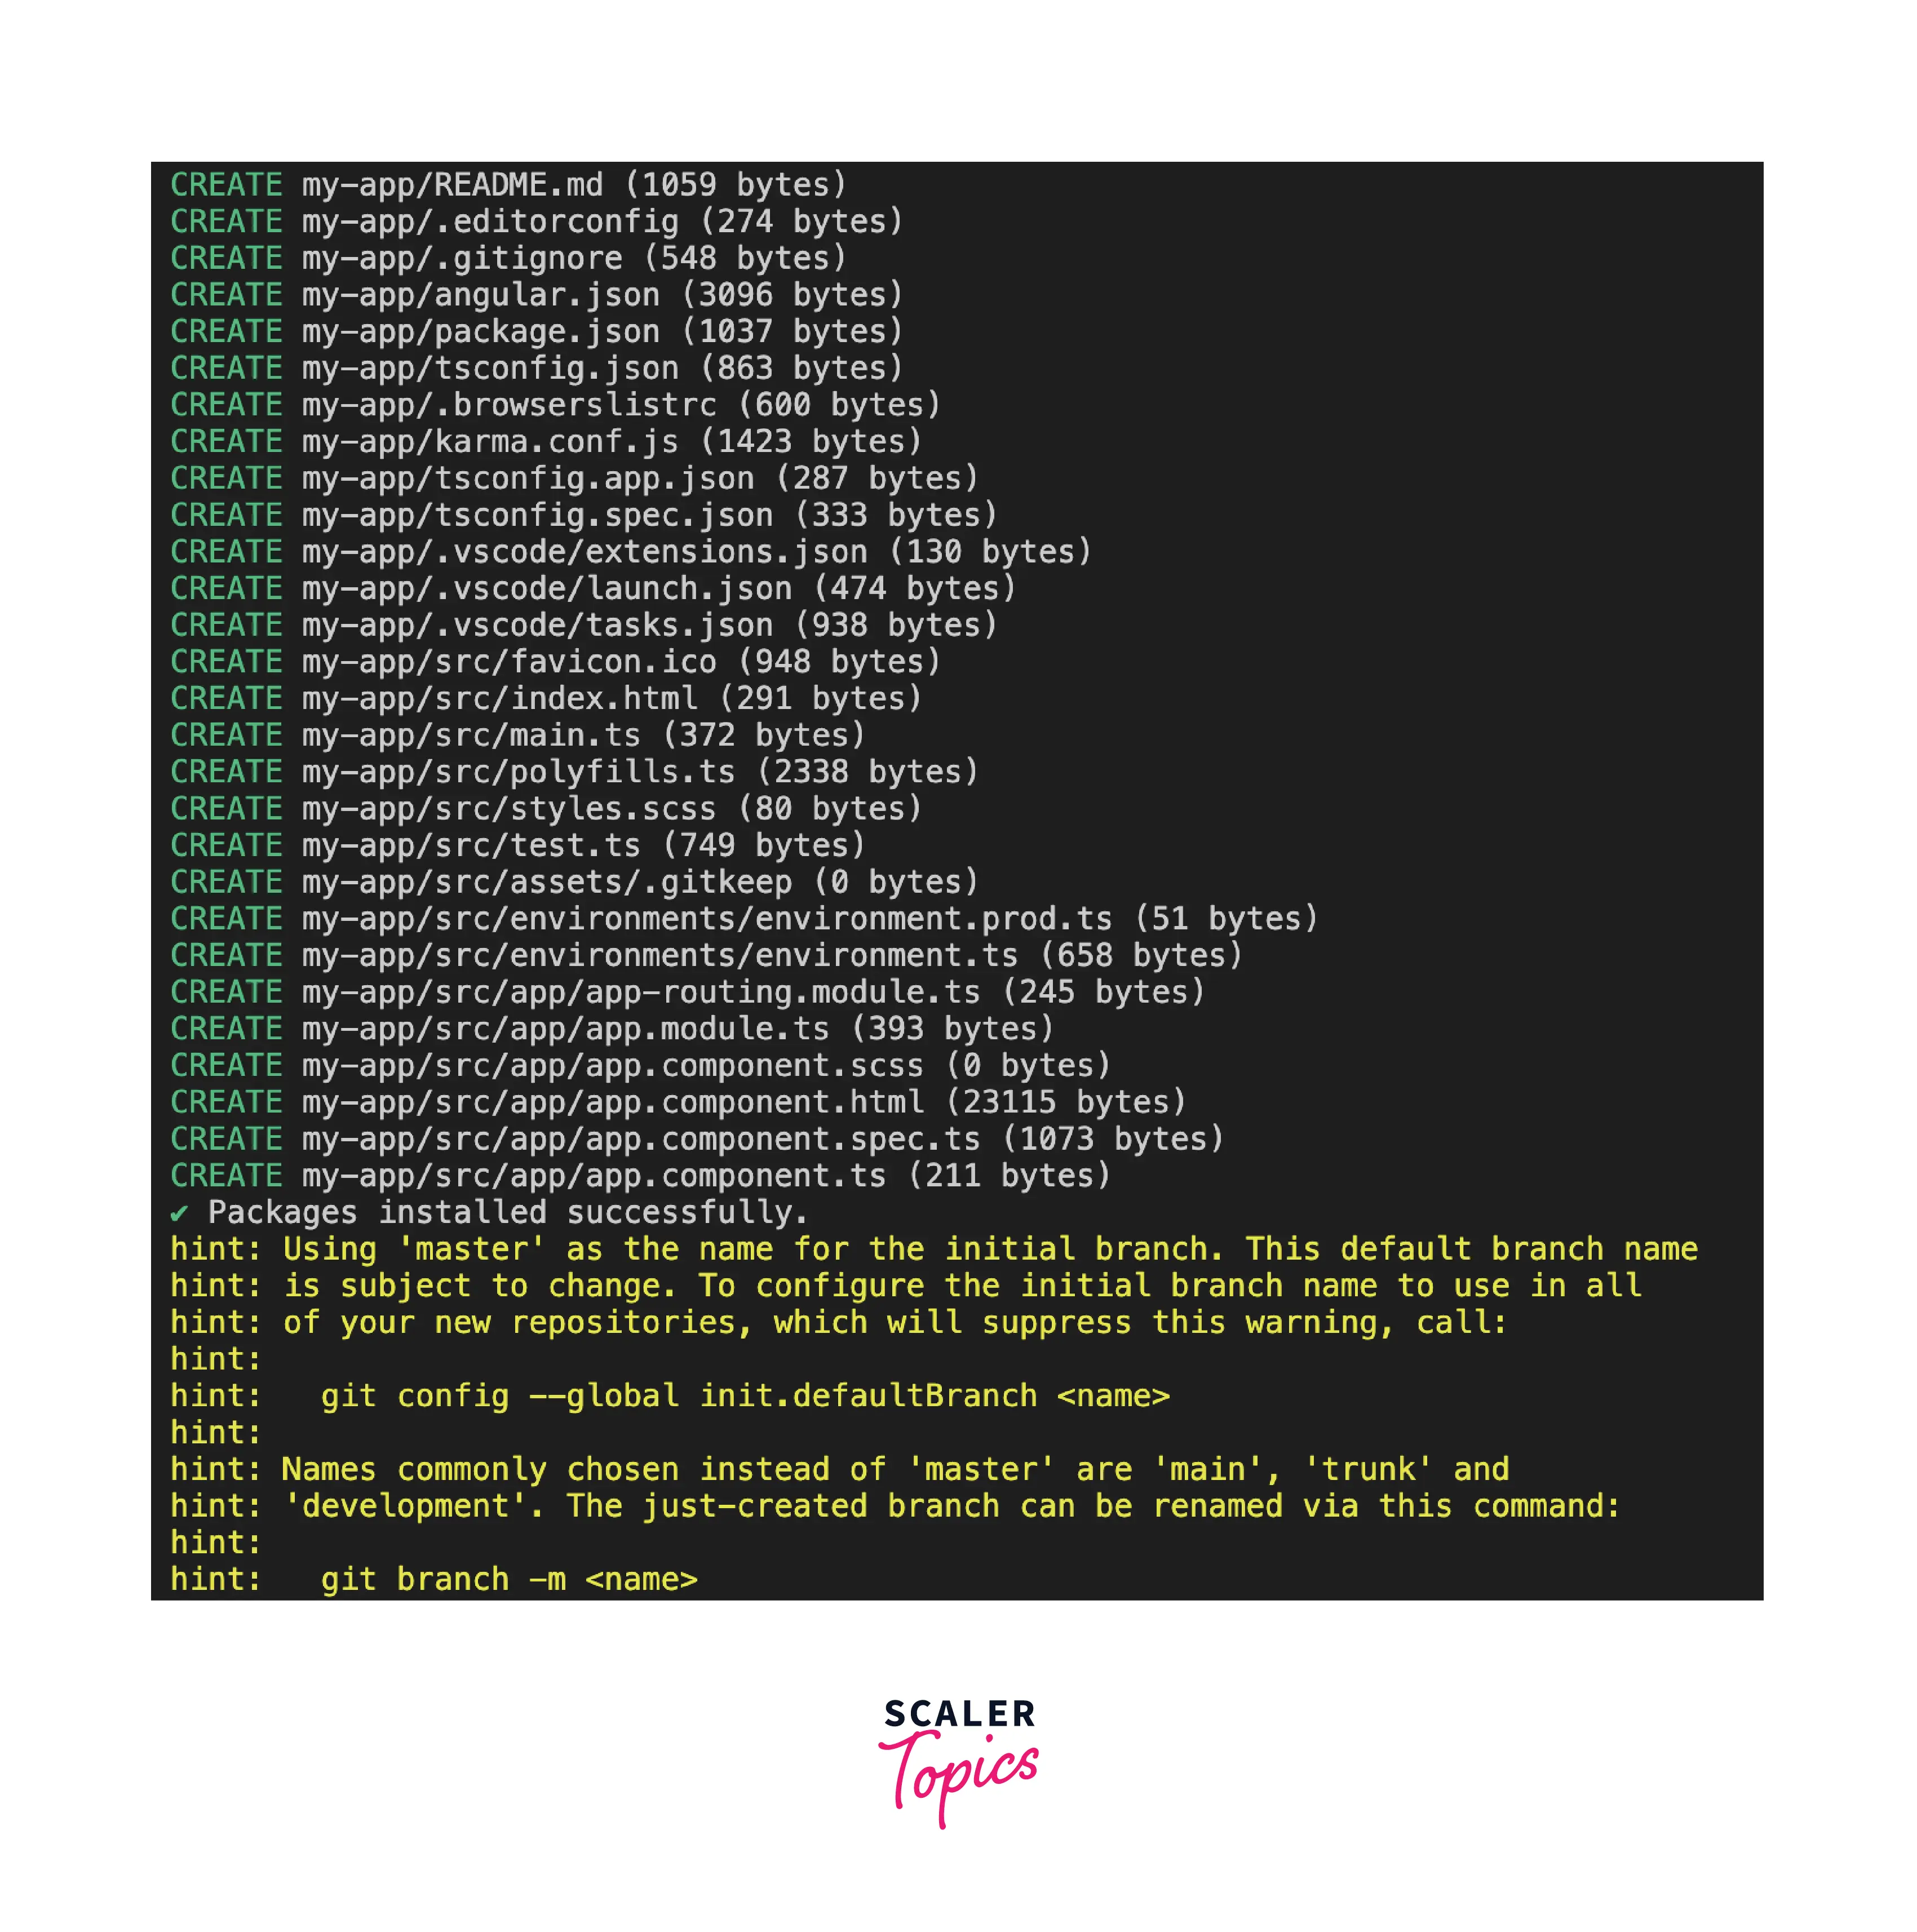
Folder Structure
As ng new command prepared an angular project for you. It produces the below folder structure.
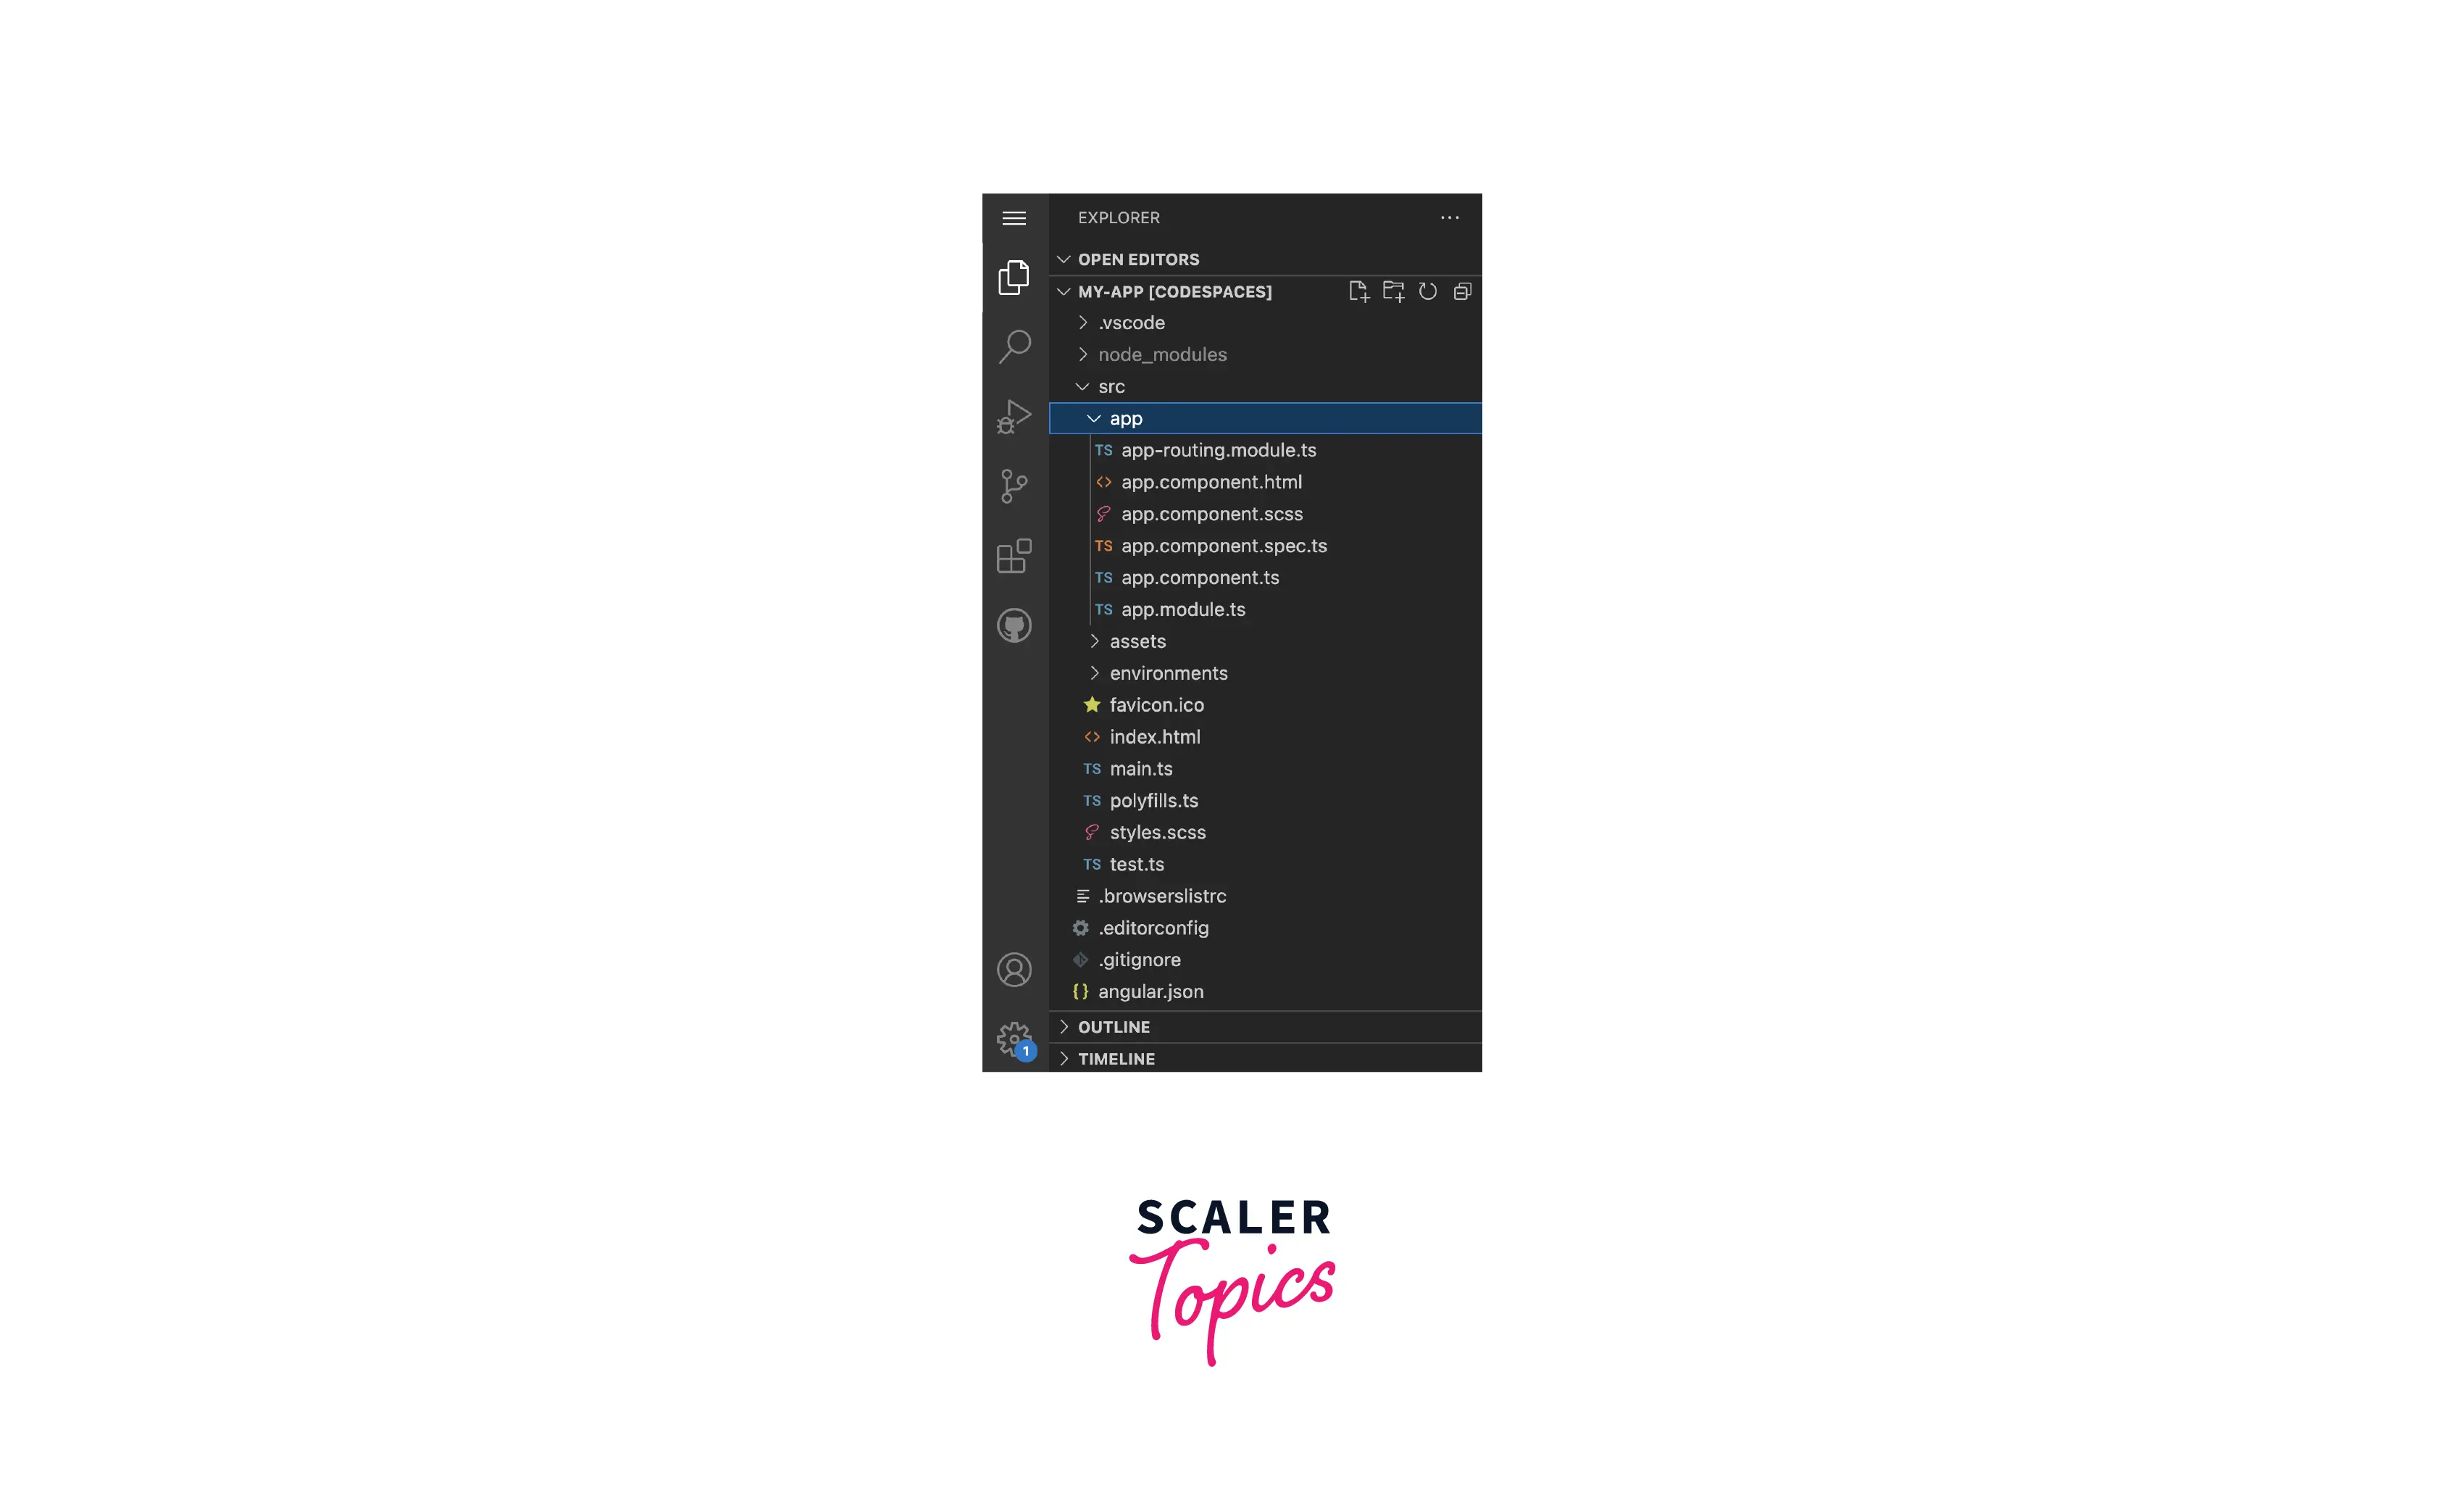
Understanding the folder structure
- node_modules - Installed dependencies from package.json
- src - This is the main Source code folder
- app - Contains all angular-related files.
- assets - Contains resources that are going to be hosted with the build.
- environments - Environment configurations
- index.html - Main index.html file
- main.ts - Entry point of angular application, contains bootstrapping
- polyfills.ts - Backward compatibility js references.
- styles.scss - Global CSS
- angular.json - CLI refers to angular.json configuration while executing commands.
- karma.conf.js - Karma configuration for testing.
- package.json - Packages dependency maintained here.
- tsconfig.json - Typescript configuration.
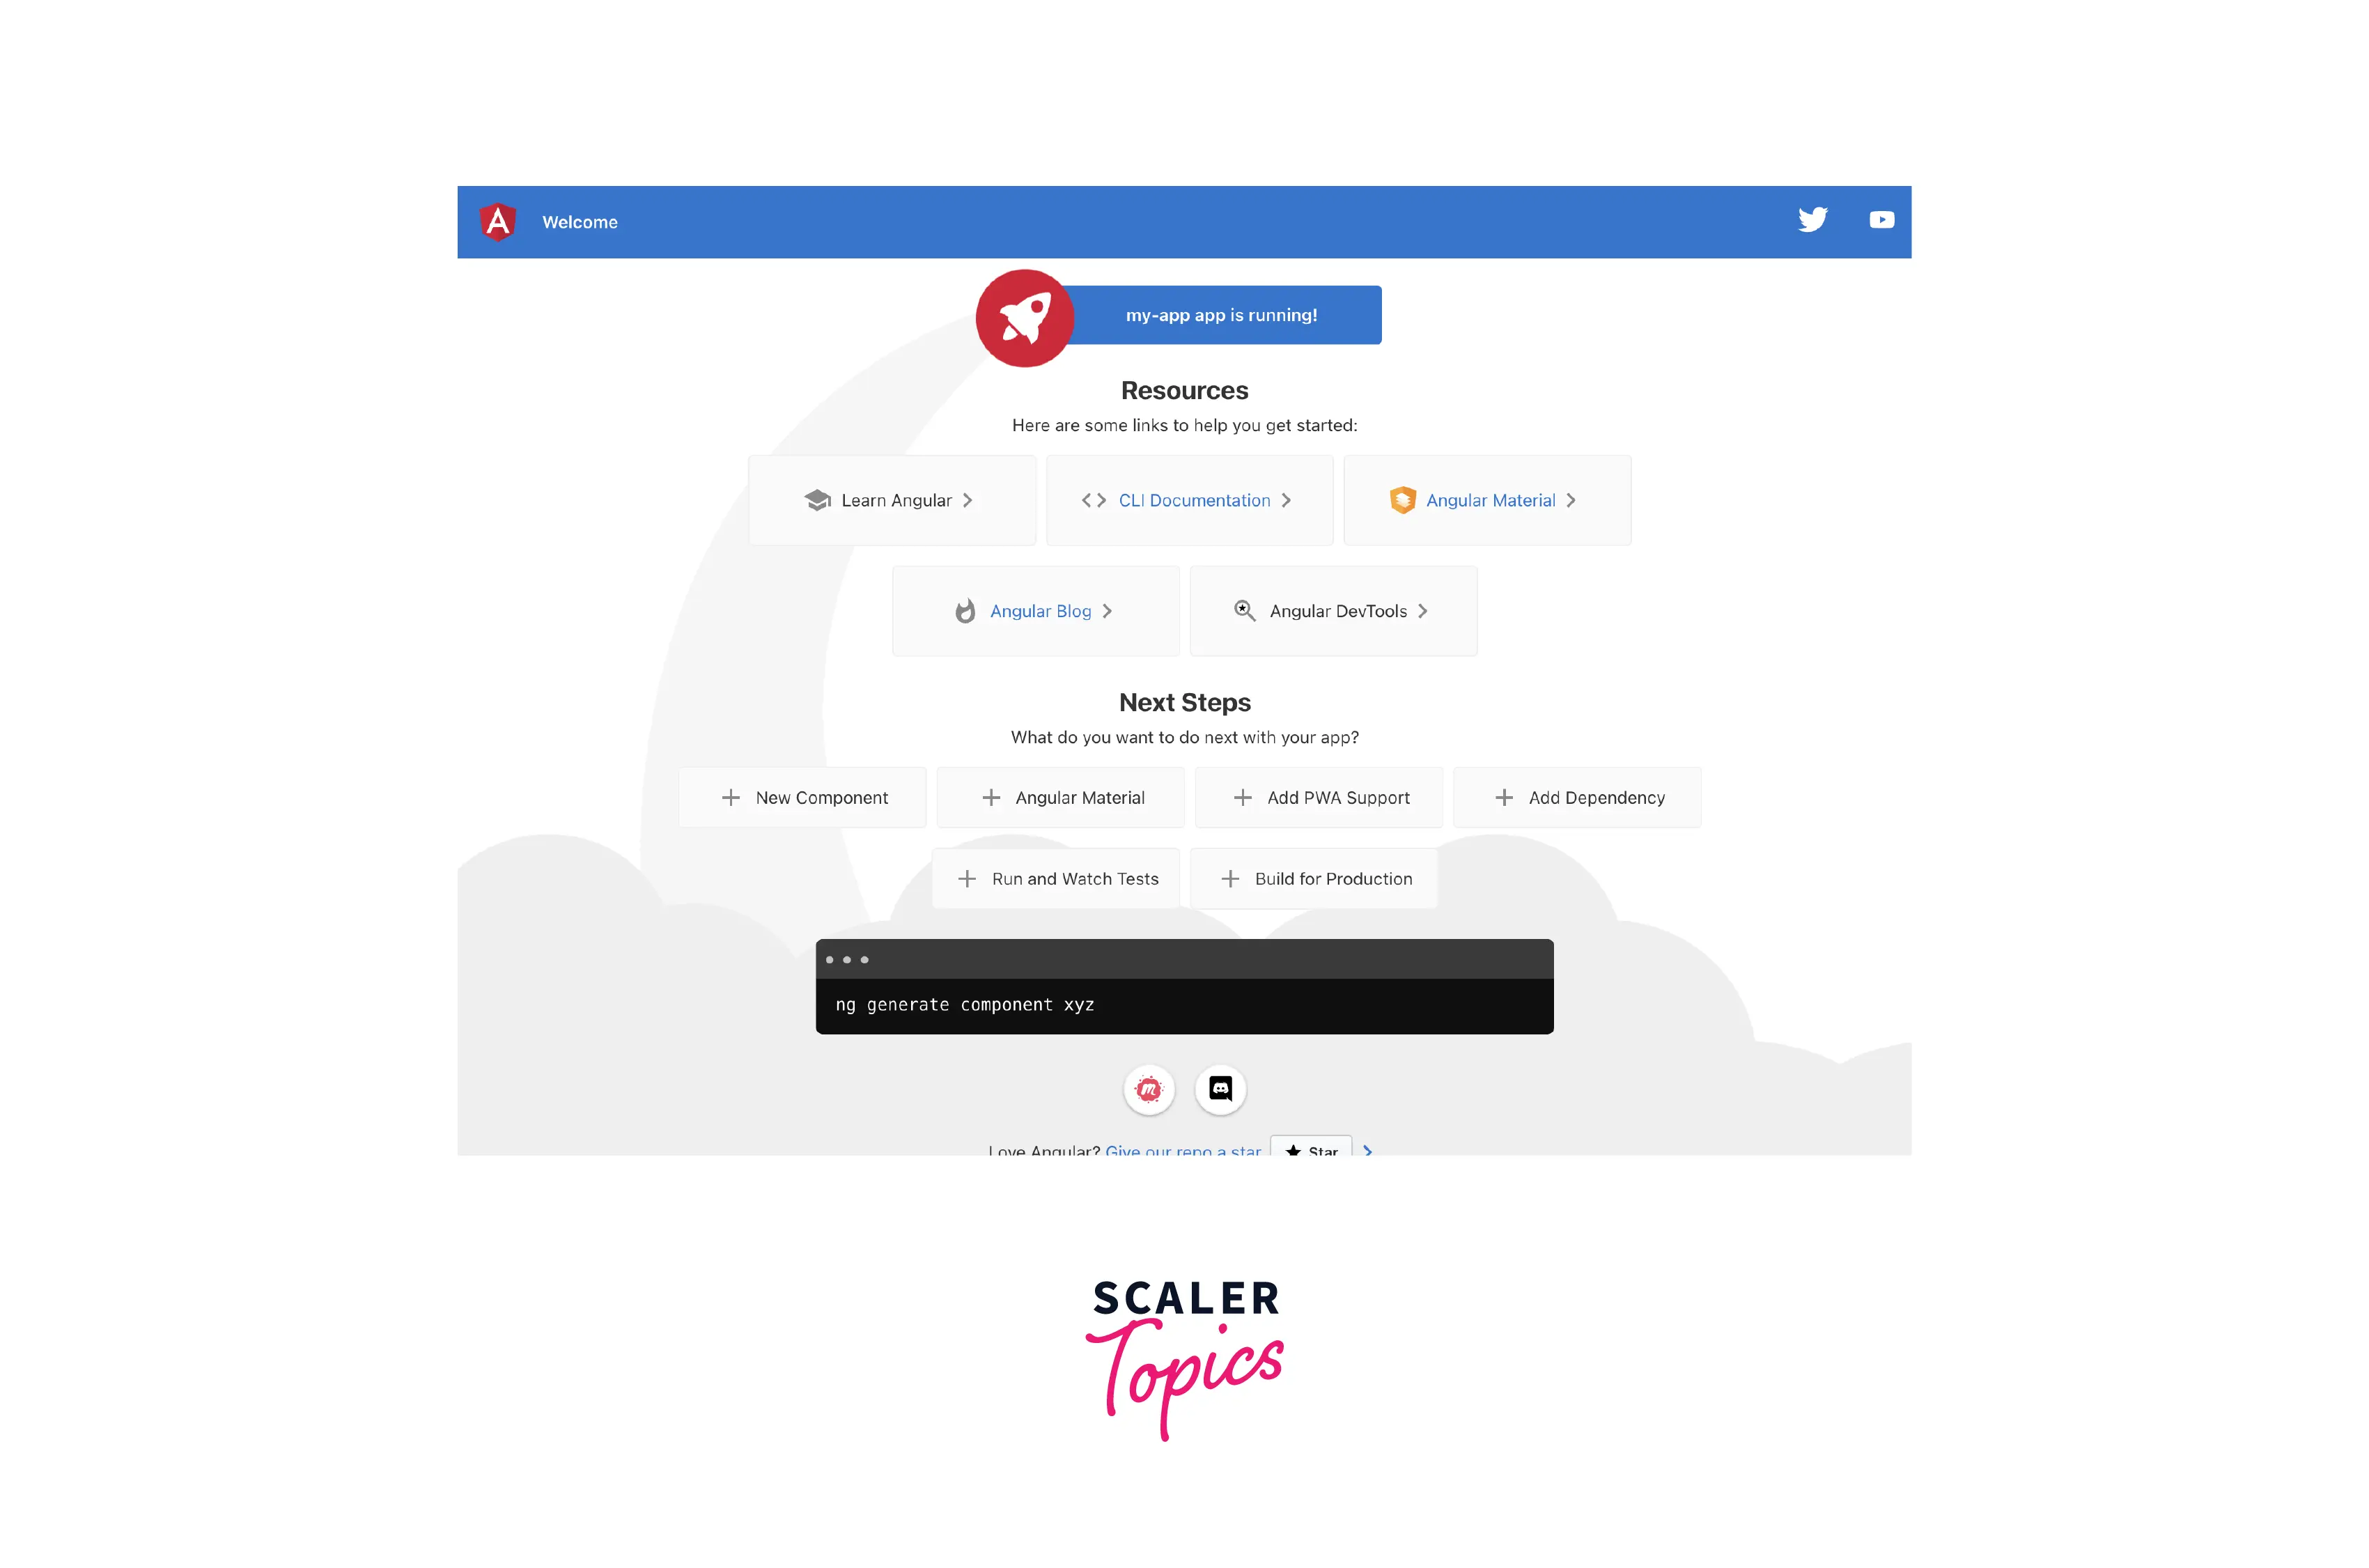
Step 5: Run the Angular Application in Browser.
You can run the my-app in the browser
- Open your project with VSCode
- Open a terminal
- Run npm start OR ng serve command.
Hurray! We can see our application running on the browser http://localhost:4200
Conclusion
- We've learned how to install dependent angular tools like Node, npm, and typescript.
- How to install Angular CLI on a windows machine.
- Create a brand new angular application using CLI.
- Run the angular application locally.