Python First Program

Overview
After learning the theoretical aspect of Python, now we will be creating our very first Python Project. And Yes! it will be more than just executing Hello World!.
With the below article we will be exploring and applying the concepts of Python we learned so far. We start by taking a look at the prerequisites that must be maintained and eventually follow through with the module to get our hands dirty on our first python project.
Pre-requisite
Before starting with the project, we should first make sure that the following prerequisites are met:
-
We should be working with PyCharm Community or the Professional version.
-
We must make sure to have the Python installed which is already installed in case of macOS or Linux. If not, we can get it done from python.org.
-
First before we shall get started with PyCharm, let us first write a Python script.
Transform Your Career
Choose from our industry-leading programs designed for career success
Modern Software and AI Engineering Program
Master full-stack development with AI integration

Modern Data Science and ML with specialisation in AI
Advanced data science techniques with AI specialization
Advanced AIML with Specialisation in Agentic AI
Deep dive into AIML with focus on Agentic systems
DevOps, Cloud & AI Platform Engineering
Build and manage AI-powered cloud infrastructure
AI Engineering Advanced Certification by IIT-Roorkee
Premier AI engineering certification from IIT-Roorkee
Let us Create one Python Project to Begin
-
Once you open Pycharm, you will be directed to the Welcome screen where we need to select New Project. Sometimes we have the project open beforehand then we can directly navigate to the main menu and select File -> New Project.
-
Through the PyCharm, we can create various types of projects like Flask, React, Django, etc. but for this tutorial we will be developing a simple Pure Python project. We can see in the below figure, what the empty project will look like for better insights.
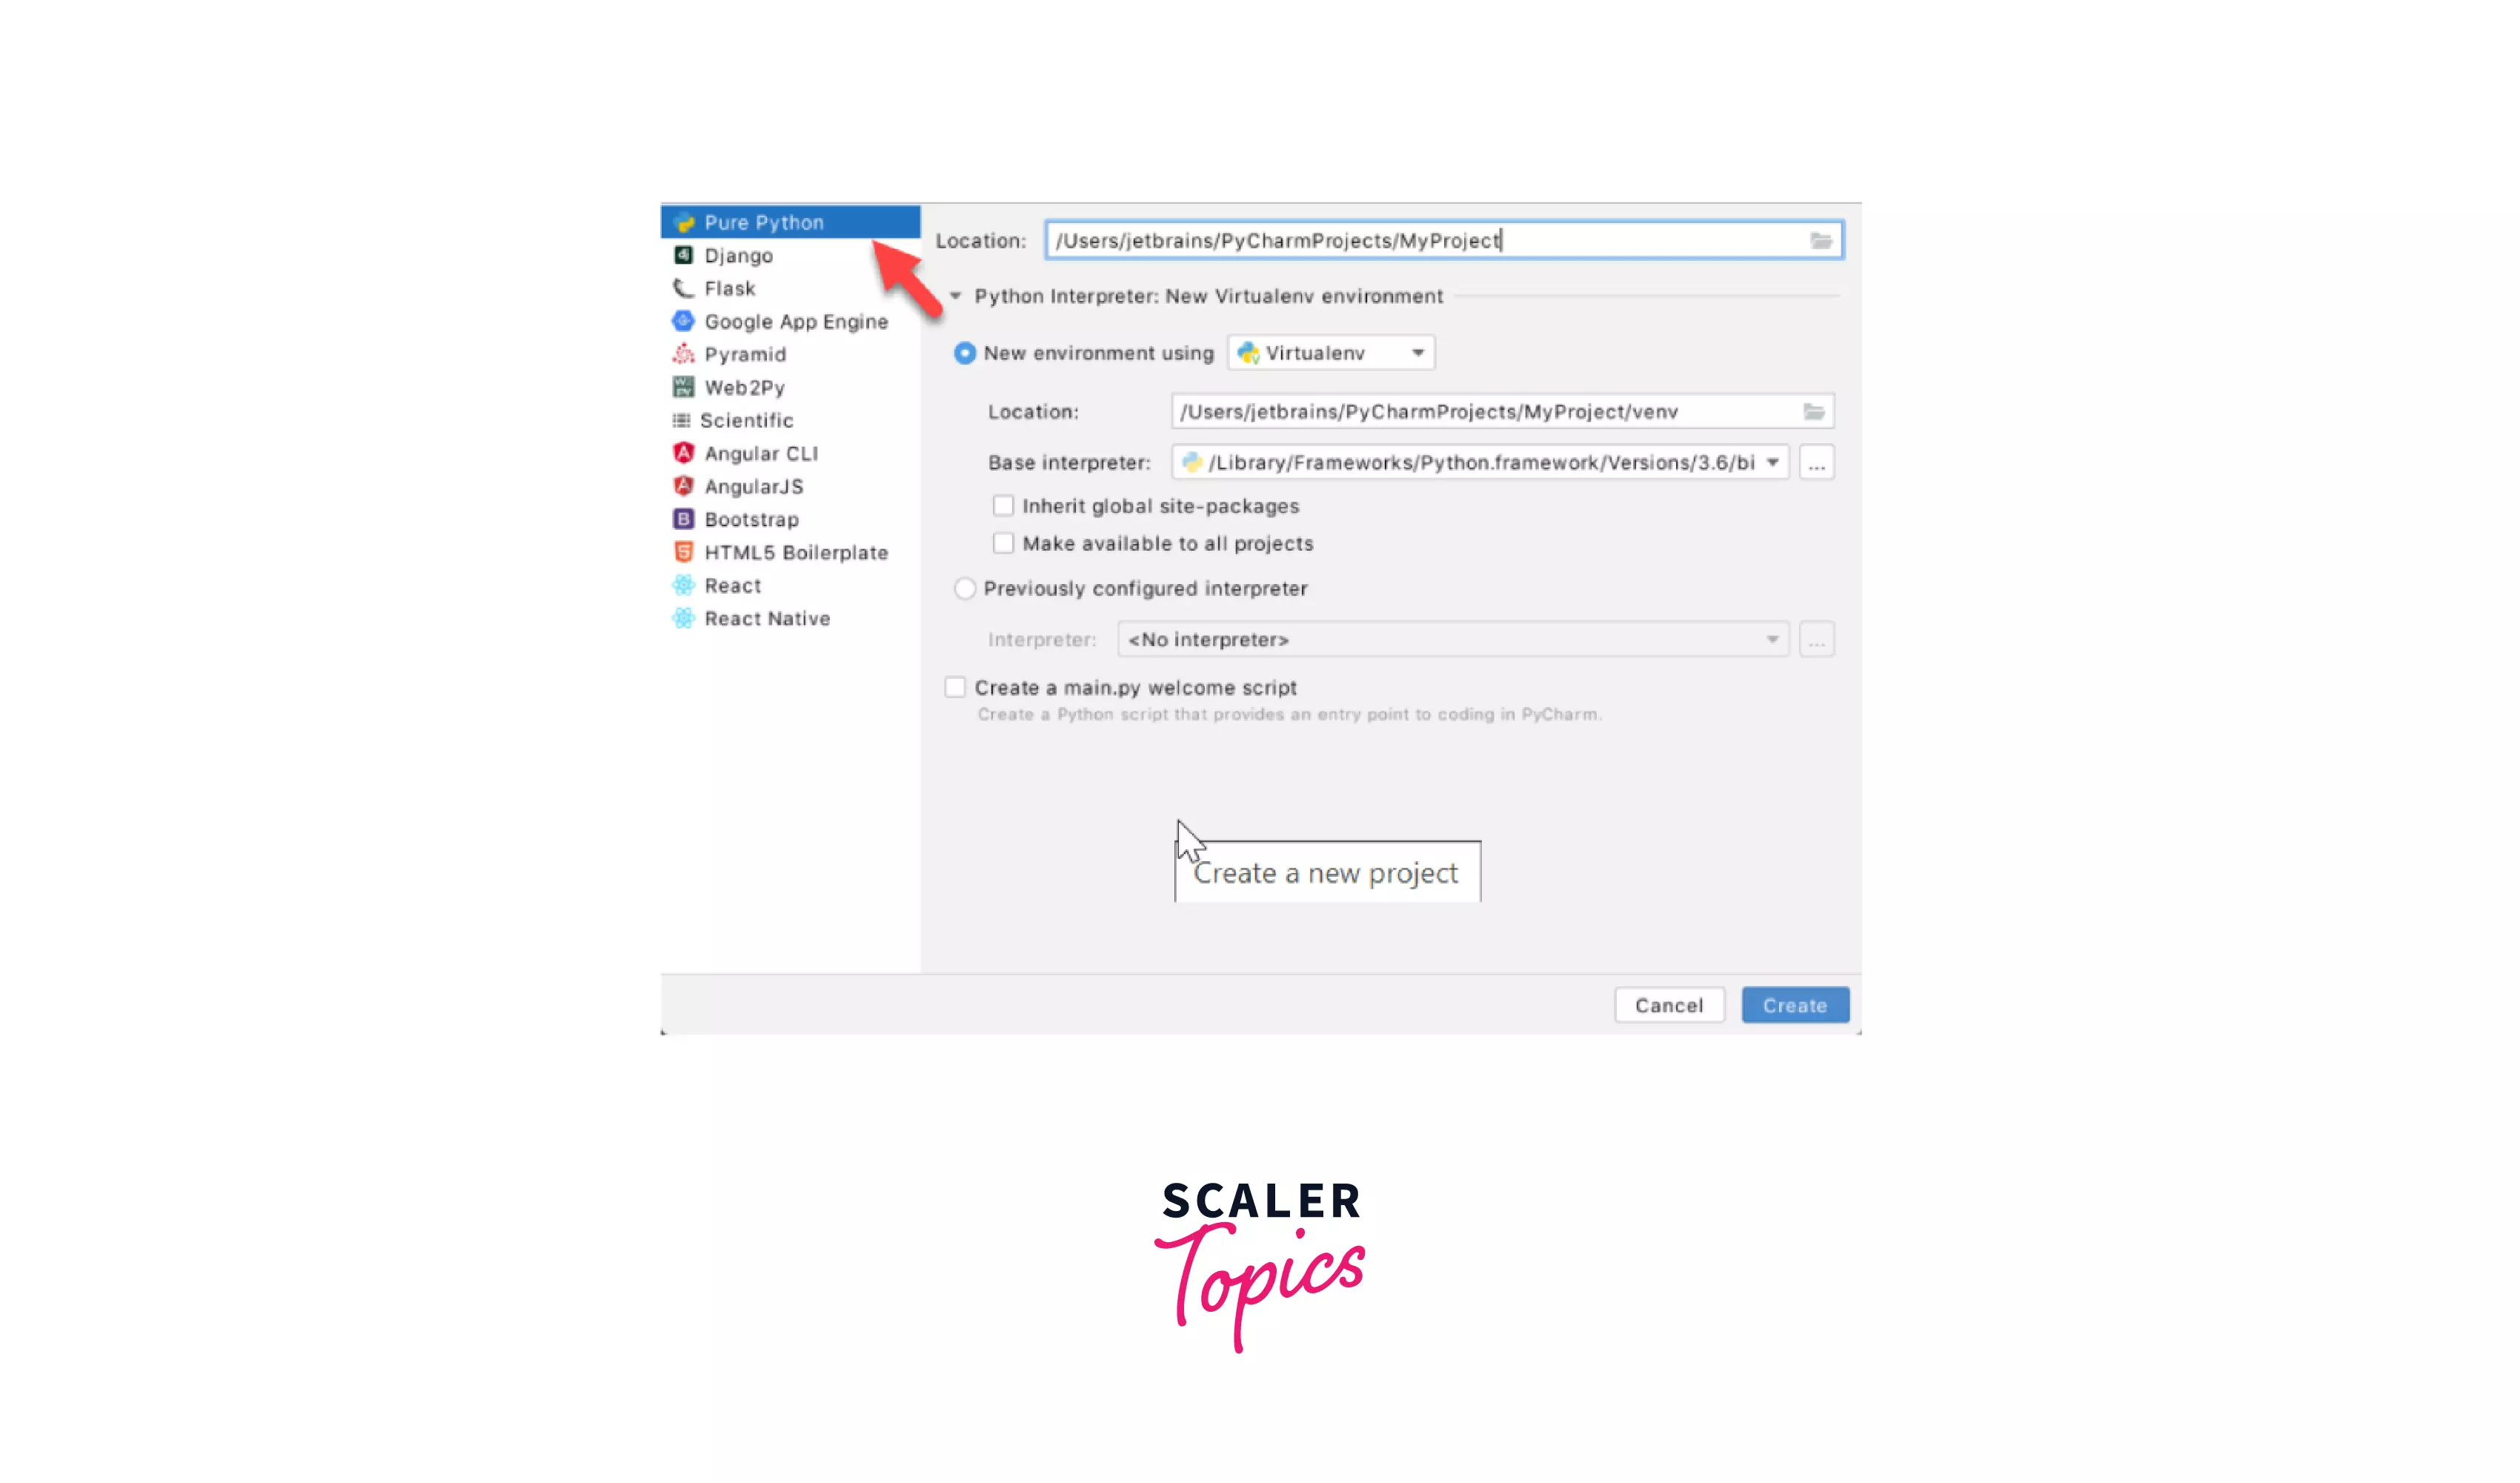
- Now as we have selected the Pure Python project, we shall choose the project location for which we need to click the Browse button next to the Location field and then we can specify the directory for our project.
NOTE:
For better grasping, we will remove the tick from the checkbox of Create a main.py welcome script for this tutorial and shall be attempting to create a new Python file for the same.
-
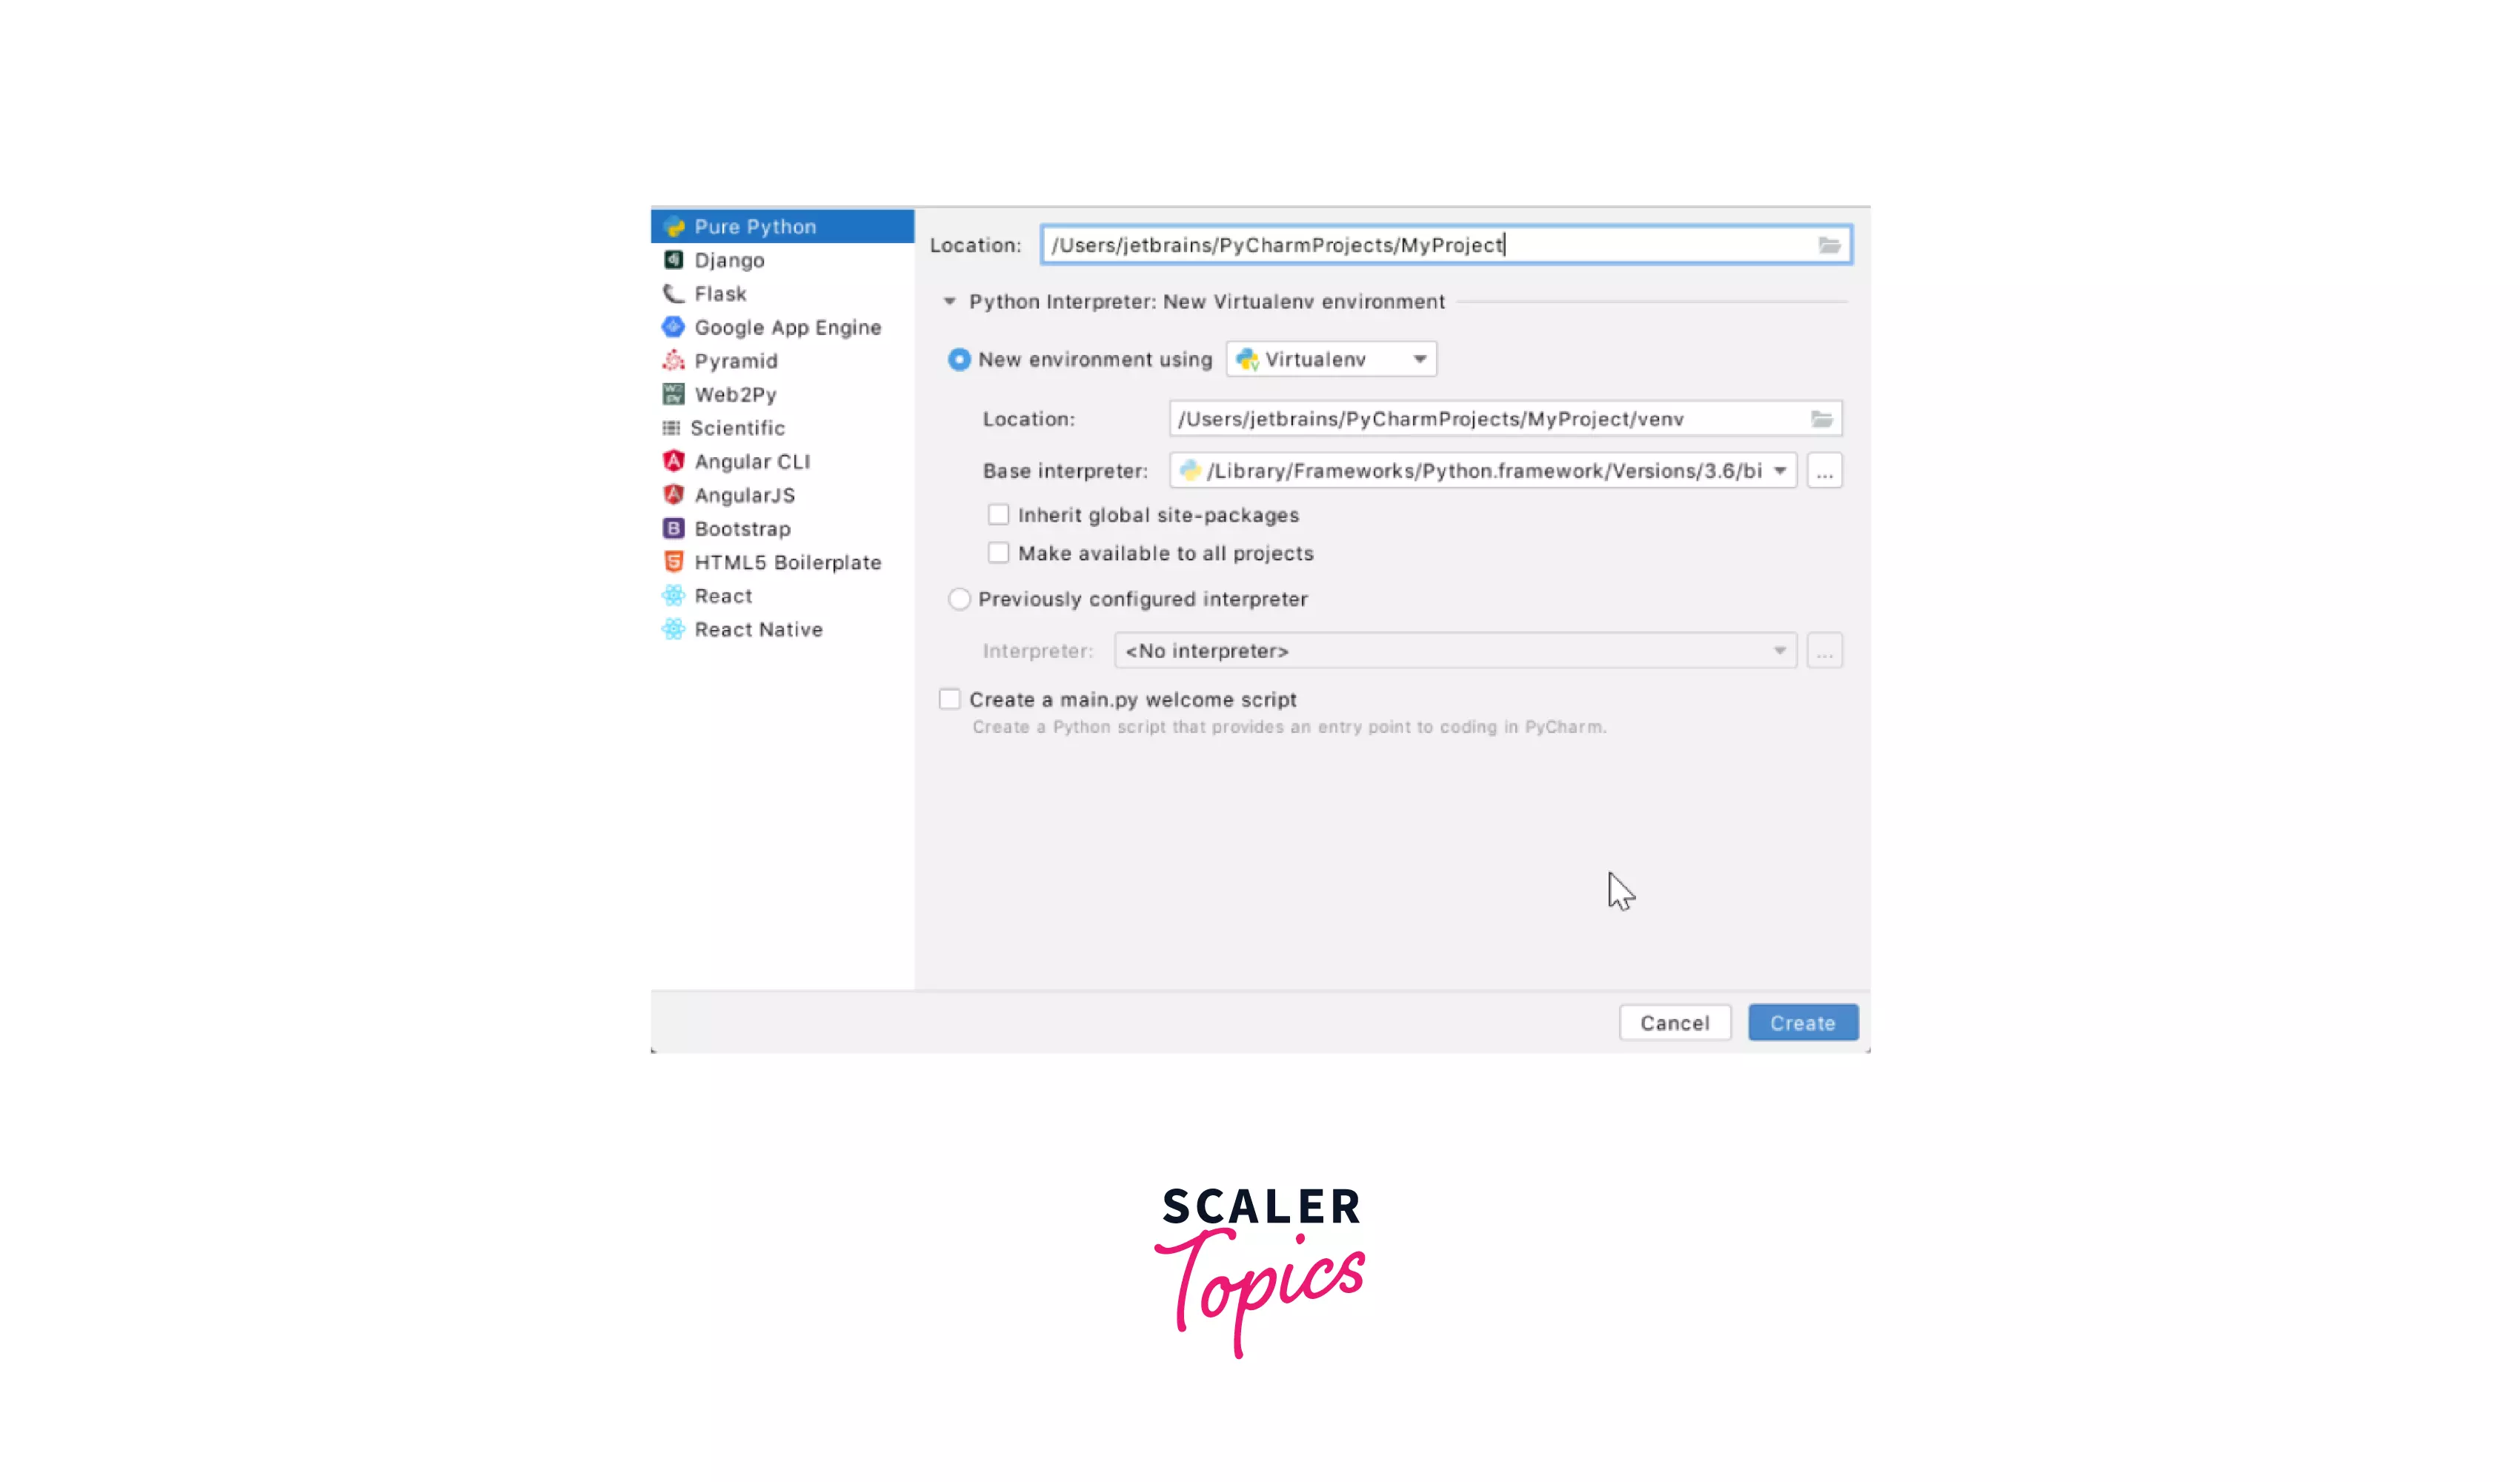
One of the Python best practices includes creating a virtualenv every time we start developing a project. It does get created automatically by PyCharm and we don't really need to configure it from scratch. But we must create it beforehand and customize, preview, and modify the venv options according to our requirements.
-
Moving further we will now be selecting the dropdown of the Python Interpreter: New Virtualenv Environment node and then we can customise new virtual environment by selecting the tools which we require.
-
With that being said let us choose the Virtualenv tool for our virtual environment and locate the base Python interpreter and the environment to its respective directory location.
-
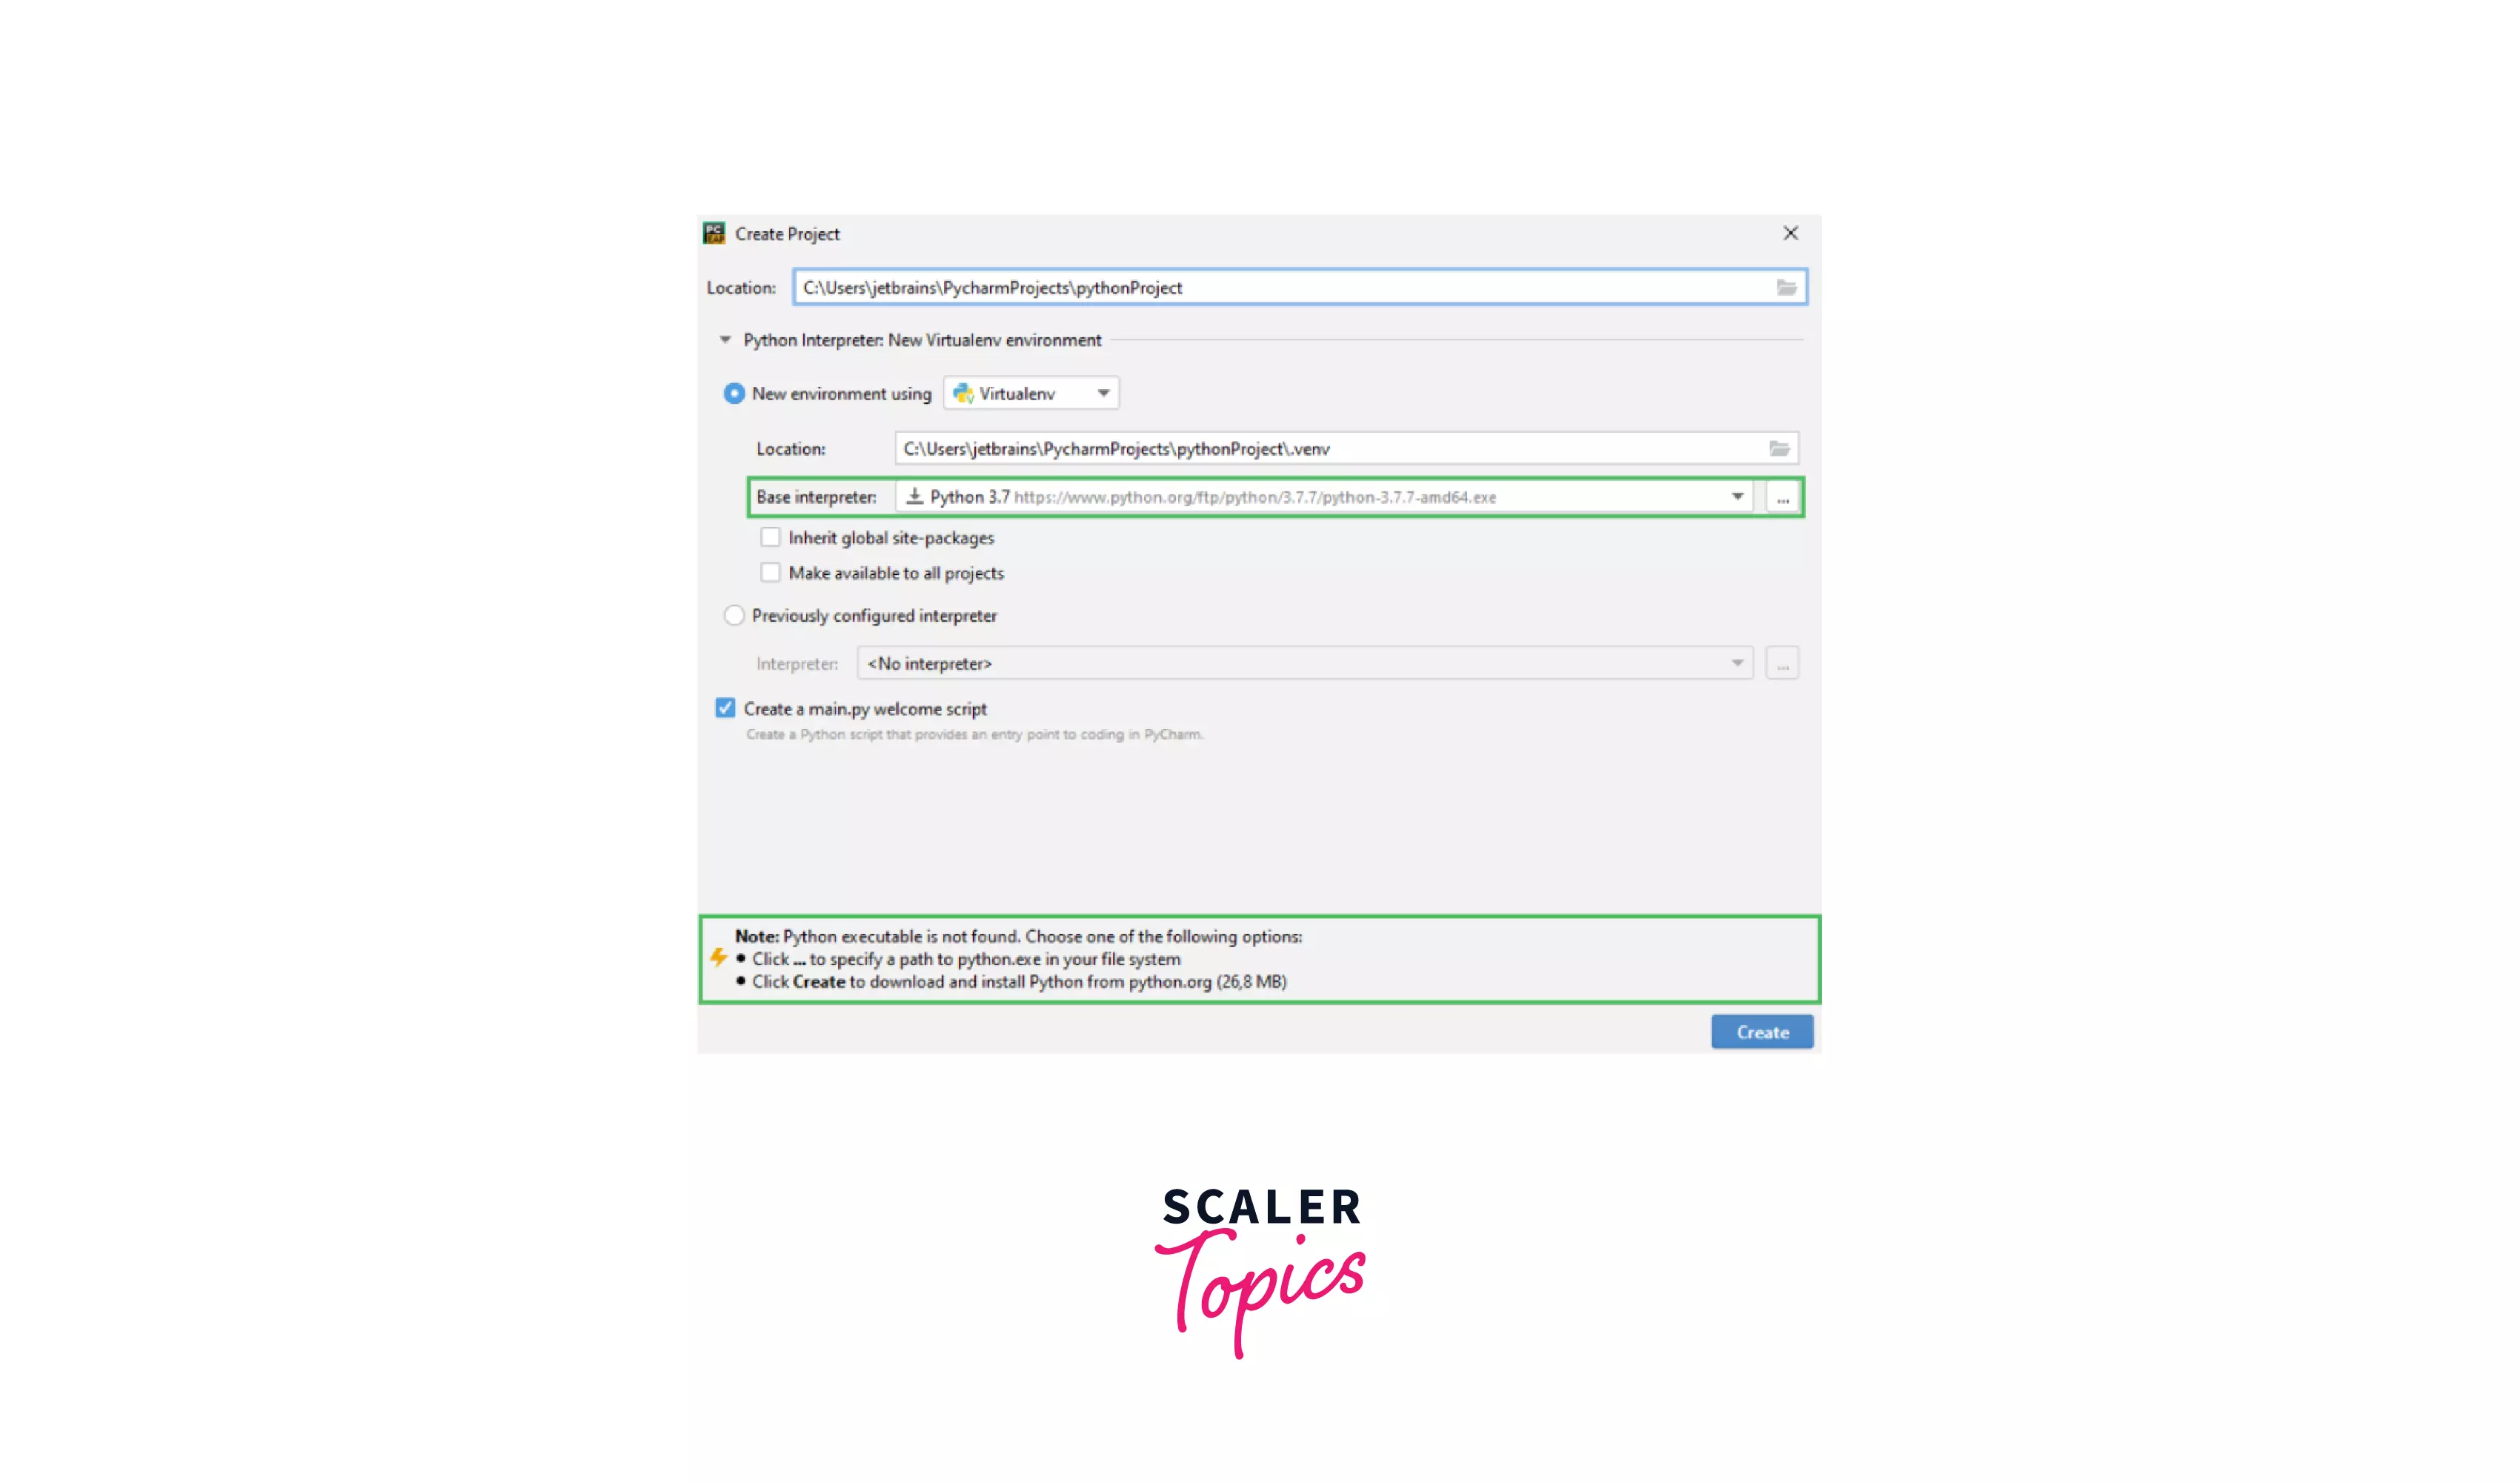
Now we need to locate the path to the Python executable along with configuring the base interpreter. Here we shall observe two options stating us to download the latest Python versions from python.org in case we don't have Python installed or to mention and locate the path to the Python executable as can be seen in the below diagram.
-
After the configuration is done, click the Create button at the bottom of the New Project dialog.
-
Also, sometimes it may happen that when you open a new project if any of your projects is already open then PyCharm will ask you whether you want to open a new project in the current window or in a new one then we need to Choose Open in the current window. Now the project which was already open will close down which we can refer to if required later too.
Creating Python File
Now lets us create a python file to start working on the project.
- First we need to route to the Project tool window where we need to select the project root and right-click it to select File | New. This project root that we had to select is the root node of the project tree.
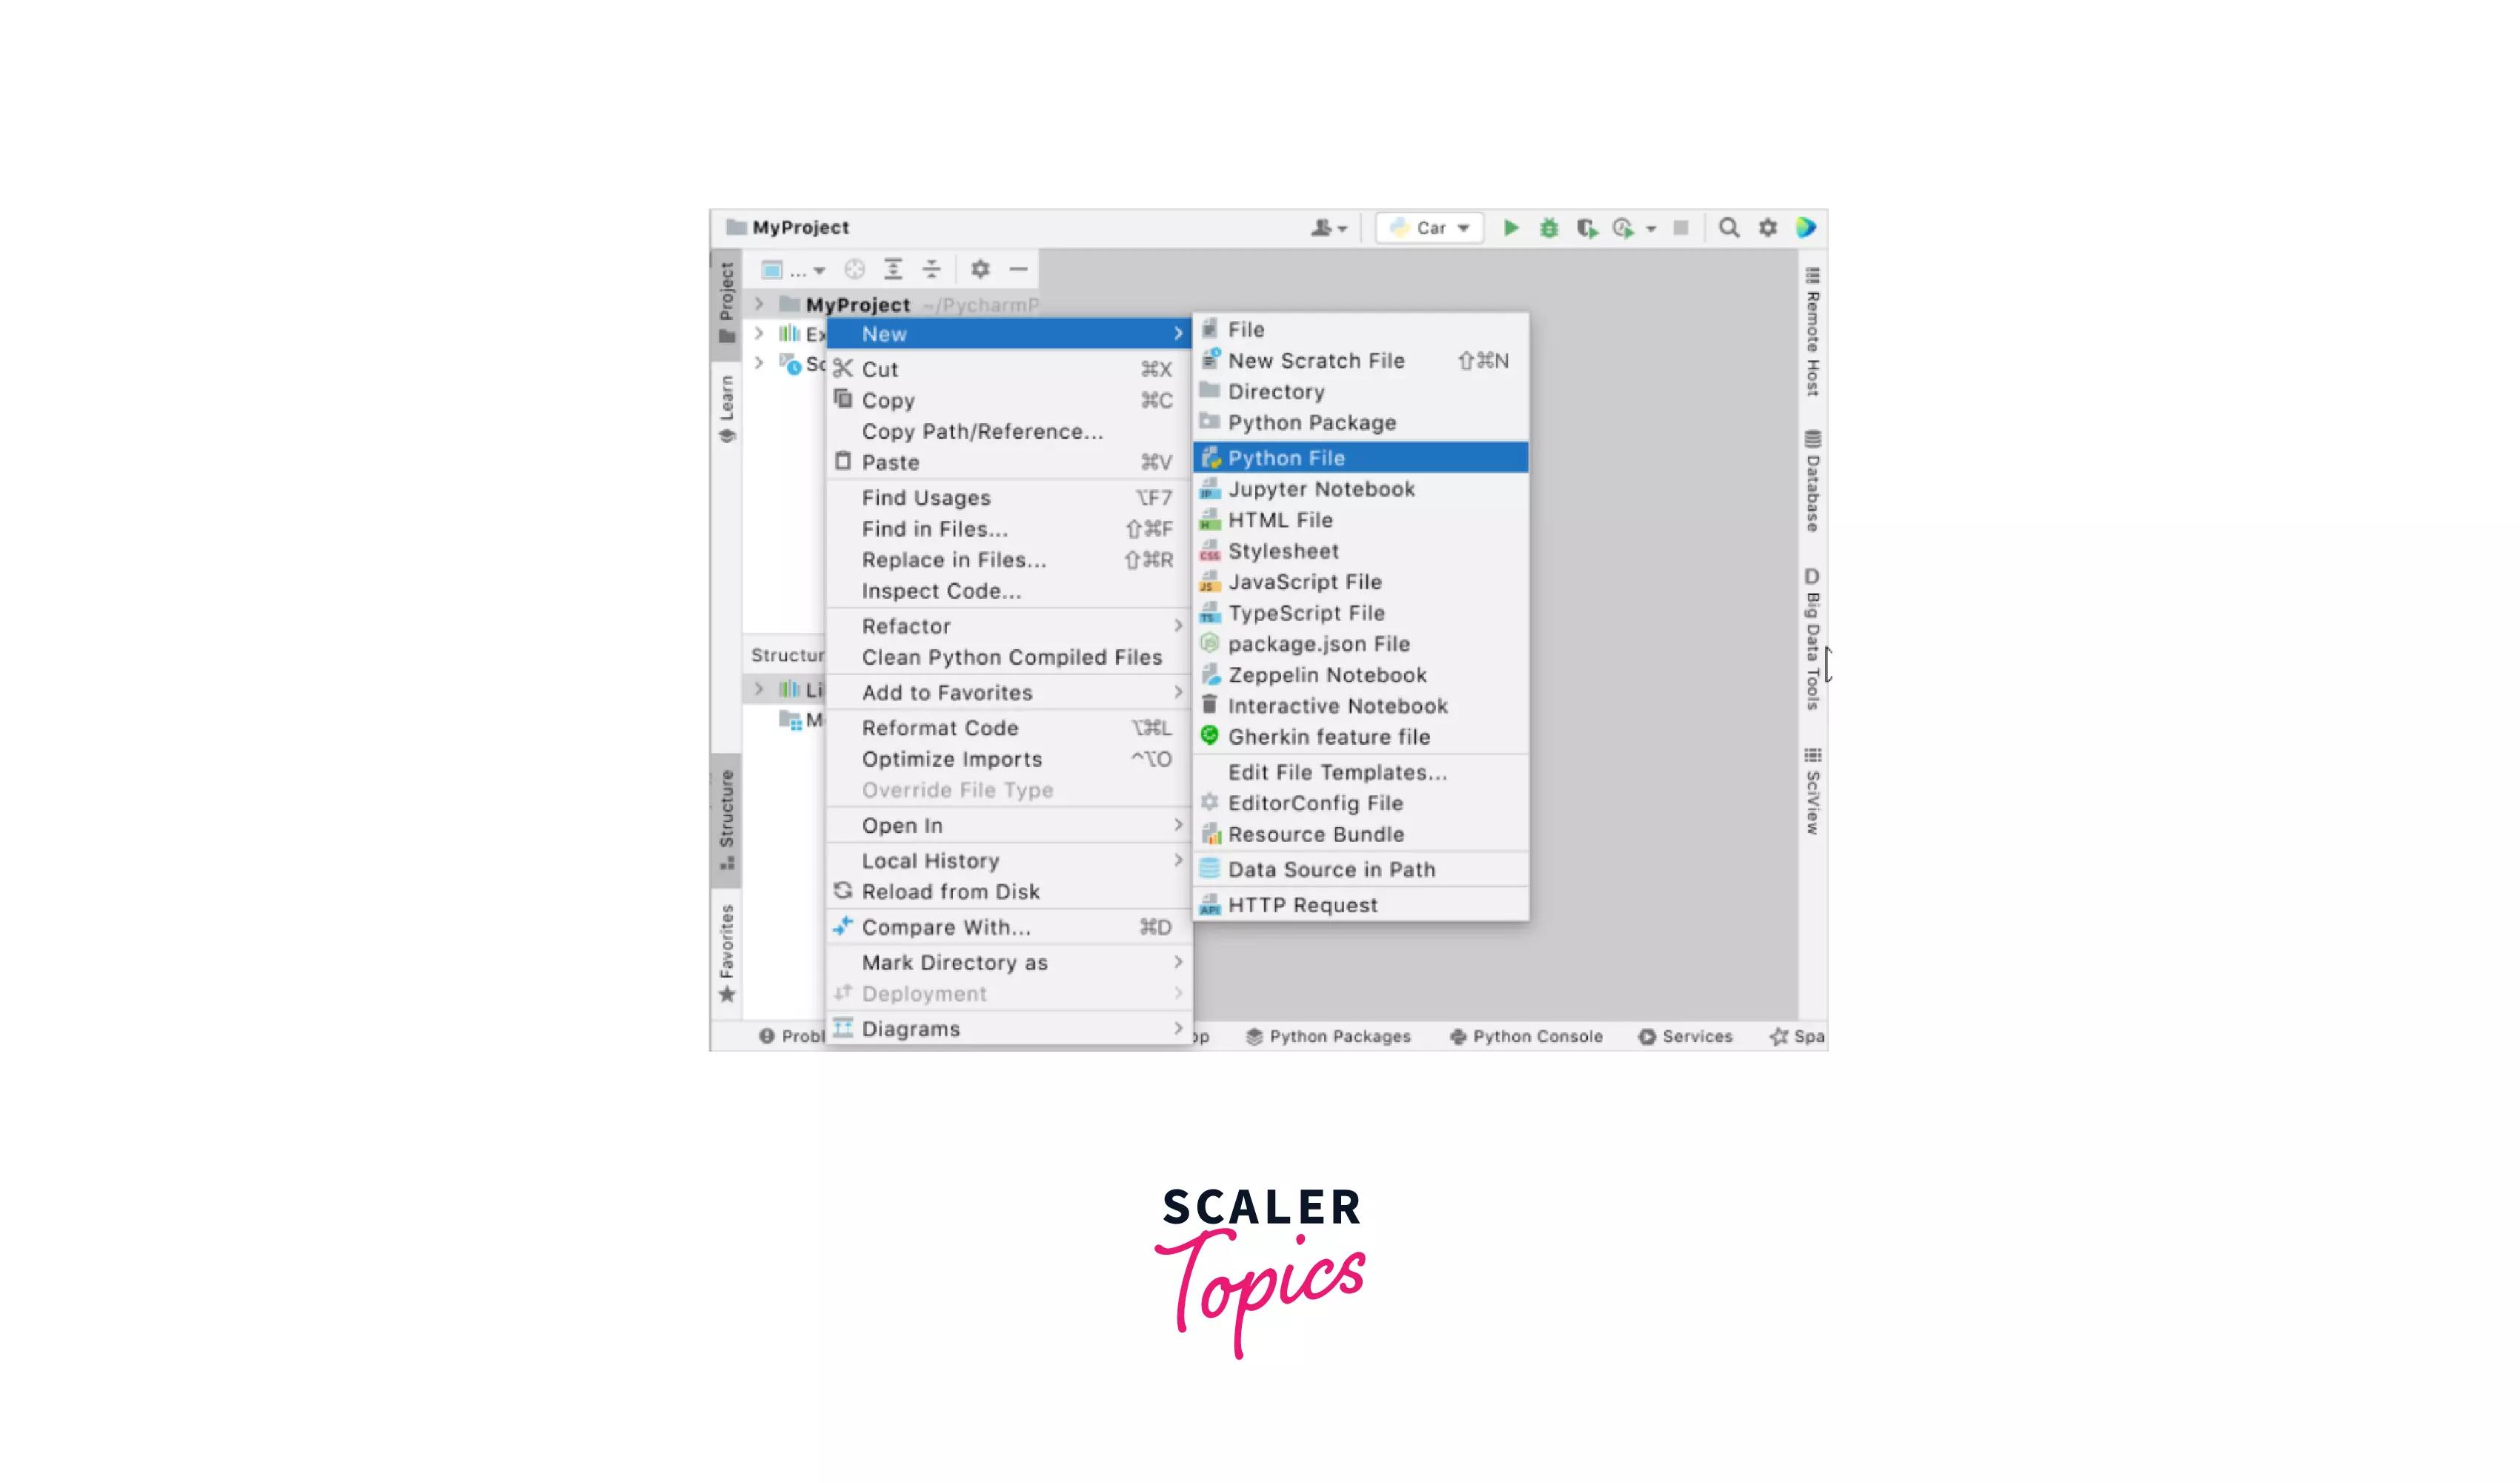
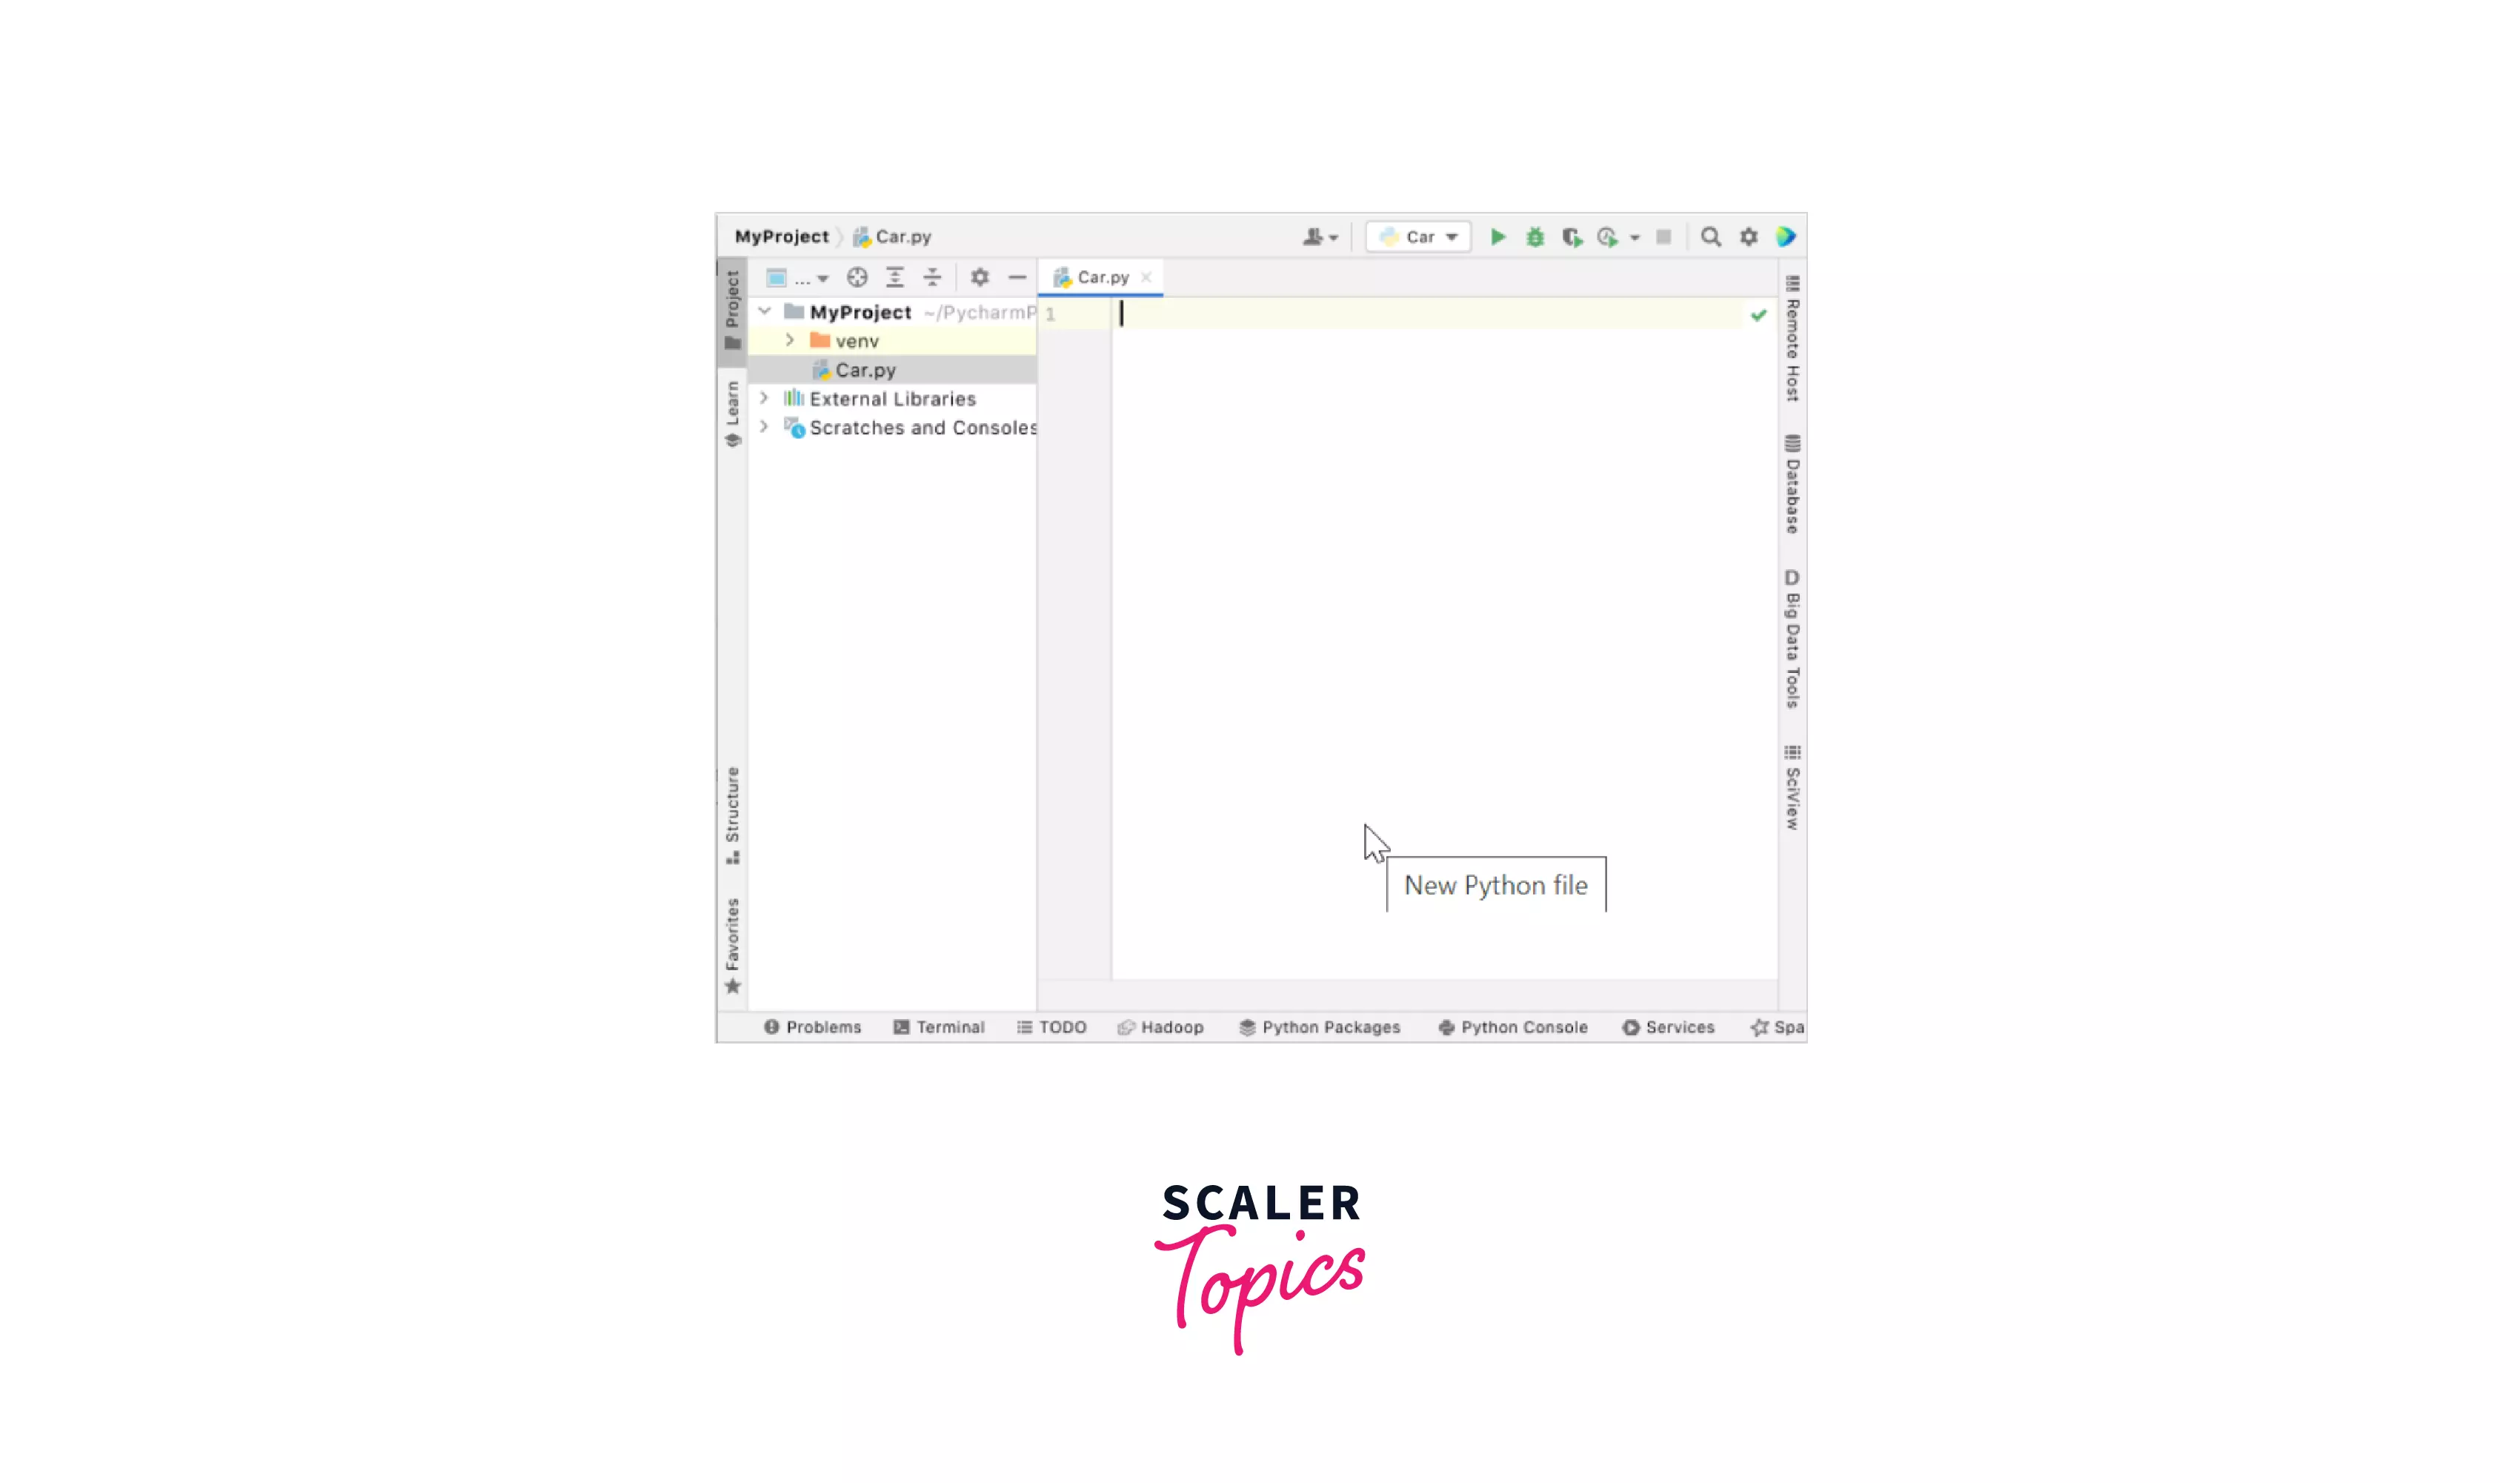
- Now from the context menu, we will be selecting the option Python File and then we can give the name to the file.
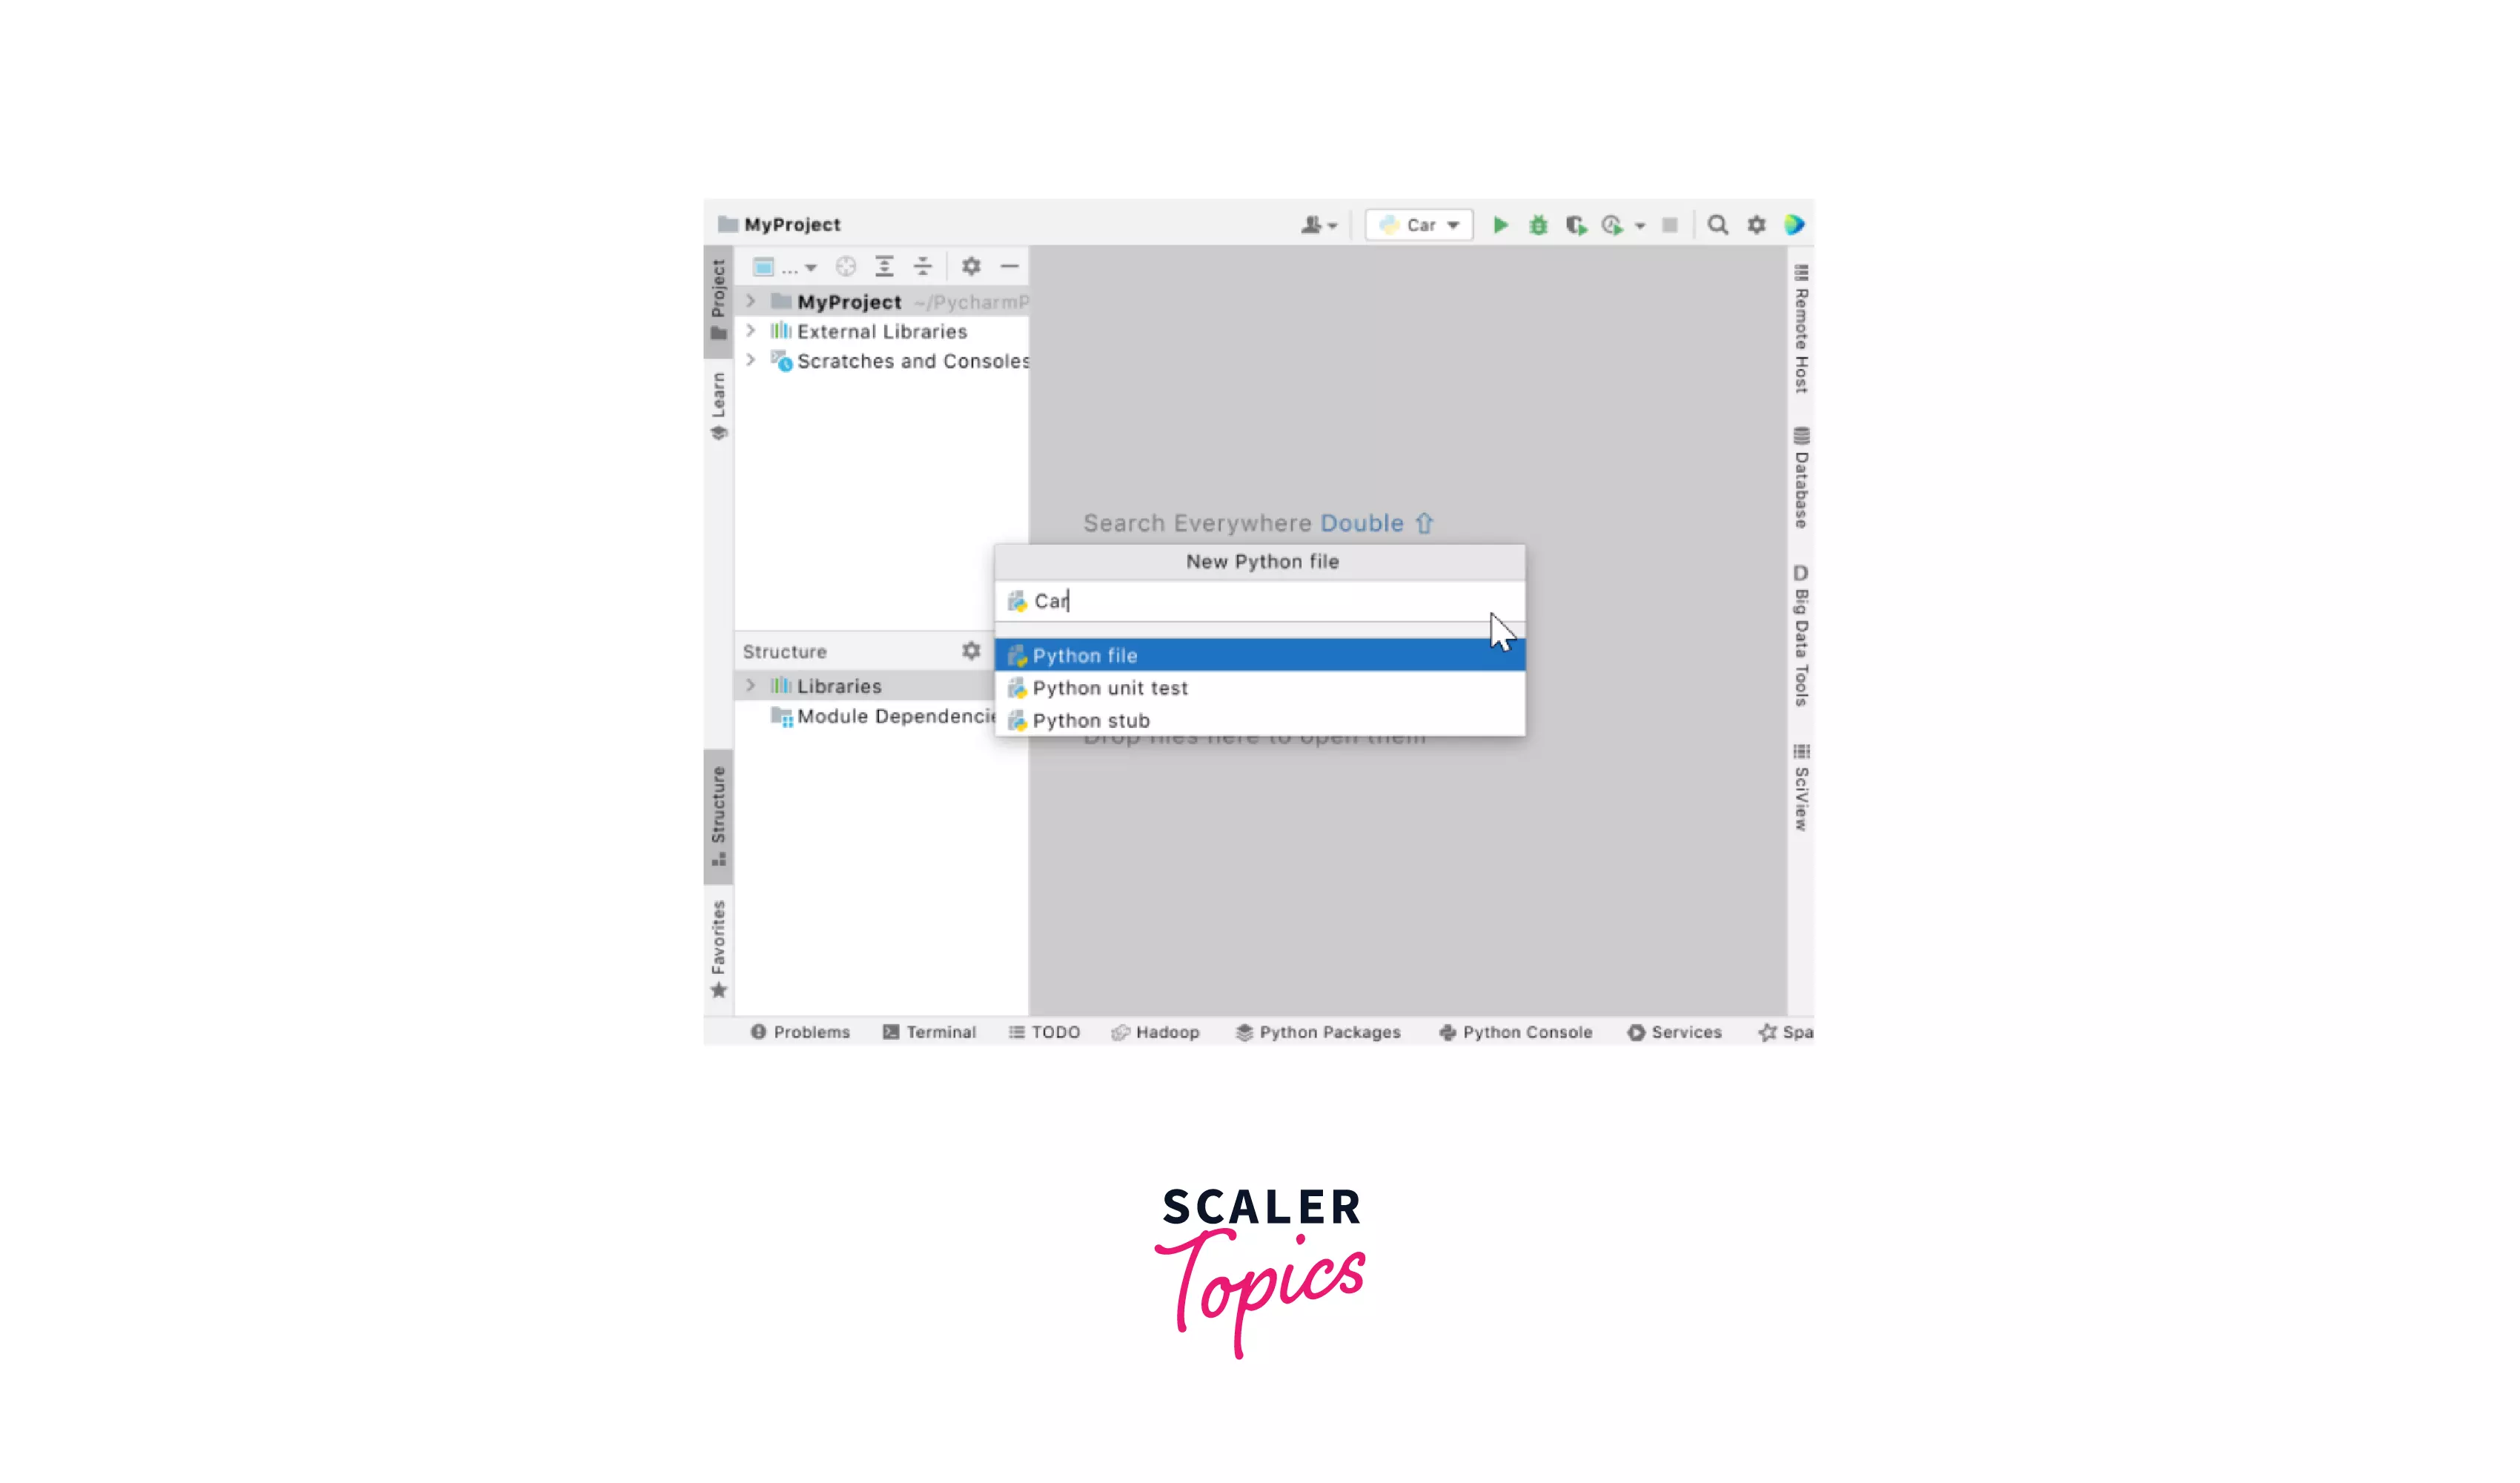
- The PyCharm will create a new Python file and now we are good to go for editing our code in it. We can refer to the below pictorial representation for in-depth understanding.
Editing Source Code in Python Project
Moving further as we have set the pre-requisite and opened the Python file, Let us start editing the Python file.
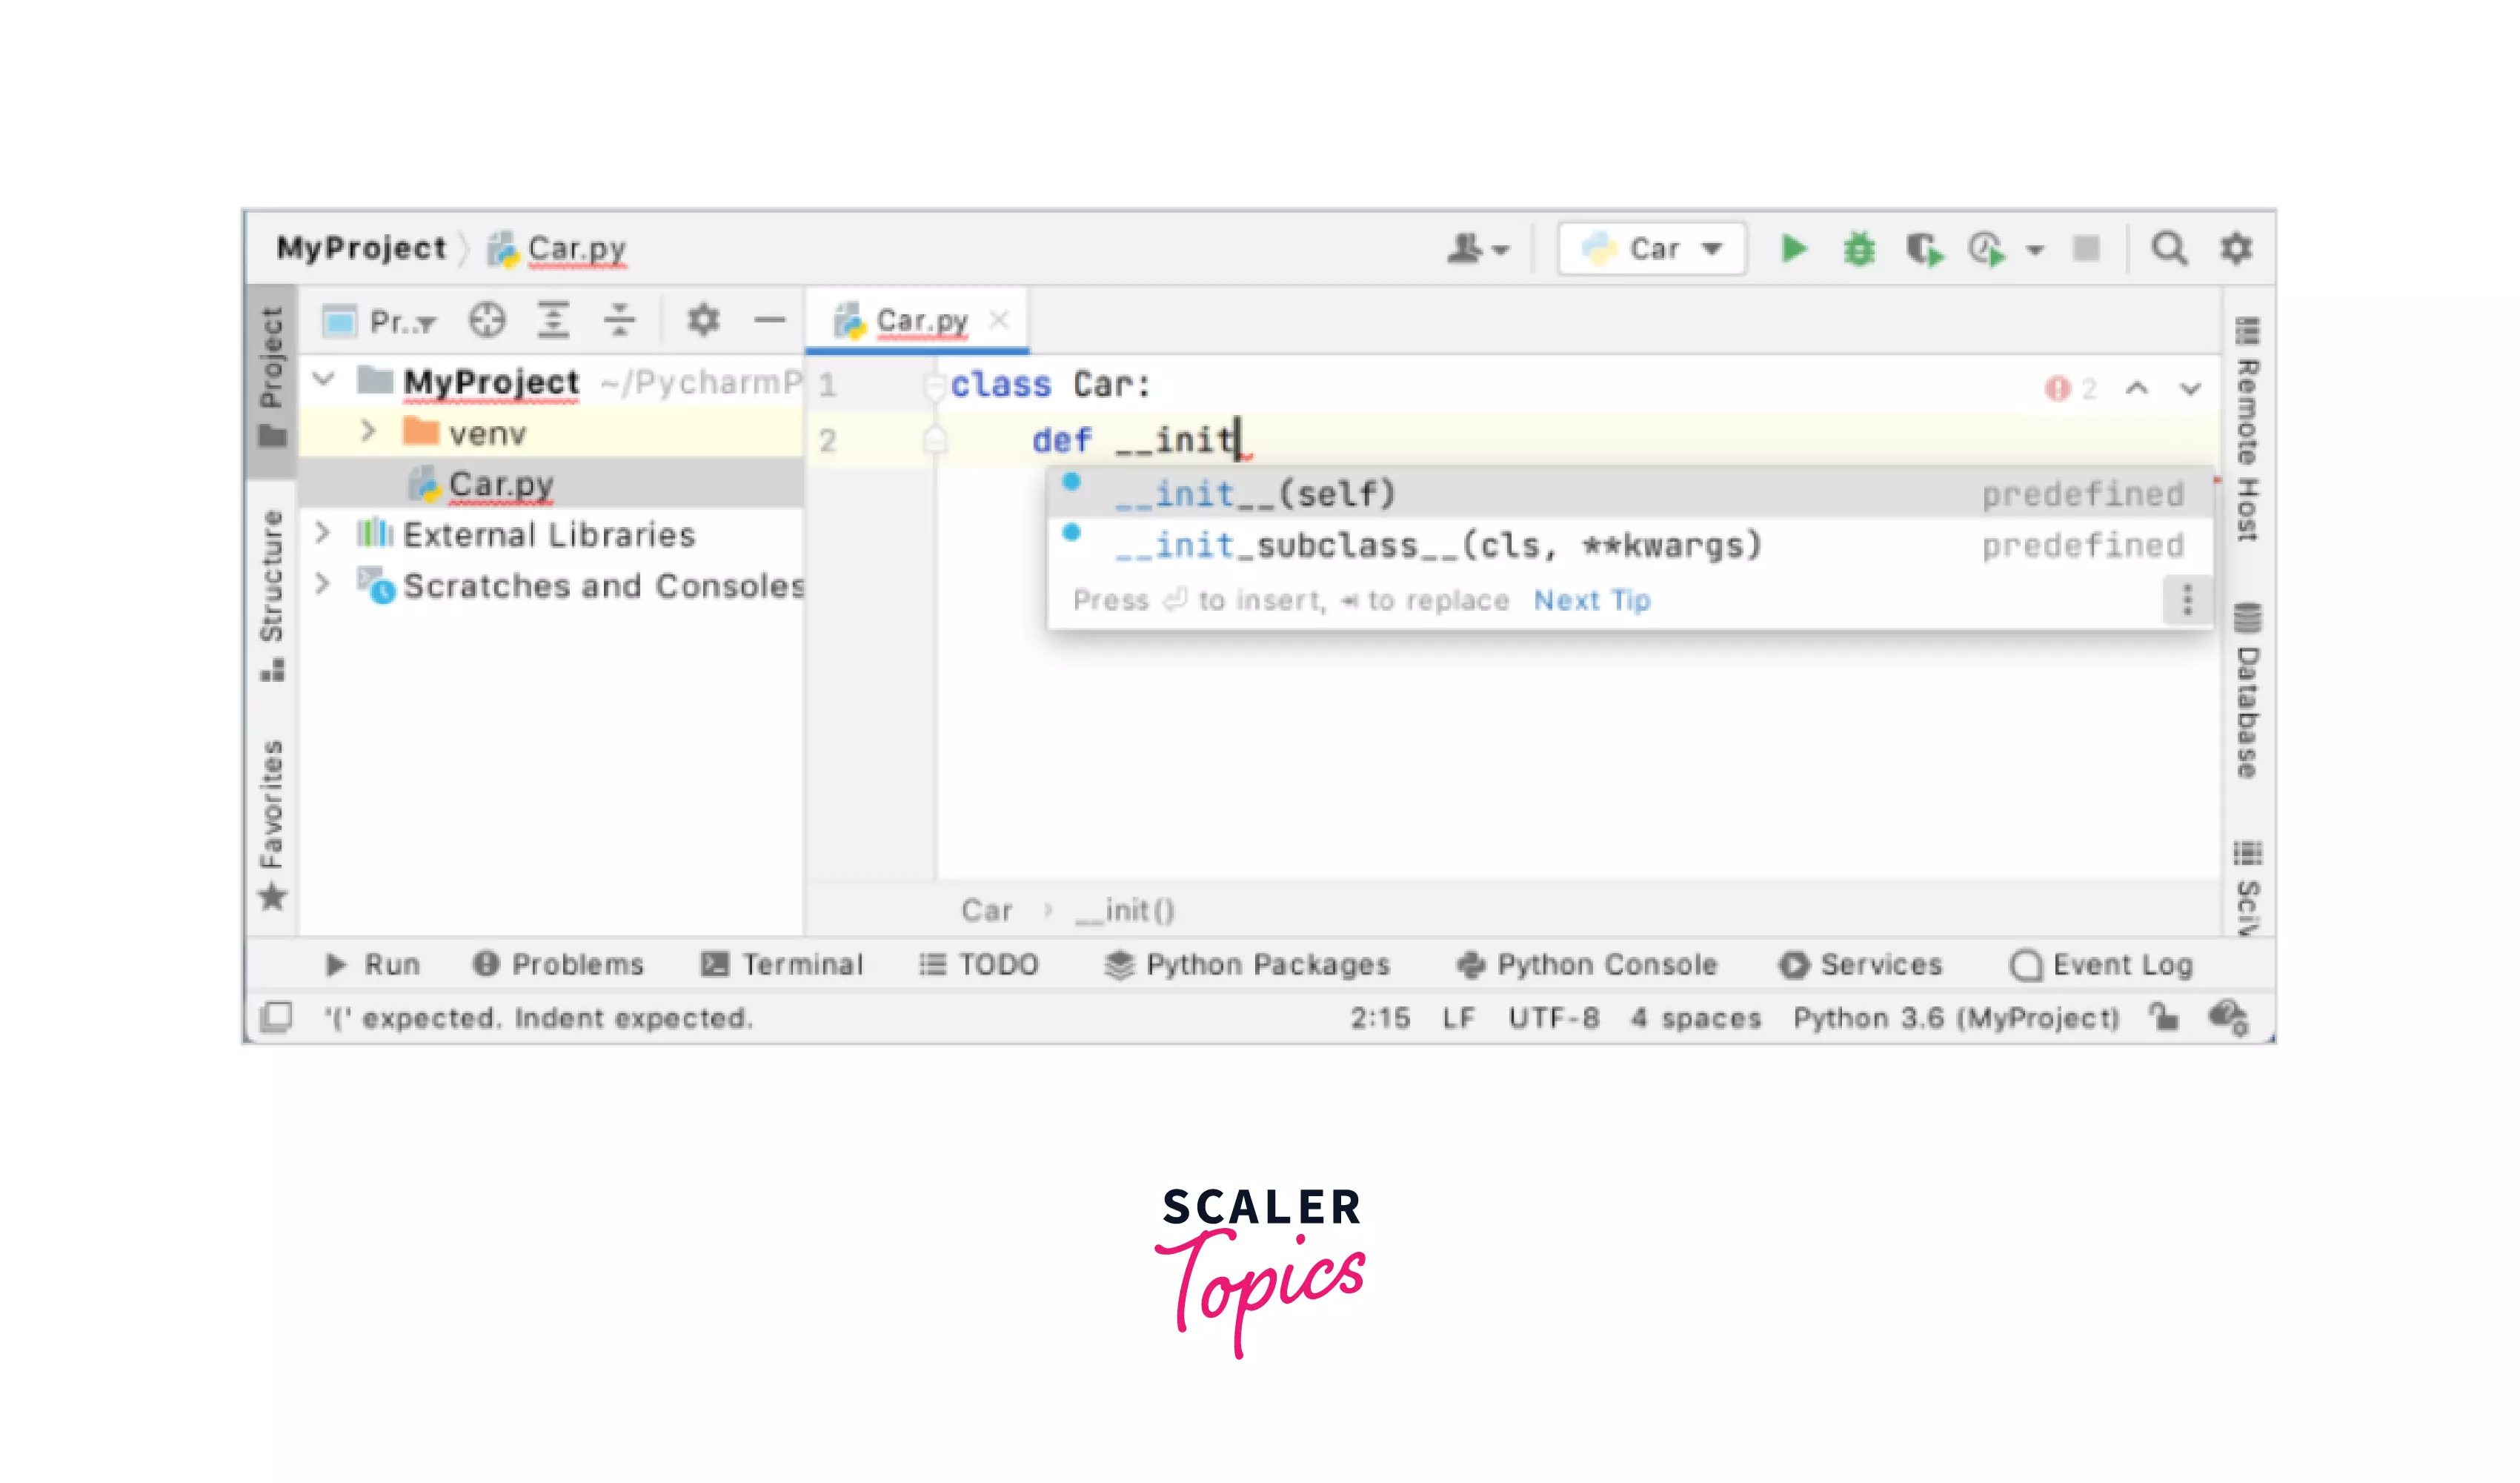
- First, Start by declaring a class. Now PyCharm immediately suggests us and helps in completing our line as soon as we start typing which makes it really convenient as can be seen below.
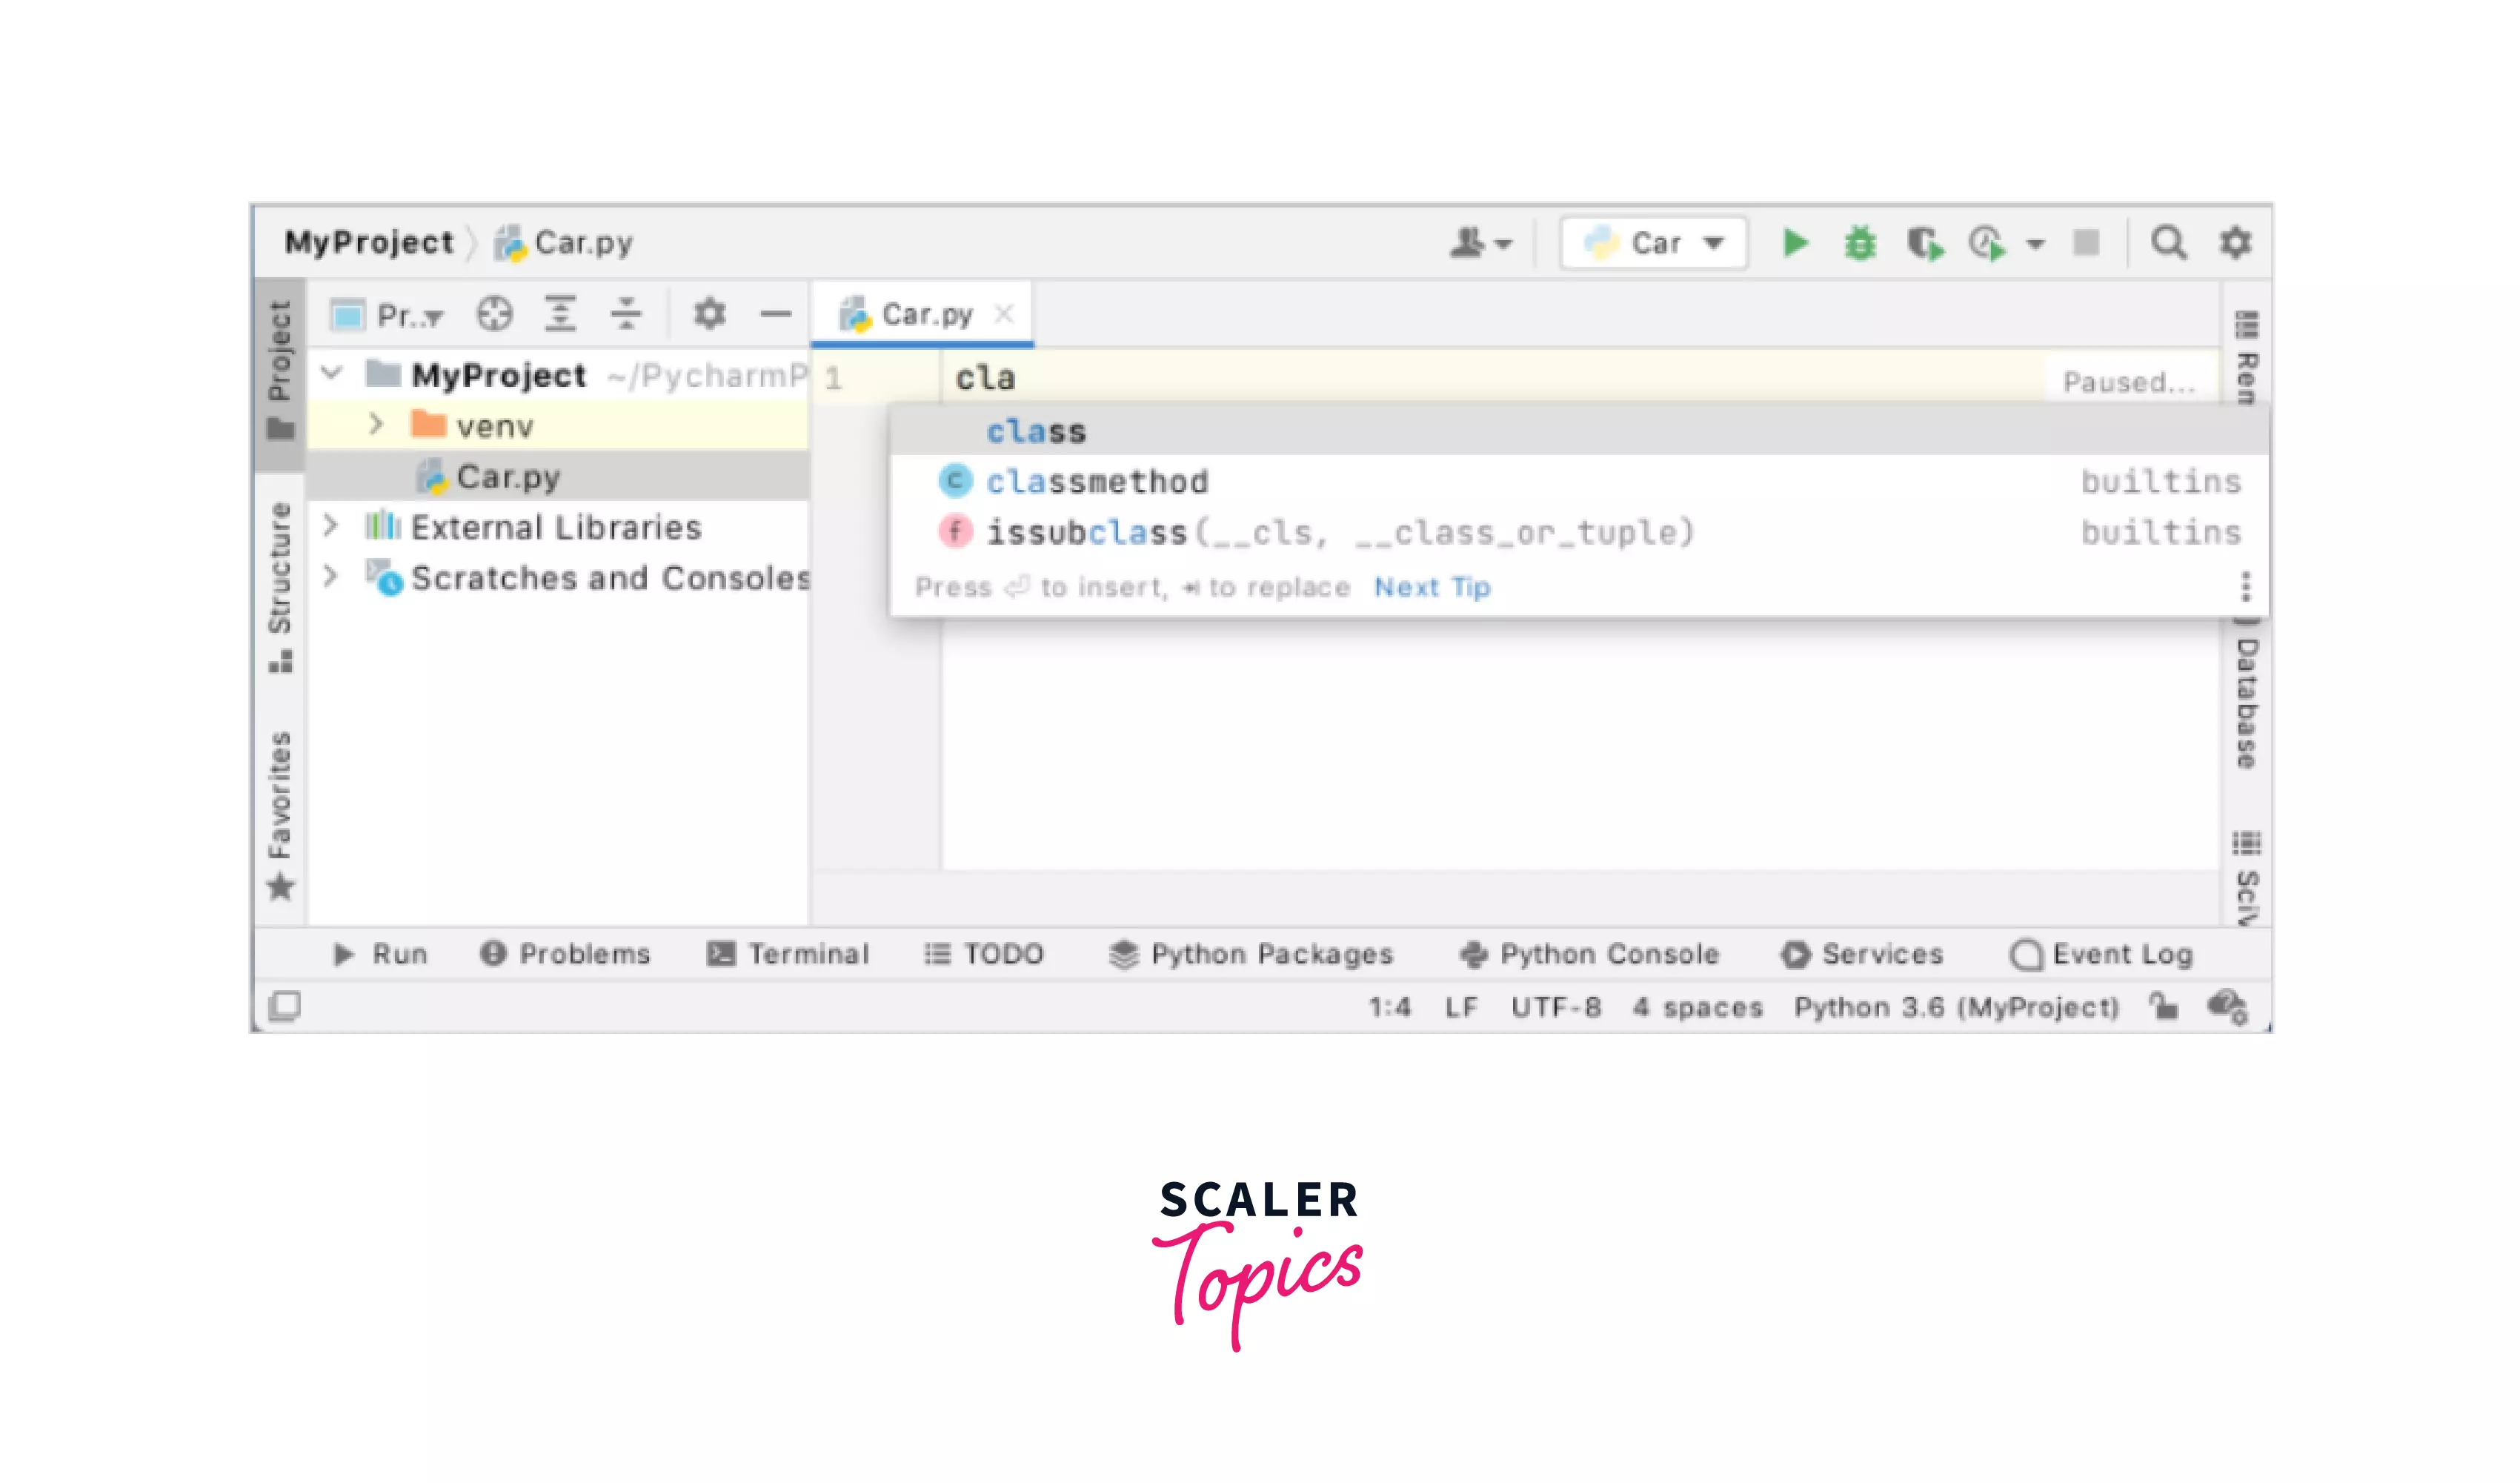
-
Second, We will choose from the suggestions by PyCharm the keyword class and give it the class name Car.
-
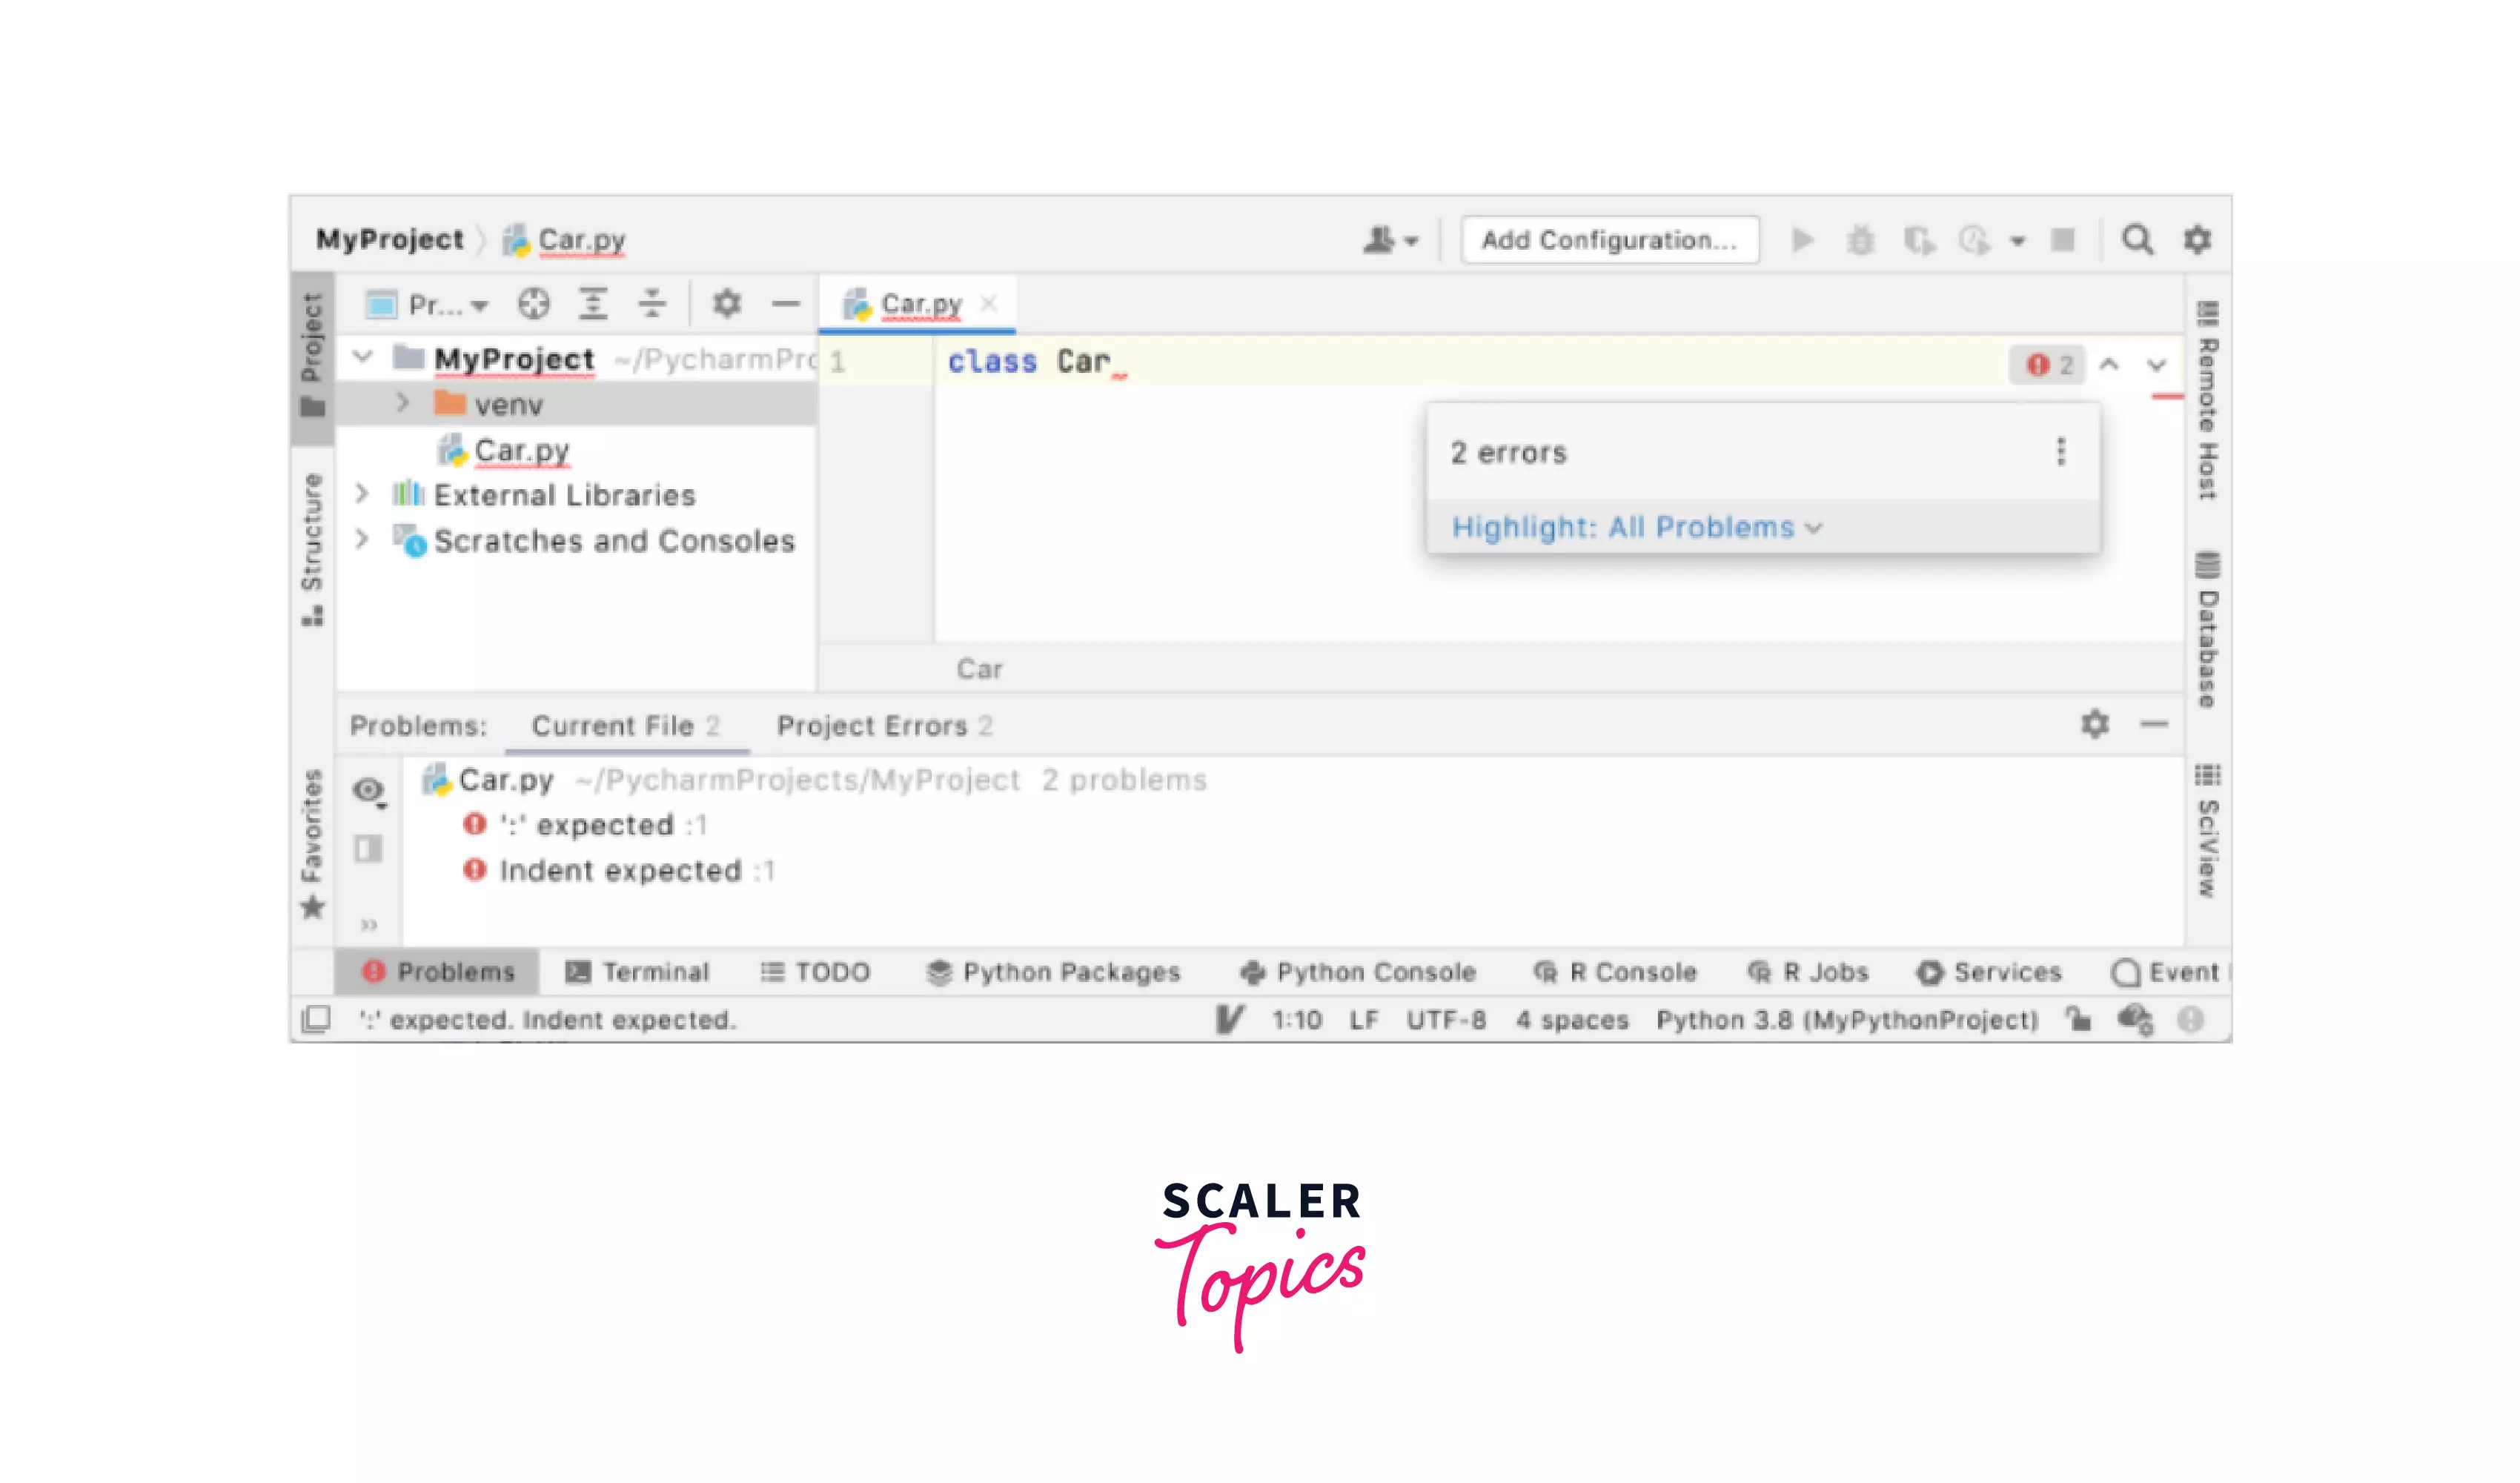
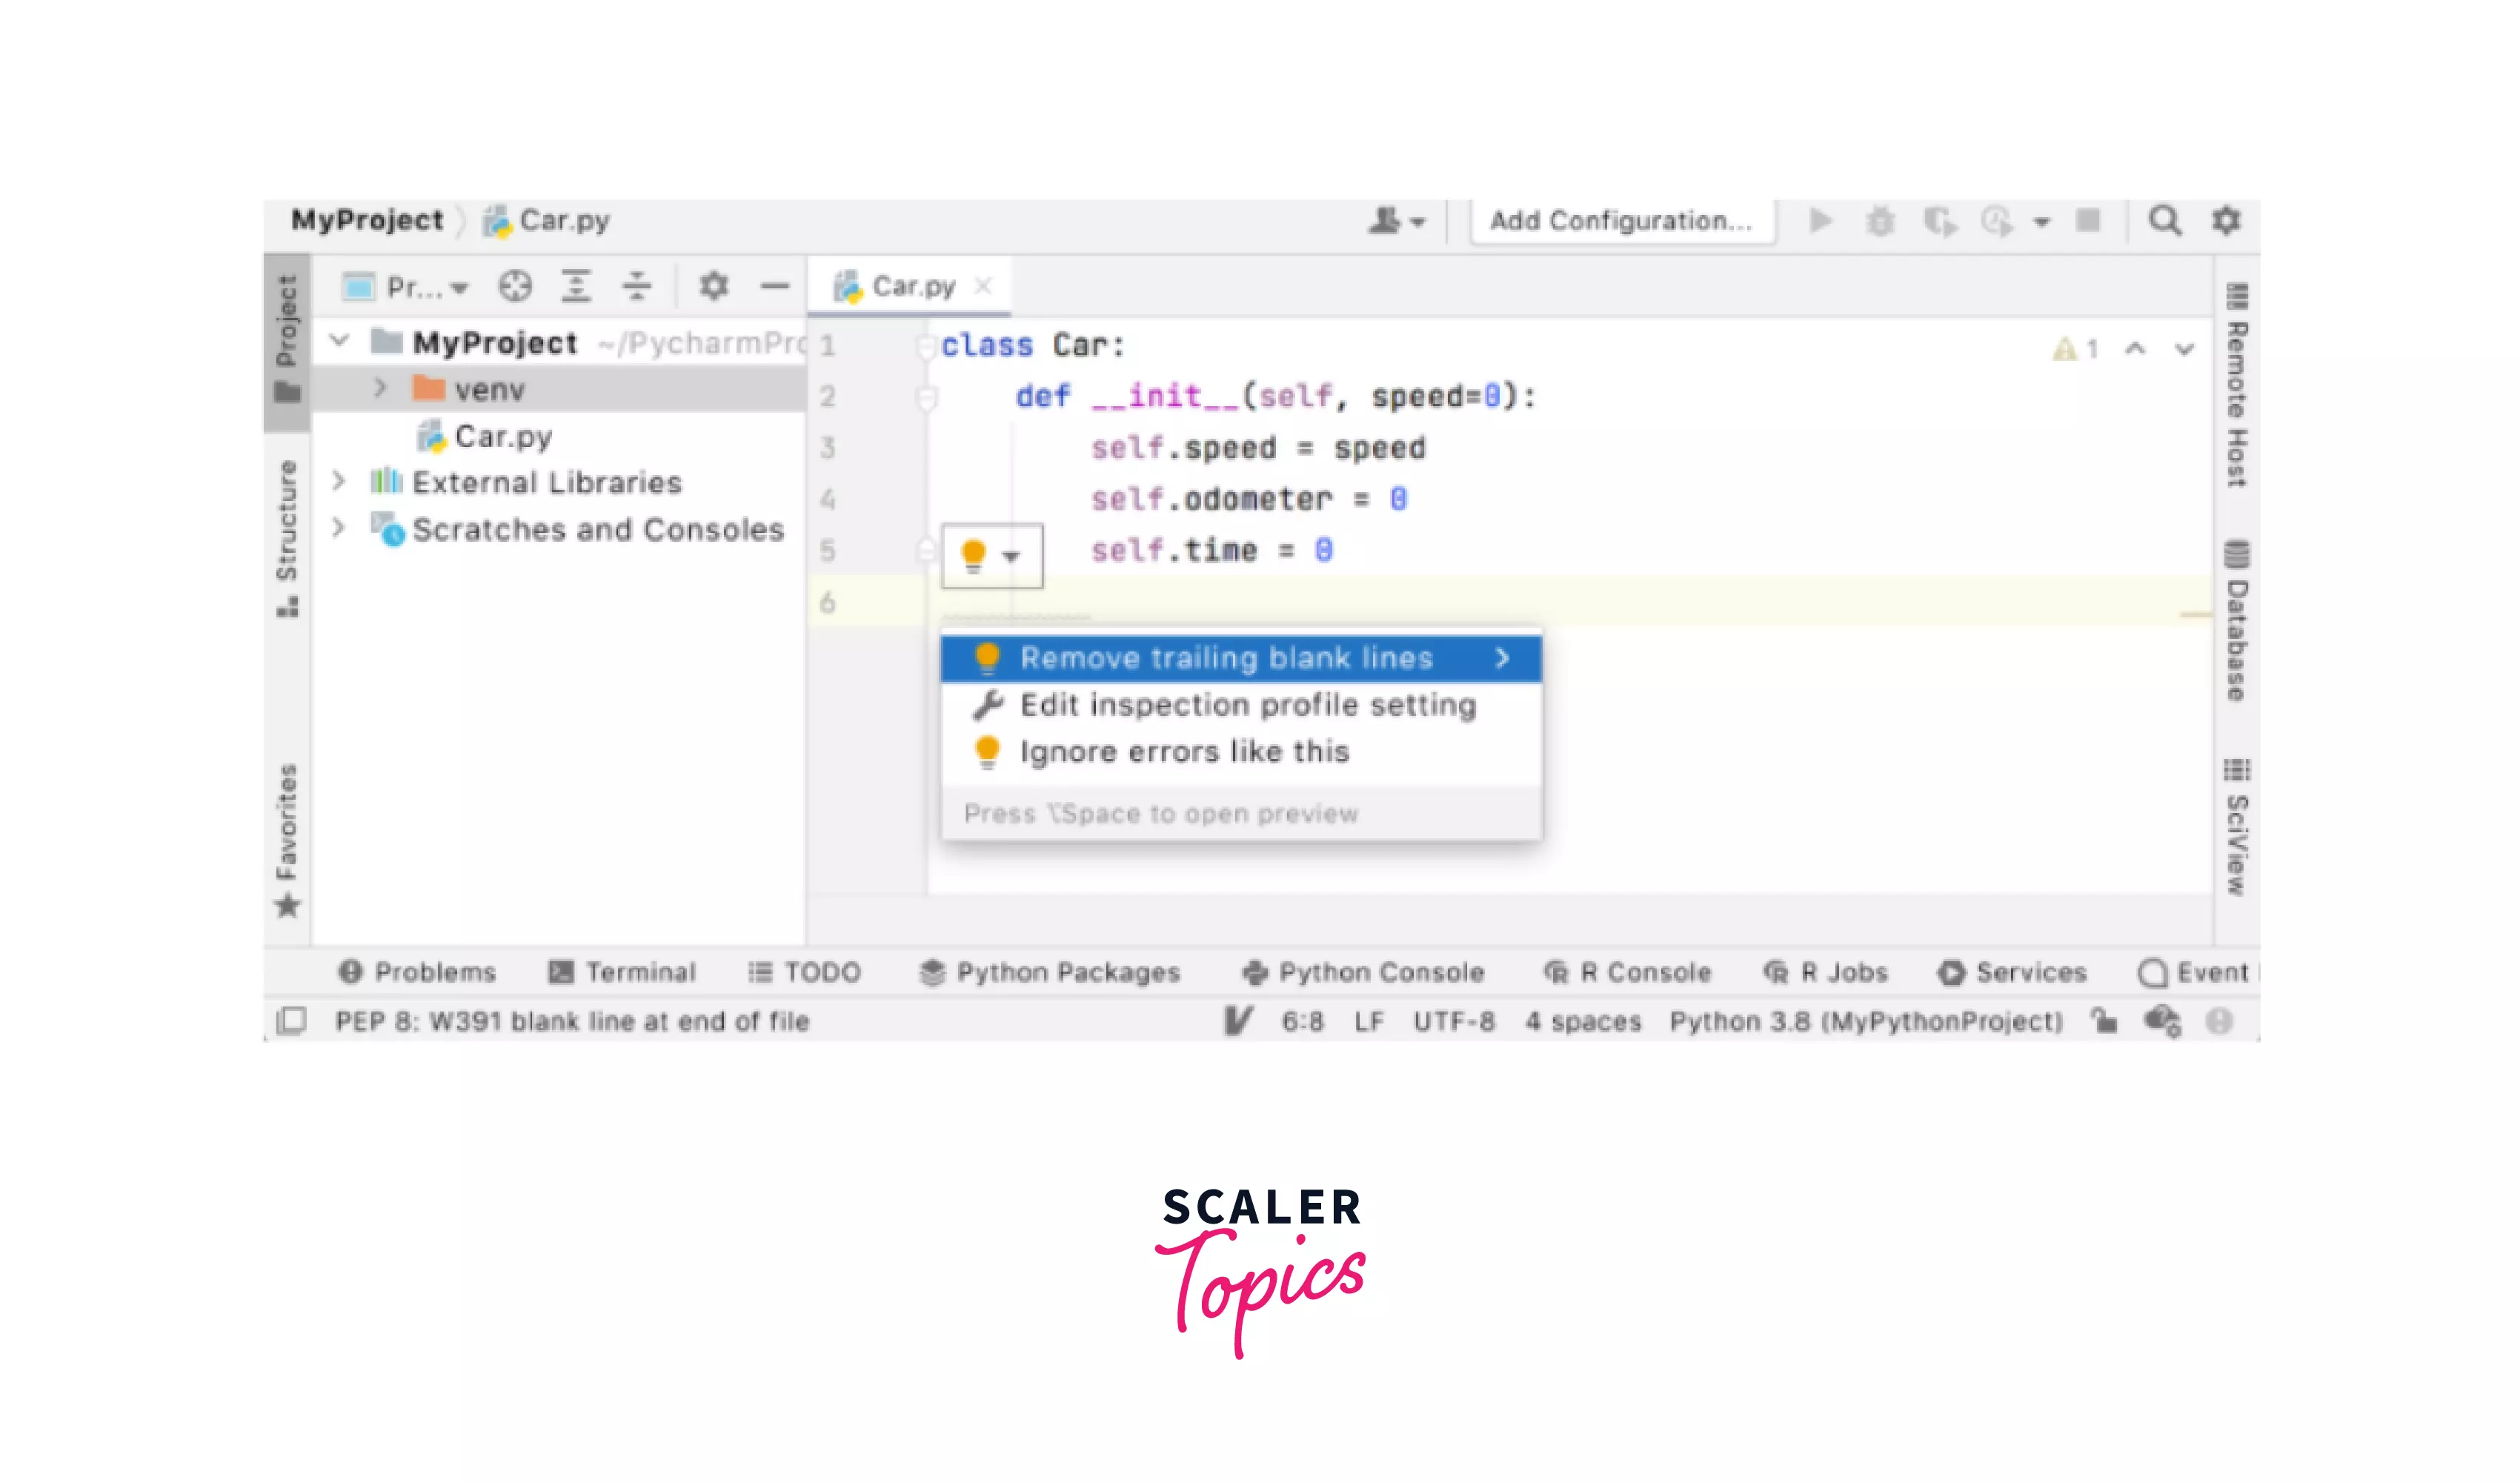
PyCharm informs you about the missing colon, then expected indentation:
Quick Tip:
We can see that PyCharm always is continuously analyzing your code on the go, which helps us get a check-in in case we are going wrong. The indication of the results is immediately shown in the upper-right corner of the editor by the indication indicator.
The color there works like a traffic light: when it is green, We are good and we can continue coding and the yellow light will be visible which means some minor problems that however will not affect compilation.
The point to notice is when the light is red, which means that we have had some serious errors. But here too we can understand the details in the Problems tool window by Clicking it to preview as shown below.
- Now when we continue creating the init function: we see that just by typing the opening brace, PyCharm helps us create the entire code construct i.e mandatory parameter self, closing brace, and colon. This provides proper indentation to the code too.
- Now each time you notice any inspection warnings while we're editing our code, we can simply click on the bulb icon to see the list of recommended actions and possible fixes
- Now, we can copy the below code which describes the various steps a car takes up in real life when its speed increases/ decrease.
Turn Learning into Career Growth
Source Code
- Now we can see that we are now ready to run our first Python code in PyCharm.
Running the Source Code
Now to run our code in PyCharm, we can have the following ways to do so.
-
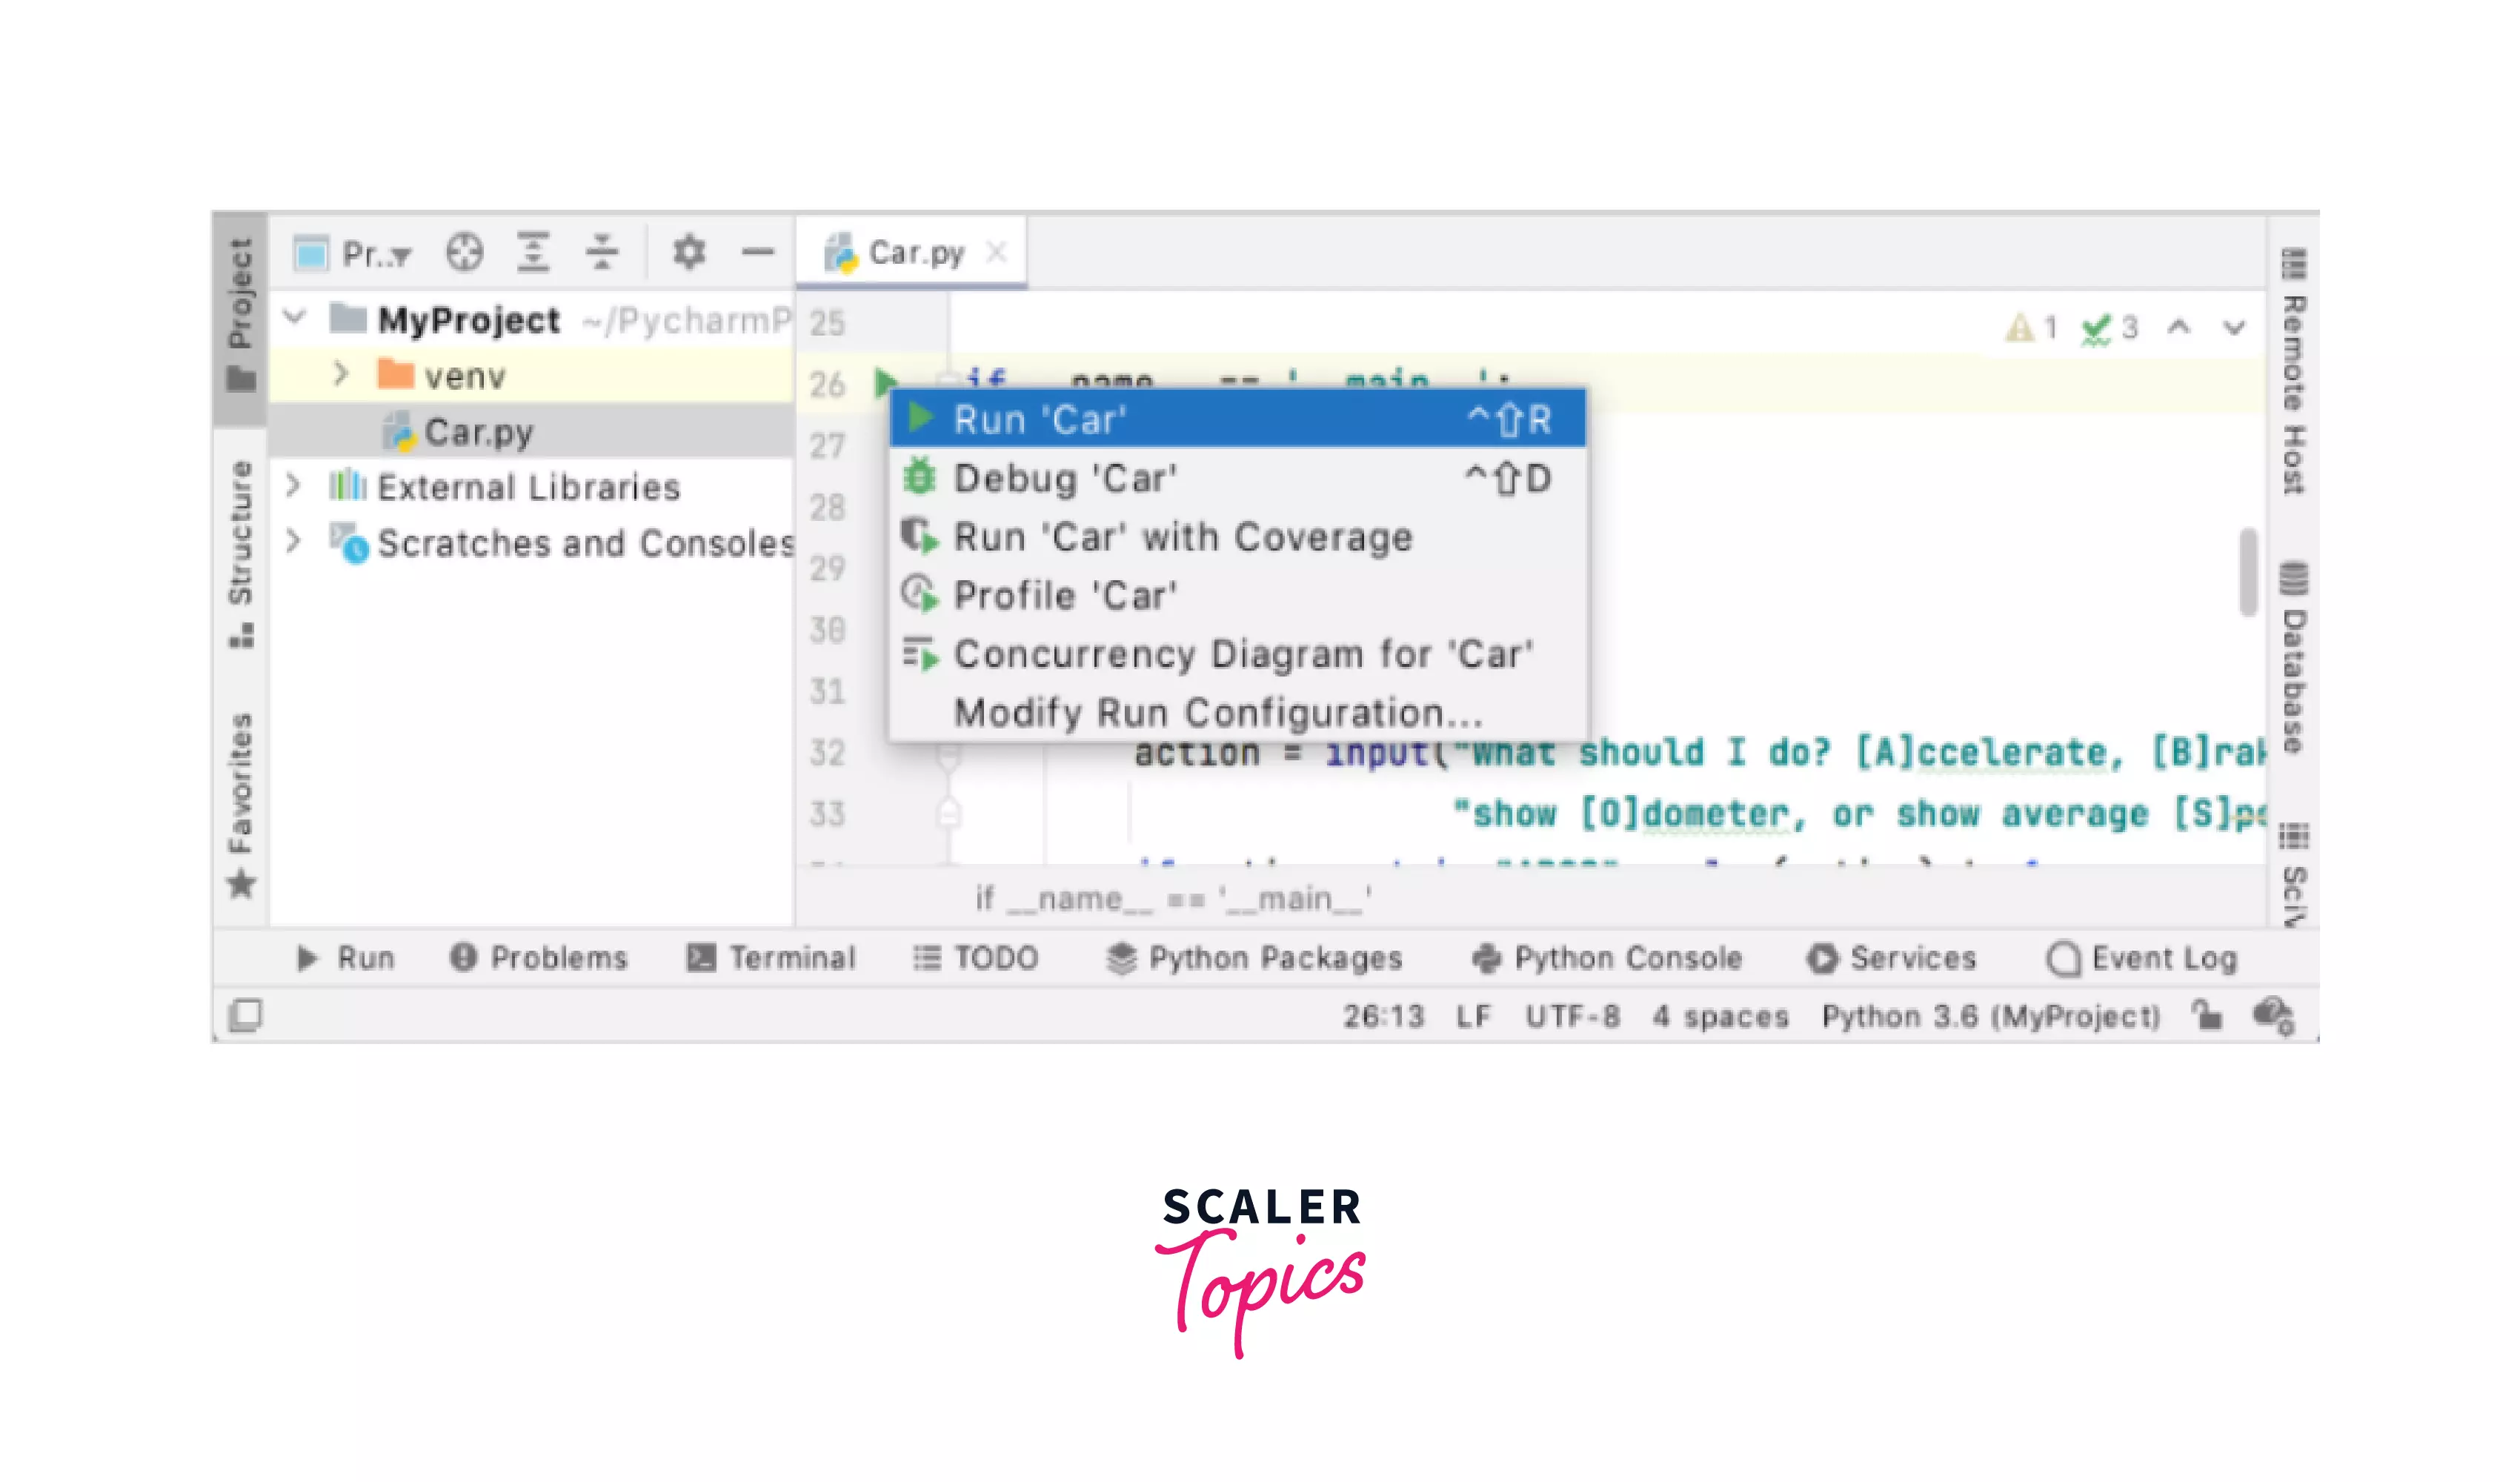
First, we can simply Right-click the editor present on the left side and click Run 'Car' from the context menu which appears in the dropdown as can be seen below too.
-
Second, Simply by pressing Ctrl+Shift+F10 also you can run your code.
-
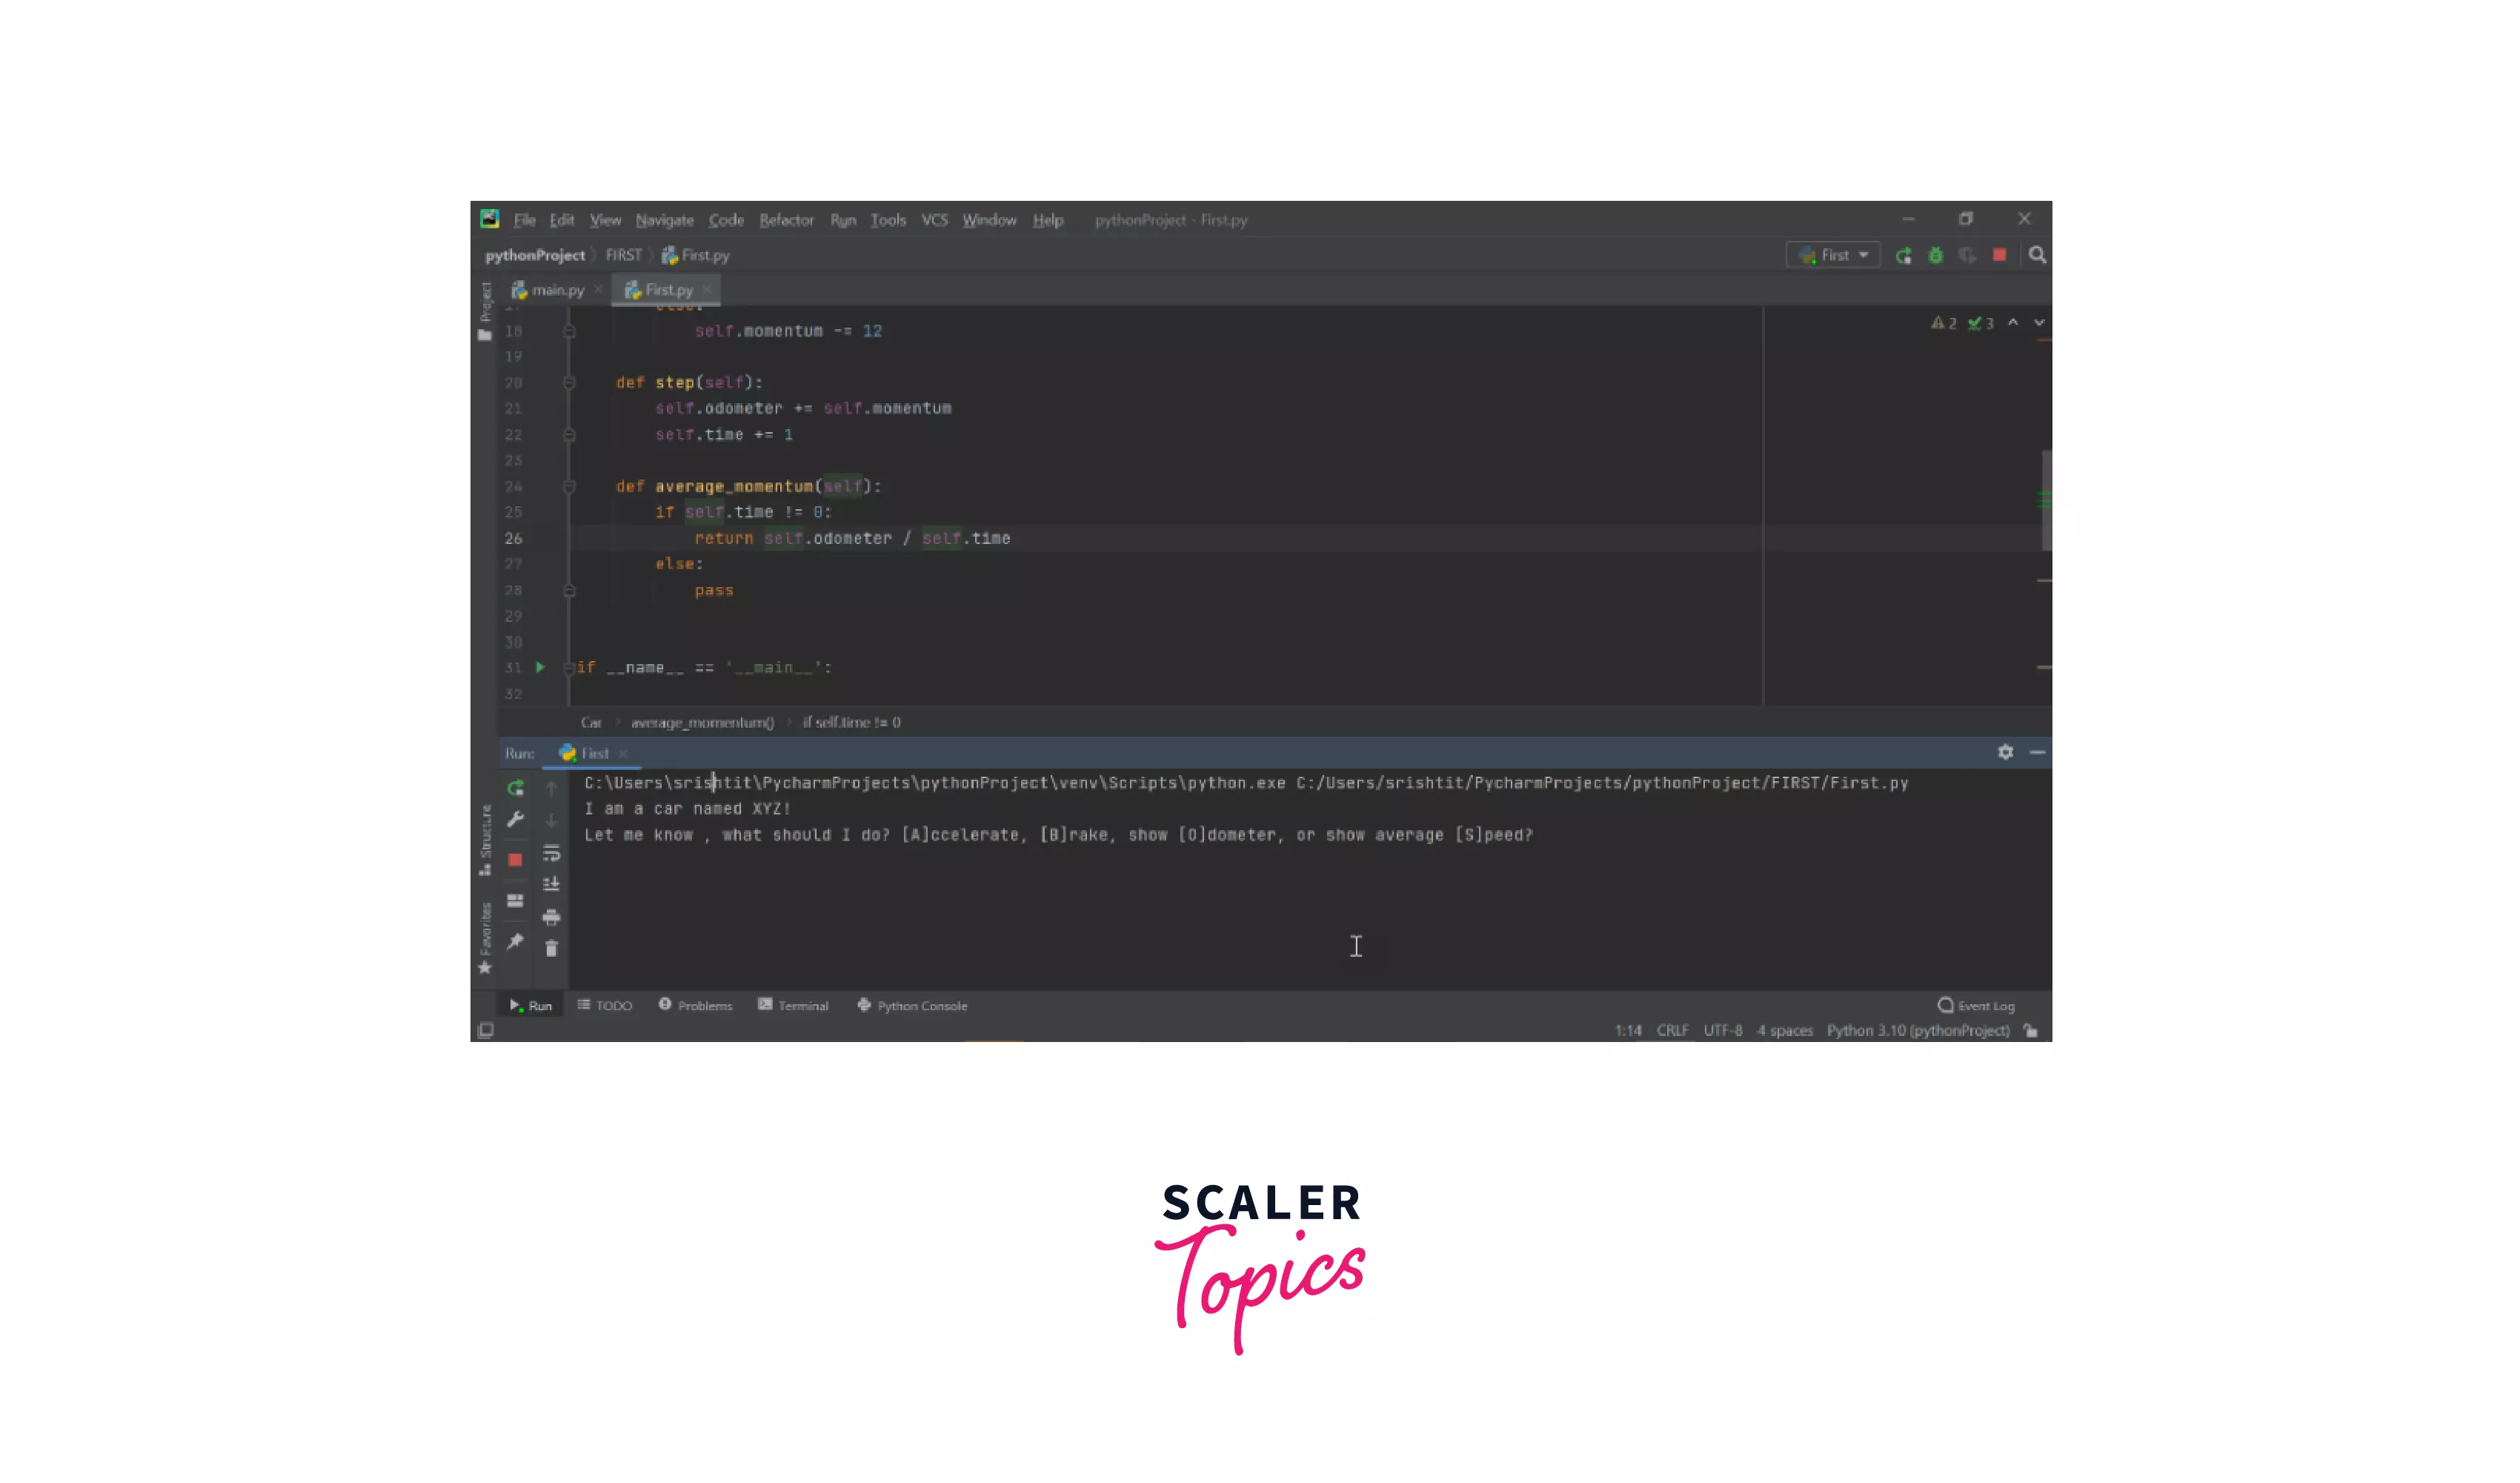
As we see that this Python script has a main function, we can click the icon Run present on the left gutter where if you hover the mouse pointer over it, the available commands will show up as below. Also if you click on that icon you can see a popup with various available commands where we can select Run 'Car' to run our code as seen below.
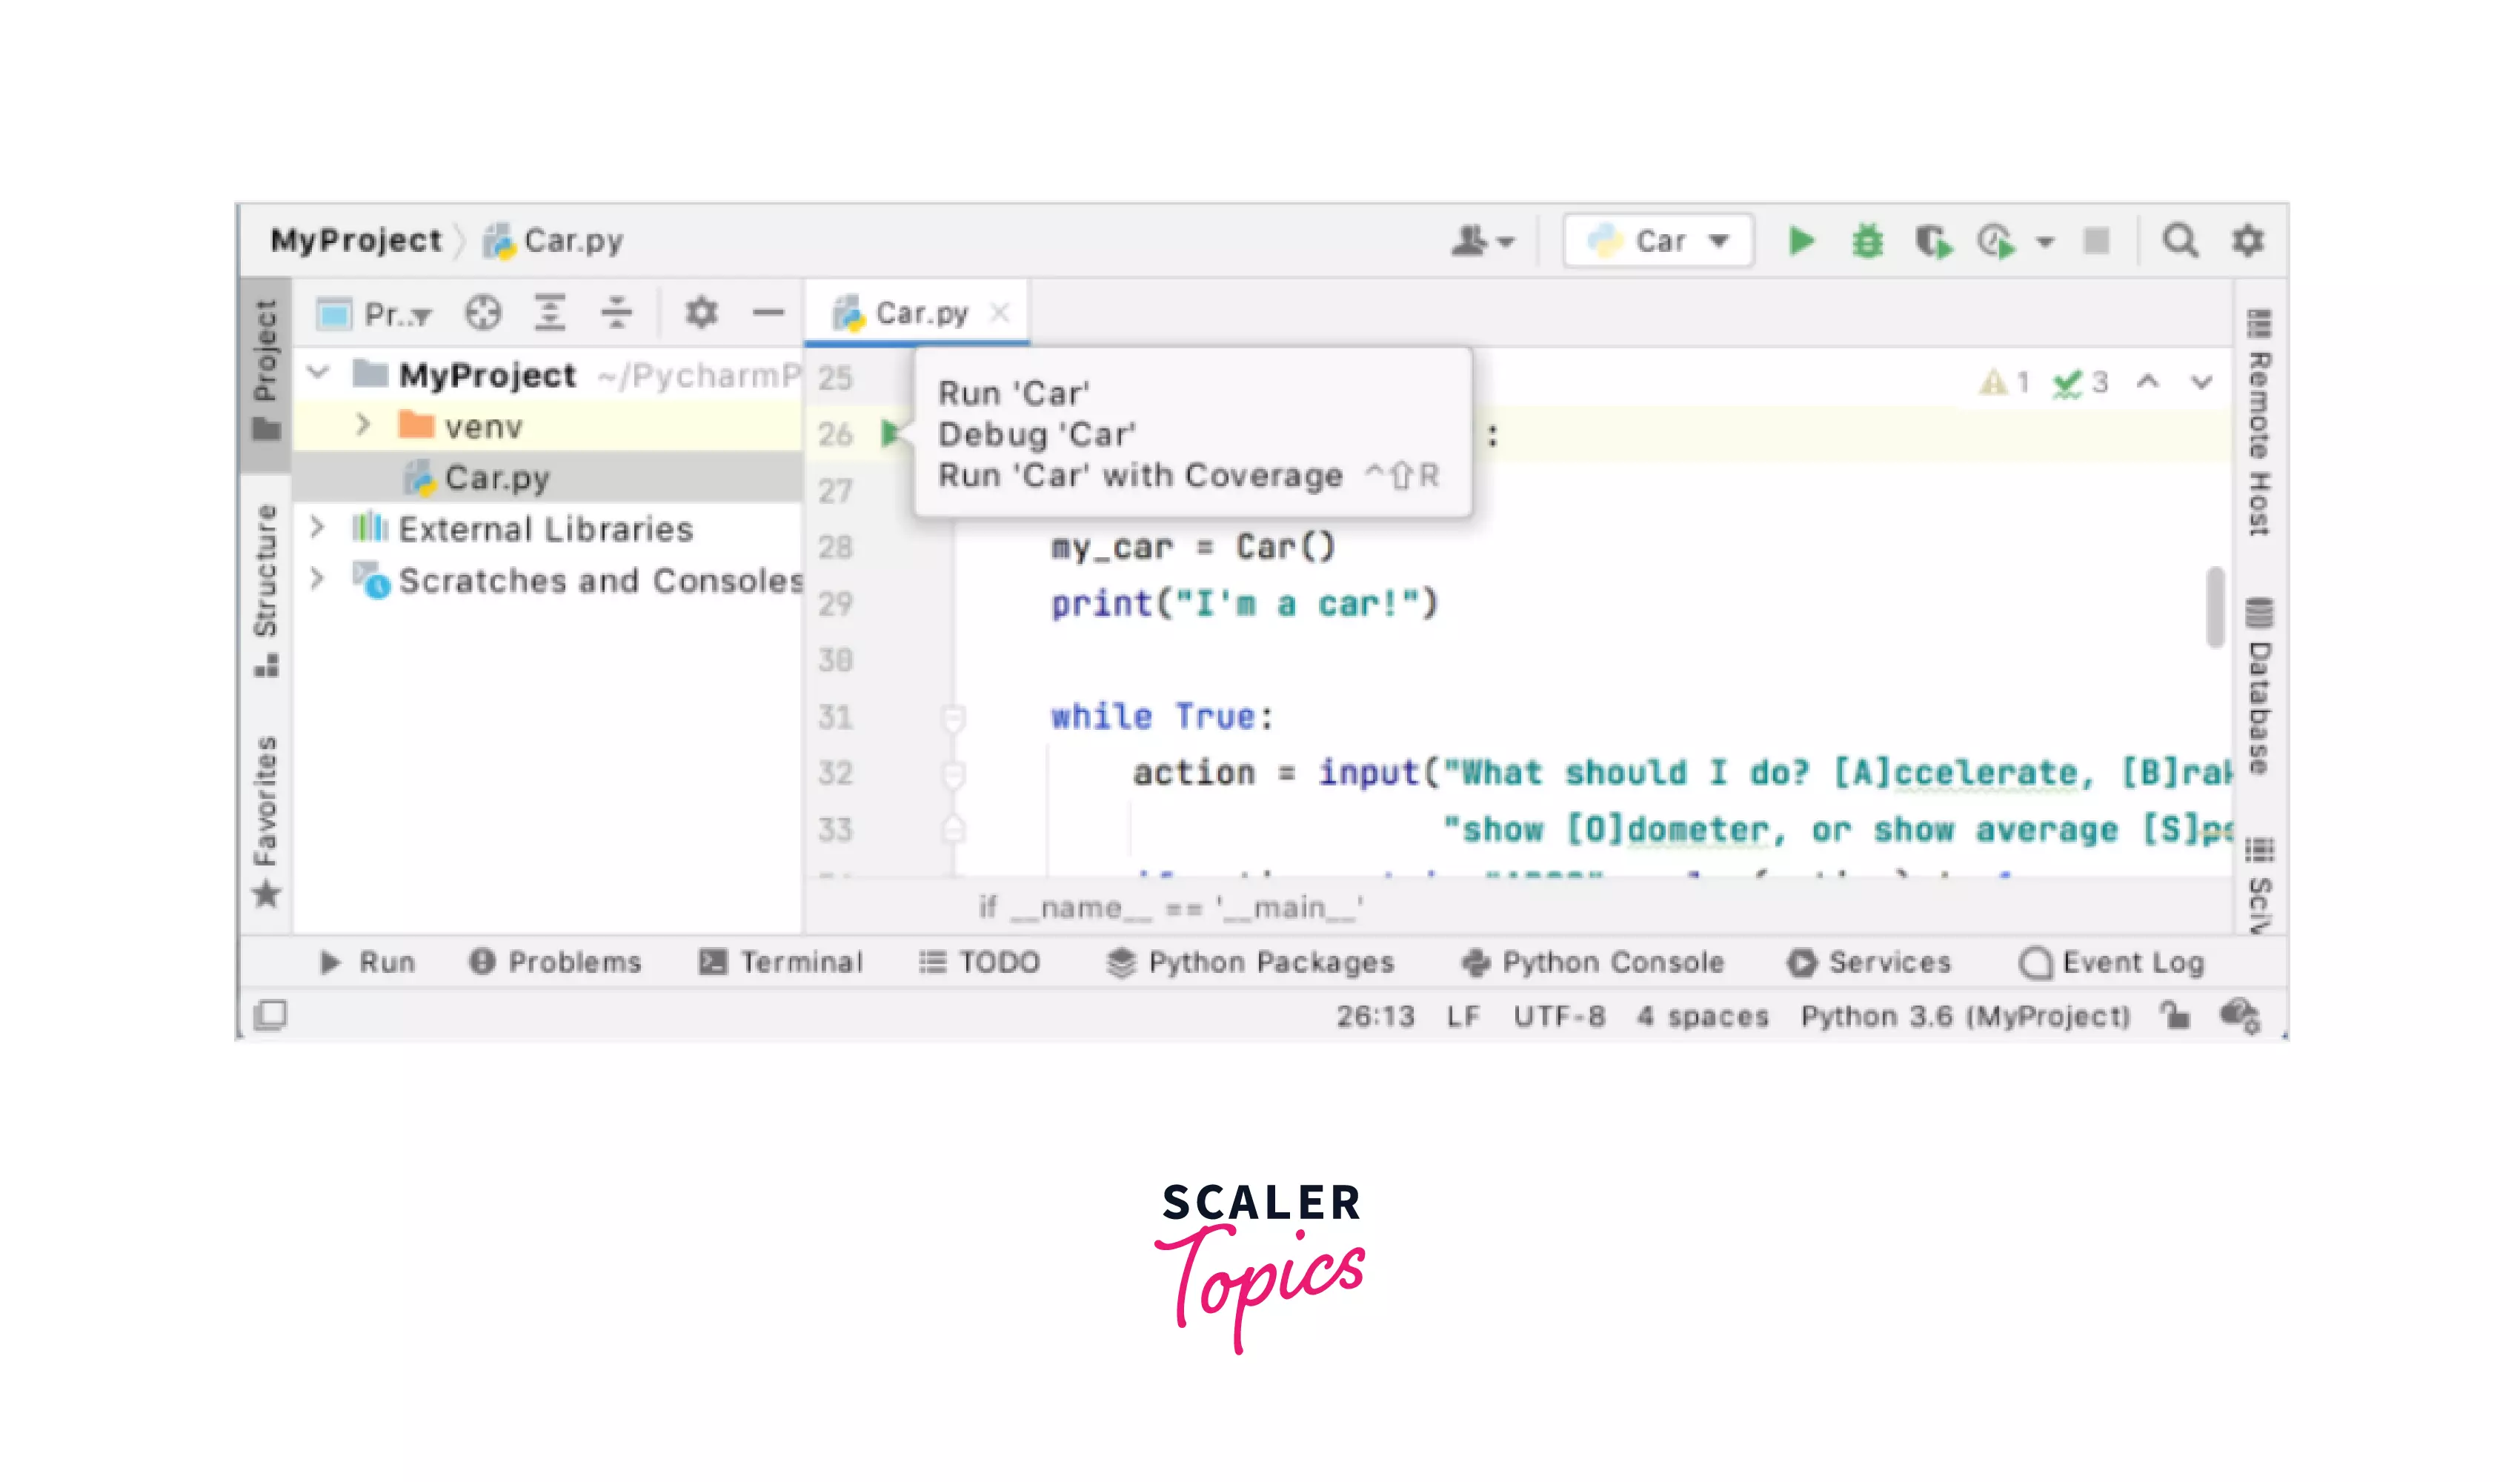
- We can understand from above that PyCharm will always execute the code in the Run tool window which appears below as seen in the figure below.
- As soon as we run our code and the code will ask us to enter the expected values and verify the script output.
Run/Debug Configuration
-
So far we have run our code and verified the script output by entering the expected values But it may happen sometime that we need to Debug our code as well.
-
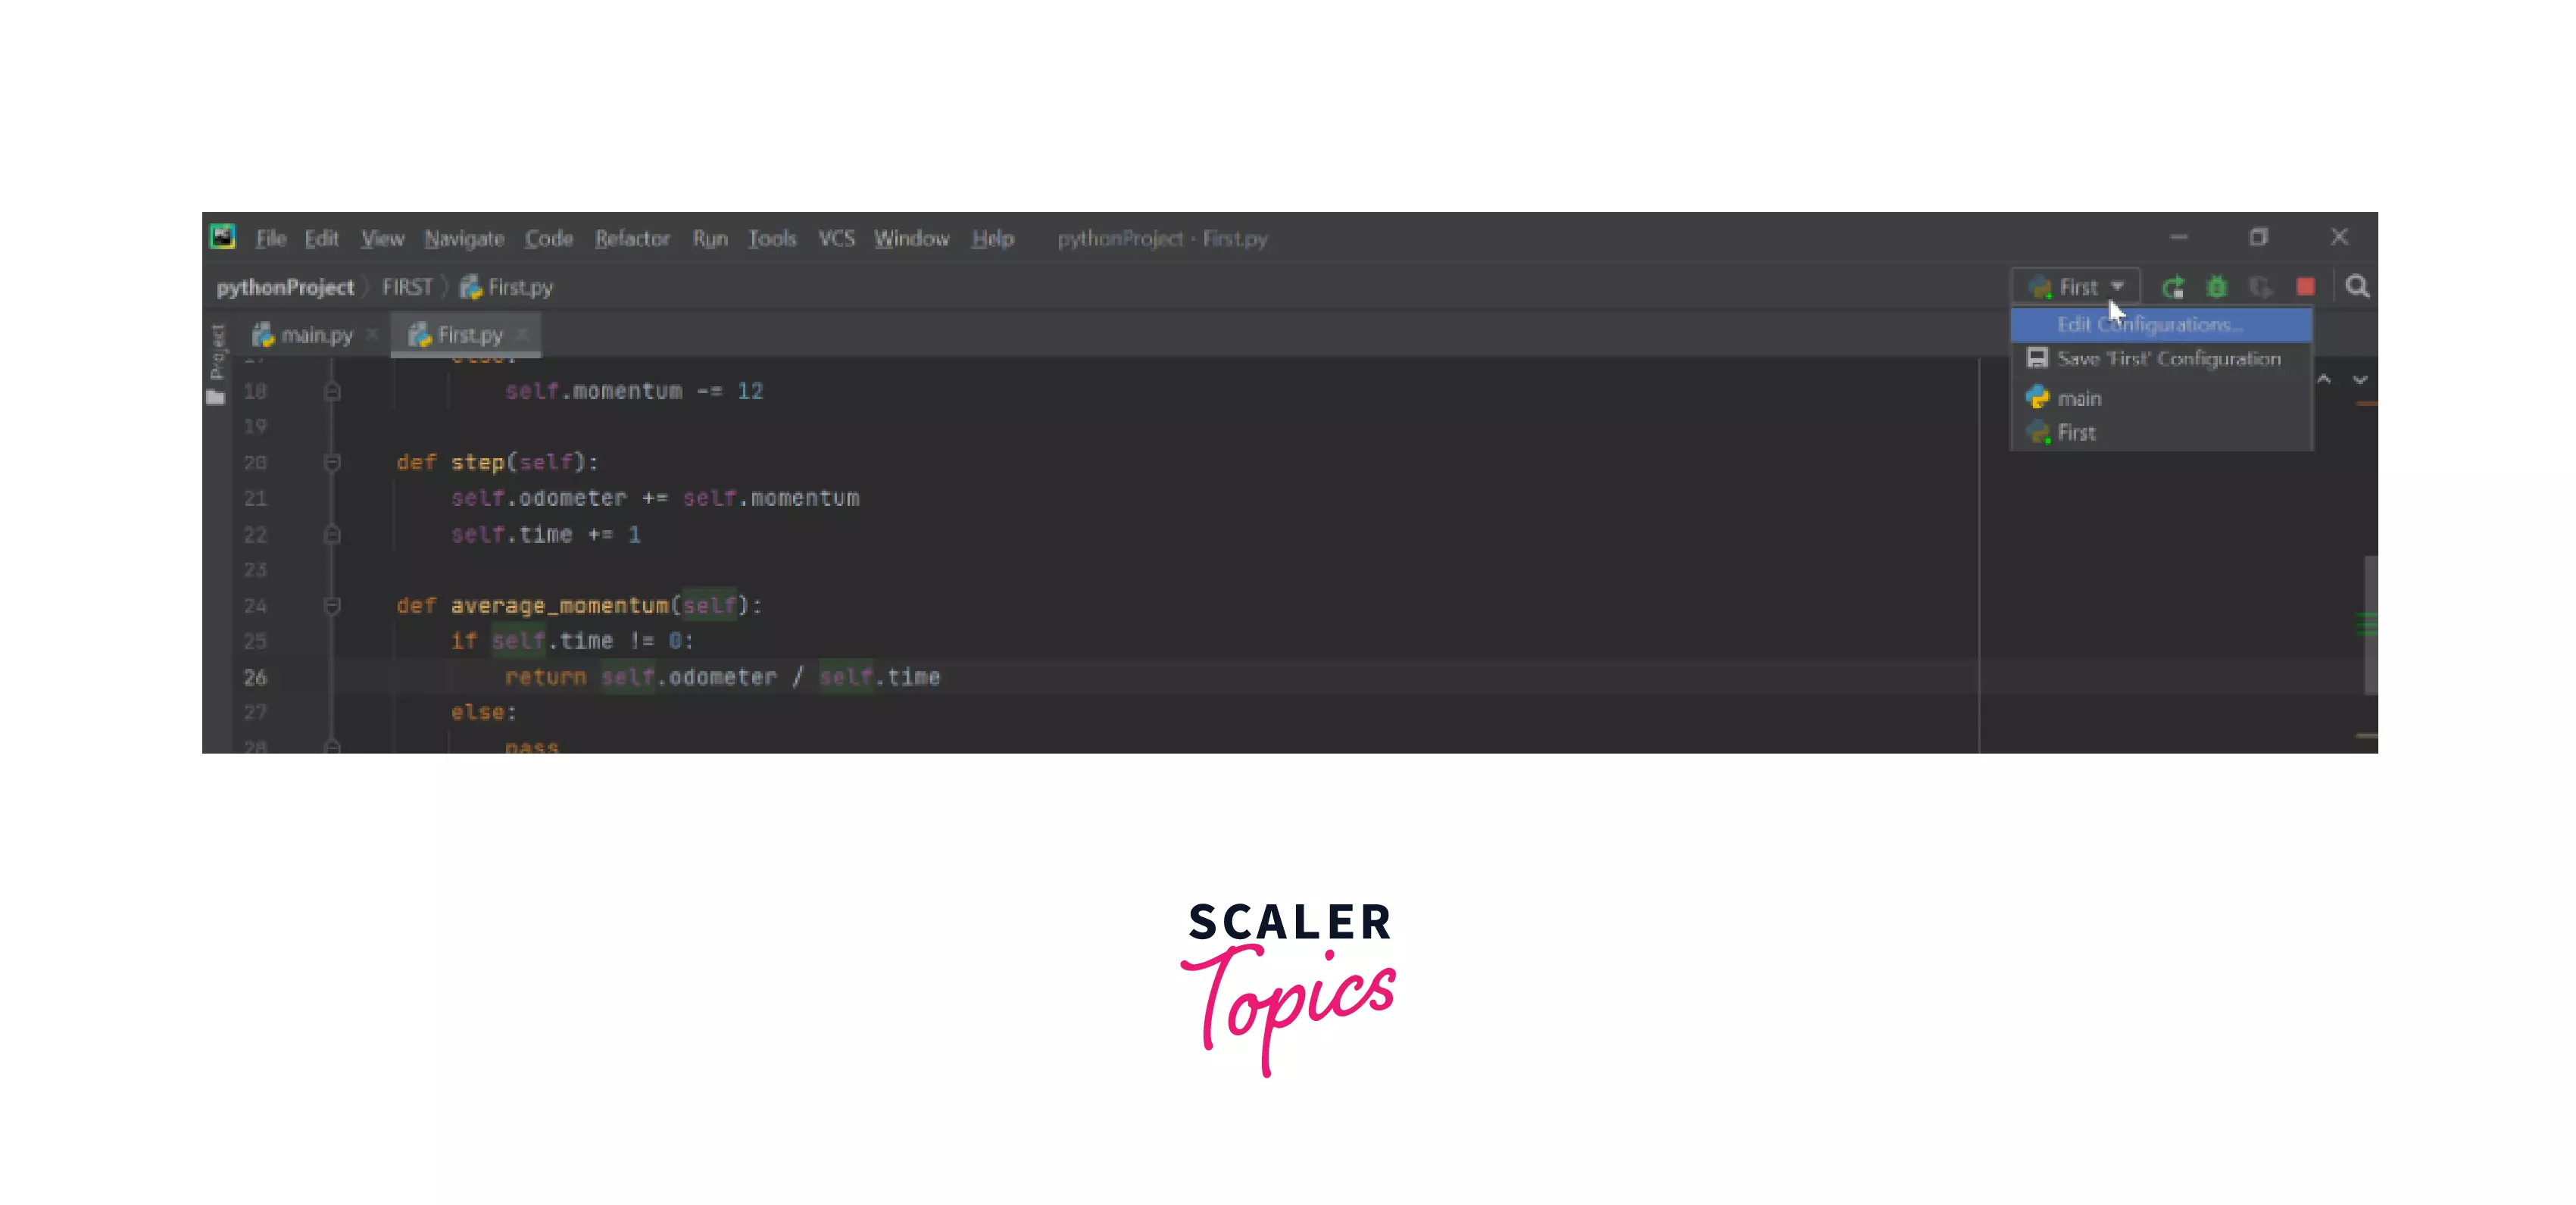
From the above compilation of the Python Code we see that PyCharm creates a temporary run/debug configuration for the Car file.
-
We can define this run/debug configuration as the way by which PyCharm executes our code in order to run, debug, and test our code. We can either save it to make it a permanent configuration or also modify the parameters.
-
Each configuration here can be defined as a named set of startup properties that tells what to execute with what parameters and environment must be used as well.
-
We can also make use of the different startup properties offered by PyCharm where we can define multiple ways to execute our script. For example, we can execute the same code/ script with different Python interpreters, having different sets of environment variables, or even get input values from multiple files.
To understand the run/debug configurations we can divide it into two types:
-
Permanent — We can create it explicitly from the template or by saving the temporary configuration too. It must be noted that this remains part of our project until we explicitly remove it.
-
Temporary— This is created every time we run or test or debug functions. The maximum number of temporary configurations is 5. Here we can observe that the older ones get automatically deleted when the new ones are added. PyCharm also gives us the ability to increase this limit as per our convenience by following the Settings/Preferences -> Advanced Settings -> IDE -> Temporary Run/Debug configurations limit.
-
We must note here, that every time we run/debug or test our code - PyCharm will create a temporary configuration or permanent one by using the existing permanent run/debug configuration
-
We can also mark the difference between the two configurations as the temporary configurations are semi-transparent while the permanent configurations are opaque.
Conclusion
-
You got it! We have successfully run the python code in PyCharm and our first script in PyCharm is ready! Let us recapitulate all steps we performed.
-
We checked on the pre-requisites. We then created the new project.
-
Then we created a fresh file in the project to understand the basics of the creation of a project from scratch.
-
After that, we executed the source code and we successfully ran it.
-
We understood in detail how the run/debugs configuration in PyCharm can be leveraged to run, debug, and test our code.
-
We also studied the two types of debug configurations that are created by using the existing permanent run/debug configuration - a. Permanent debug configurations b. Temporary debug configurations
Click Here, To know more about format() function in python.